Jenna Rainey

CEO + ARTIST + EDUCATOR


hey friend!
I’m jenna rainey. , i'm an artist, self-taught designer, and multi-faceted creative entrepreneur who is hell-bent on teaching everyone how to find their inner creative voice..
My favorite supplies
A highly creative nerd with a unique breed of humor and the proud earner of a self-bestowed award for being the world’s most curious and driven human.

Hey I'm Jenna!
Hang out on youtube, it’s like netflix-binging bob ross videos, but with a dose of dry + quirky humor and fewer happy little tree references. .

Wanna Learn Watercolor ?
i wrote some books

Master Watercolor magic
GRAB THE FREE GUIDE

Watercolor Sailboat
Jenna .
This week, I'm teaching you how to paint a quick and easy watercolor sailboat landscape!
When I don't have a lot of time or I just want to play with colors and basic shapes, I paint loose-style. It's just whimsical and fun!
This watercolor sailboat takes less than 10 minutes to paint but includes simple techniques to inspire and spark creativity. This is a great tutorial for beginners, too!
Watercolor Sailboat Step by Step
00:00 – Intro. 00:32 – Color mixing. 01:06 – Painting the sail boat. 02:16 – Painting waves. 03:01 – Painting trees and background. 04:53 – Painting the sky. 06:14 – My thoughts on the painting. 06:51 – YOUR thoughts?
Links & Freebies
Get access to all my favorite art supplies and business tools here. My Amazon storefront with supplies and other random things I love. My Spotify painting playlist My Floral Watercolor E-book My Calligraphy E-book
Related videos
Complete Beginner's Guide to Watercolor Complete Beginner's Guide to Watercolor: Top Questions Answered Complete Beginner's Guide to Watercolor Flowers Watercolor Techniques: Wet-on-Wet Watercolor Techniques: Wet-on-Dry 10 Tips to Improve Watercolor
… and for even more tutorials, subscribe to my YouTube channel!
Patreon Community
Join my Patreon community! You have a variety of fun options to choose from like:
- Watch my YouTube tutorials ad-free
- Get early access to the tutorials before they're released on YouTube
- Patreon-exclusive tutorials
Head on over to Patreon to get all the fun details.
by Jenna Rainey
+ show Comments
- Hide Comments
add a comment
Leave a Reply Cancel reply
Your email address will not be published. Required fields are marked *

Browse By Category
art + creativity
So Hot Right Now

Organizing Your Art Space: Tips from an Artist

Starting a New Hobby as an Adult

The Joy of Experimentation: How to Express Yourself Through Different Art Mediums

Art and Meditation: 3 Ways You Can Use Art to Enhance Your Meditation Practice

Exploring Abstract Art for Beginner Watercolor Painters

The Connection Between Art and Mental Health
back to blog home
Previous Post
« How to Map Out Your Content Calendar
“Should I Have a Blog?” Reasons Why Blogs Are Important »

The Complete Beginner's Guide to Watercolor
Get a rundown of all my recommended supplies, learn fundamental techniques and tips including color theory and composition, and walk away feeling super confident with your new love of watercolor!

Free e-book
Kickstart your art practice!
*signing up will subscribe you to our email list, you may unsubscribe at any time, though doing so means we cannot contact you with more free, valuable education and tips on this topic. you also agree to our terms and conditions and privacy policy ., an artist, self-taught designer, and multi-faceted creative entrepreneur who is hell-bent on teaching everyone how to find their inner creative voice., i'm jenna rainey..

Customer Support
YOU'VE GOT MAIL!
back to the top

Read the blog
watch me on youtube
my art community
art retreats
everyday watercolor books
licensing resources + tips
The Ceo advice column
Customer service
program login
community login
contact us!
© 2018-2024 JENNA RAINEY LLC | TERMS & CONDITIONS | PRIVACY POLICY | SITE CREDIT

@JENNARAINEY
- Start Here!
- Art Tutorials
- Art Lessons
Art Supplies
- Shopping Cart

How to Paint a Sailboat Watercolor Painting Tutorial
Sailing is one of my favorite things to do and painting sailboats is almost as fun! This lovely sailboat flew in the wind on Somes Sound on Mount Desert Island, Maine. It was one of those perfect sailing days. The light sparkled, the wind blew steadily and the last of summer heated the air. Since I didn't have a sailboat there, I sketched and took photos of the sailboats moving up and down the Sound.
The shimmering water is the tricky part of this painting. It's a great opportunity to practice your dry brush! This painting needs rough press paper to get that sparkling water. The rest of the painting is simple. Trees in the distance and a pared down palette. Keep the colors and your brush strokes simple. Sailing at its finest on a summer day in Maine!

Painting Tutorial Level
Skill Building
M. Graham watercolors
Painting Demonstration 1

Always sketch very lightly in watercolor since most pencil lines will show. You want the focus on the painting, not the drawing. Unless, of course, you're highlighting the pencil lines!

Since I'm painting a light object with a lot of brushstrokes around it (for the water) I can either mask it out, preserve highlights with wax or use white gouache. I decide on a combination of the last two since they feel more spontaneous than masking and I don't have too many bright highlights.
When you use a wax crayon, always remember it's there for better or worse. It will not come off and leave paper the same!
Disclaimer: Jennifer Branch Gallery is a participant in the Amazon Services LLC Associates Program, an affiliate advertising program designed to provide a means for sites to earn advertising fees by advertising and linking to amazon.com. I receive a small rebate for your entire order (starting at 4%) if you choose to purchase through Amazon. Most items can be bought multiple places and I highly recommend local art stores if you have one! Any other recommendation links I receive no compensation for. These referrals help me support this website, and I thank you for any purchase you make through them. I will never recommend a product I have not used frequently and believe is the best tool for the purpose!
Painting Demonstration 2

I want barely there water sparkling in the background. Very pale highlights and dark shadows, so dry brush is the solution! Dry brush and texture is why I chose the rough press paper, after all.
With a tricky dry brush where every stroke shows, I like to test the brush a few times on an area of the painting that isn't quite so tricky or a scrap of paper. As you can see, I got the texture just right in the trees at the upper part of the painting. Some extra texture there is perfect and it will be dark enough the individual strokes don't show.
Since all those strokes show up in the water, make them count! Move your brush with the waves. Notice how highlights show up in horizontal swathes across the water. Work with the water, not against it.
A squirrel hair brush is perfect for hit and miss dry brush like this. It barely touches the ridges of the paper so you can really get that sparkle!

Painting Demonstration 3

Since this is dry brush, there's no time between washes! I continue moving around the painting, using slightly varying blues and values. This gives me that great water shimmer! If some of the dry brush hits a still wet area, great! that gives a natural feeling variation.
I still keep everything light in value in this wash. I don't want thick sludgy paint, but effervescent sparkle!
Artist Tips

Painting Demonstration 4

Now that dark background! I want a bit of a a golden glow, but subtle instead of harsh so I use quinacridone gold. This is one of the few paintings I never use a yellow in!
I paint a loose wet brush on dry paper wash of the gold, then drop in pthalocyanine green. I'm keeping it loose since the background is not the focus, the sailboat is!
The reflection of the sailboat is also a golden glow in the water, so I use quinacridone gold again. I'm still painting dry brush since I want the water to sparkle there too, not be dulled. The reflection is also a shadow which makes it quite complicated to paint.
Painting Demonstration 5

Now it's time to turn the golden green into hazy rich darks. While it's drying, I move maroon perylene into the trees to darken them. The rich red helps with the strong, clear color. Then I scrabble in ultramarine blue to make the trees green again. Finally, I add cobalt blue for the slightly opaque haze.
I dash quinacridone dry brush on the wooden mast. A bit of ultramarine blue and pthalo green gives shape to the boat.
Painting Demonstration 6

After the painting has dried completely, I start on the sail. The gorgeous sail is really the star of the painting so it's fun to finally start painting it! Still, it has to be kept simple since there really isn't much to the sail. Quinacridone gold gives the faint glow of the reflecting sun.
I continue adding texture and color to the waves. I need strong darks to balance out the background trees.
I keep a light hand on the waves since the lovely shimmering could be destroyed with a few strokes too many!
Painting Demonstration 7

The last stage is the details and it's hard to keep them from getting too fussy!
I continue the details on the sail. I use the top mainsail reinforcement as an excuse to dull down the arrow pointing the viewer out of the painting!
To purchase How to Paint a Sailboat original watercolor painting, please click!
How to Paint a Sailboat Final Watercolor Painting!
Related Art Lessons

- Painting Galleries
- Latitude Pens
- Contact Me!
All Paintings, Images, Videos, Text and Website Design Copyright 2022 by Jennifer Branch. All Rights Reserved. No Image, Video, Text or Website Design may be used without my written, specific permission.
Michele Clamp Art
Watercolor paintings, tutorials, and videos
Watercolor Boat Painting Tutorial

Want to paint this watercolor boat painting? Follow the step by step instructions (including video at the end) and see how easy this can be!
I just can’t resist painting boats in watercolor. The colors, the details, the sun and shadow – all come together to make painting these watercolor boats so much fun. In this watercolor boat tutorial I break down all the steps and show you how you can paint this scene. Boat watercolor paintings can seem daunting but if you take things slowly it’s amazing how they come together.
Sign up for updates on classes and free livestreams
Watercolor materials needed.
- Mechanical pencil
- Watercolor paper (I like Fabriano Artistco 140lb cold press)
- Permanent rose
- Vermillion/pyrrole red/naphthol red
- Ultramarine blue
- Cobalt blue/cerulean blue
- Yellow ochre
- Lemon yellow
- Burnt Sienna
- Value Scale
- Color isolator
- Palette/paper towels/water pot
- Small spray bottle of water
Watercolor Boat Drawing

The drawing for this painting is pretty important. Sometimes I won’t put much detail into a drawing and just indicate the main shapes. For instance a landscape with trees can be pretty sparse in the drawing. All the detail and texture goes in by eye with just paint. But for this scene there is a lot going on and we want to indicate the position of a lot of different things.
Using a Grid Helps With Drawing Accuracy
I did this drawing by eye but, if you’re not confident with your drawing, you can grid up your paper lightly with pencil and draw it square by square. That way you can be sure you’re getting everything in the right place. It’s not a foolproof method but it gives you far less room for error. I’ve included a gridded up version of the reference below.

The aspect ratio of the photo is the same as for a 10″x14″ piece of watercolor paper. If you mark your paper into quarters on each side and join them up to make a 4×4 grid you can transfer the drawing more easily onto your paper.
Take Some Time to Make a Plan for Your Painting
Before we dive into the painting it always helps to take a few minutes and plan out what you’re going to do. It can be hard to do this – we want to jump straight in and get those brushes moving and paint splashing around. But a few minutes thought at the start always makes for a better painting. We can spot possible problem areas and make sure we know roughly how we’re going to proceed.
Which Direction is the Light Coming From?
I first make note of where the light is coming from and where the shadows fall. In this case the sun is on our right and the shadows are falling on the left. This is always good to keep in the back of your mind. If the reference is unclear in some areas you can work out how the lights and darks should fall even if you can’t make it out from the photo.
Where are the Lights and Darks?
The next thing I do is note where my lightest lights are and my darkest darks. Once we’ve located these then we know that everything else has to fall somewhere between those areas. In this case our lightest light is the white hull on the left boat. The darkest darks are in the shadow underneath the boats and possibly inside the cabins. I keep this in mind. Nothing else can be darker or lighter than these areas.
Where are the Main Shapes and Values?
This one is trickier but it pays off giving it some thought. Even though there’s a lot of detail going on in this photo I like to break it down into 4 or 5 main value shapes. In this case I would estimate (or measure using our value scale) the value of the following areas
- The hulls of the boats (in light and shadow)
- The cabins of the boats (in light and shadow)
This may seem like a lot to work out ahead of time but getting those big value shapes right is an enormous help getting a scene to hang together and getting it to be convincing.
Identify a Few of the Colors

Doing some test mixes of a few of the main colors can also be a good idea. It’s much easier to do this before the painting. When you’re in the middle of the painting there’s so much going on it’s hard to stop and think about this. It’s a bit like prepping for a recipe. Getting all the ingredients measured out ready ahead of time makes putting a meal together much easier. (Not that I ever really do that – but I should!) In this painting I mixed as I went along but it’s a better idea to try out your color mixes at the start. If you think you can’t remember how you mixed your colors then putting a pencil note next to the swatch is a good idea. It’s doesn’t have to be anything complicated – just a list of the colors is enough.
Watercolor Boat Painting – Finally we Paint!

So let’s start painting. We’re going to paint this in layers and build up the painting from light to dark. We’re first going to block in all the shapes with their lightest colors. Once those are dry we can go back in and add in the darks. This way of working takes a bit of getting used to. As we’re starting with the light colors of all the shapes things won’t start to look three dimensional until quite late on in the painting.

I have many more step-by-step tutorials and videos!
We want things to look flat to start with..
If we put in too much value variation in the early stages then the darks won’t make as much impact when we put those in. In these early stages try and match the color and value as best you can to the reference. And, most importantly, keep these early washes even. Don’t be tempted to try and make things look right at this stage. It takes a bit of faith but once you get used to it it will all make sense.
Keep Going With the Light Values

Keep going across all of the main shapes of the boats. One thing to remember is that we’re putting in the light value of each different shape but these values may vary from shape to shape. For instance, the hull of the red boat is a bright orange-red in the light. The actual value of this is around a 5 i.e. mid-way down the value scale. If we compare this to the beige area above we can see that it’s a little darker. The beige area in the light is around a 7 but it’s still in the light.
Similarly the red stripe on the left hand boat is around a 4 (i.e. darker than a mid-value) in the light. If you have a value scale and a printout of the reference you can measure the values directly. If the color is distracting (and it can be with bright colors like these) squint your eyes and it becomes easier to judge value.
Use the ChromaMagic Tool to Measure Color

Alternatively you can load up the reference in ChromaMagic and click on different areas. It will show you the three components of the color – hue, value and chroma. The color notation is part of the Munsell way of measuring color. It is incredibly useful in painting and makes color very straightforward to analyze.
Paint in the Sea in the Background

The sea in the background goes in next. This is a fairly dark blue and helps to tie the boats in the scene and give us some depth.
As you can see at this point the painting isn’t looking three-dimensional. Don’t panic! This is exactly how it should be looking at this point.
Paint in the Sand Around Your Watercolor Boats

Next we’re going to put in the sand. I really like this bit as we get to put in some texture with our spray bottle. One thing to be careful of – sand isn’t yellow. Or rather it is yellow but a very grayed out low chroma yellow. In this scene it’s a kind of beige so make sure you add in some black to your mix to take out some of the brightness. I’ve made the mistake of painting sand far too bright in color many times. Again mixing a swatch of color beforehand helps a lot as does using ChromaMagic for checking the chroma.
Use a Spray Bottle to Add Texture
While your sand wash is still wet take a spray bottle of water and lightly spritz the surface. If the paper is the right level of dampness the water will add small sparkles and splodges in the paint. It adds some interest and texture to the foreground. This can take a bit of practice to get right. If the paper is too wet the water will just disperse and disappear. If the paper is too dry the water won’t do anything at all.
Watercolor Boat Painting – Add the Sky

Note: I’ve got the order slightly wrong here. I’ve already put in some of the darks on the boats before doing the sky. The order doesn’t really matter. You can put in the sky before the shadows and everything should work out fine.
Let’s put in some sky now. The reference photo doesn’t really have much in the way of clouds and I didn’t really want a big expanse of blue up there. So I’ve invented some cloud shapes. You have a lot of freedom here. Put in some blue around wherever you fancy the clouds to be. While the paint is wet take a clean (very clean) damp brush and soften the edges of the clouds. The blue pigment will diffuse out into the damp areas of paper making lovely soft and convinving clouds.
Watercolor Boat Painting – Second Layer Darks

Now this bit is where the painting starts to come to life. We’re going to put in the shadow sides of the objects and make them look three-dimensional. Adding in these contrasting areas also helps the visual impact of the scene and it will make the image more interesting as well as more realistic.
Don’t Add Color in the Light!
We’ve already painted in the light sides of our objects so we won’t be putting any color in there at all. We’re just going to paint in the shadow colors on mostly the left sides. Make sure your colors are at least a couple of shades darker than your light sides and things will start to take shape. When you get to the insides of the cabins we’re even darker as very little light is getting in there – you don’t need to paint things – just a few dark shapes at different angles will suggest a lot of detail.
Be careful with the shadow on the white hull. We don’t want to go too dark here and keeping that shadow light will really suggest strong sun.
Add a Cast Shadow to Anchor the Boats to the Ground
Finally add some cast shadows on the sand and right at the bottom of the boats. This will make the boats convincingly anchored to the ground.
The Magic Bit – Details on Your Watercolor Boat Painting

By this point you should have something that’s looking pretty three-dimensional. This next bit really adds sparkle and interest to your watercolor boat painting! We’re going to put in some lovely details. Put in the masts and rigging with a small synthetic brush. Make sure they’re not too dark – a mid value gray is plenty dark enough here. The other thing to take care with is not to make your lines too continuous. Leave a few gaps here and there as it will make the masts more convincing than if you carefully paint them in one continuous line.

Continue with the masts and smaller details. Add in a few lines for the railings and the ropes holding the buoys. A few light lines on the white hull will also suggest their structure. I hope everything is looking really good by now!
Flags and Signs

We’re right at the end now. A few red marks for the flags will add a pop of color. The signs on the boat go in with an almost black background. The lettering is suggested with a little opaque white.
Final Thoughts on This Watercolor Boat Painting
If you tried this painting I hope it turned out well. I would love to see your results – please feel free to send them to me. I have also videoed the whole process and you can paint along with the full painting.

2 thoughts on “ Watercolor Boat Painting Tutorial ”
Hi Michele, Kathy Martinez here. I am working with the ColorMagic tool. Love it except for one problem I am having. My monitor is a Cintiq 32 inch display that I have supposedly color corrected with an i1 display gizmo. The colors for the Munsell chips from
Kathy your program don’t come through to match my big book Munsell chips. It is way off. My cintiq screen pretty matches my Ipad. Do you have any suggestions? I have just been finding the chip I have that matches the color swatches from ColorMagic, even though they aren’t the same as described in the program.
Hi Kathy – I replied by email. I was thinking that it may well be hard to match chips directly to the screen. I’m going to try with a setup that I know the colors off and see how it goes. ColorMagic will report the colors in the photo accurately but whether you can match to the display directly may not be possible. Screens give out light and chips only reflect the light so comparing them side by side is going to make the chips always look dark. But maybe there’s something else going on! We’ll see. If it’s fixable we’ll fix it.
Comments are closed.
Princeton Blog
Blog categories.
- All categories
- Mixed Media
- Oil Painting
- Artist Spotlight
- Fashionable Fridays: Art in Fashion
- Featured Brush
- Artist Tips
- Free Projects
- Painting Techniques
- What's New at Princeton Brush
- Where's Howard?

November 7, 2017
Watercolor Sailboat Painting Tutorial

Los Angeles-based watercolor artist Maria Raczynska demonstrates how to paint a beautiful birds-eye ocean scene with a sailboat in this video tutorial!
Filter Blog Categories
Filter gallery categories, gallery categories.
- Kurt Weismair
- Terry Moeller
- Gentian Osman
- Kickstradomis
- Holly Hanley
- Michael Fitts
- Josh Tiessen
- Imperial Gallery
- Heritage Gallery
- Summit Gallery
- Neptune Gallery
- Umbria Gallery
- Select Artiste Gallery
- Expressionism
Join Our Mailing List
Sign up now to receive monthly newsletters featuring talented artists, tutorials, news and more!
We do not sell your information. All emails include an unsubscribe link. You may opt-out at any time. See our privacy policy .
Flowing Waters Art
Creating art for harmonious living.

Watercolor Sailboat – Tutorial

I enjoy sailing, but never seem to do it enough. It is so very peaceful to sail in the open waters. I love listening to the waves splash against the boat as it zips through the water at the mercy of the wind.
I created this painting last month from an online tutorial. My art for this week is a bit behind schedule with the Thanksgiving holiday but I’m working to catch up. It was my first try at painting waves with watercolor and it was harder than I originally thought. I used a pen for a little outlining and that was it.
This is probably the only painting I’ve ever done without adding bling with Stickles. It was hard to do, but thank goodness I survived, lol.
I hope it inspires you to create!
Thanks for stopping by.
Share the happy!
Share this:
- Click to share on Twitter (Opens in new window)
- Click to share on Facebook (Opens in new window)
- Click to share on Pinterest (Opens in new window)
2 thoughts on “ Watercolor Sailboat – Tutorial ”
I also love being on the water. Peaceful. The mind slows down. Yessss. I love the sky in your painting. It contains the essence of watercolor.
Like Liked by 1 person
Thank you Gretchen! I’m glad you liked it 😊
Leave a comment Cancel reply

- Already have a WordPress.com account? Log in now.
- Subscribe Subscribed
- Copy shortlink
- Report this content
- View post in Reader
- Manage subscriptions
- Collapse this bar

How to Paint a Sailboat Watercolor: Unleash Your Artistry
To paint a sailboat watercolor, sketch the sailboat lightly and layer the watercolor washes. Use wet-on-wet techniques for realistic water effects. Creating a sailboat watercolor painting can be a relaxing and rewarding experience. Start with a light pencil sketch to outline the sailboat and its surroundings. Choose a color palette that reflects the mood of…

To paint a sailboat watercolor, sketch the sailboat lightly and layer the watercolor washes. Use wet-on-wet techniques for realistic water effects.
Creating a sailboat watercolor painting can be a relaxing and rewarding experience. Start with a light pencil sketch to outline the sailboat and its surroundings. Choose a color palette that reflects the mood of the scene, whether it’s a vibrant sunny day or a serene sunset.
Use wet-on-wet techniques to blend colors smoothly, especially for the water and sky. Pay attention to the light source and shadows to add depth and dimension. Layering washes will help you achieve the desired intensity and texture. With practice and patience, your sailboat watercolor can capture the beauty and tranquility of the sea.

Credit: jenniferbranch.com
Getting Started With Sailboat Watercolor
Painting a sailboat in watercolor can be fun. Start with simple steps. This guide will help you. Learn how to choose supplies and understand watercolor basics.
Choosing Your Supplies
Good supplies make painting easier. Here is what you need:
- Watercolor Paper: Choose thick paper, 140 lb or heavier.
- Watercolor Paints: Use artist-grade paints for better results.
- Brushes: Get a mix of round and flat brushes.
- Palette: Use a palette to mix your colors.
- Water Jar: Keep a jar of clean water nearby.
- Pencil: Lightly sketch your sailboat before painting.
- Eraser: Use a soft eraser to remove pencil marks.
Understanding Watercolor Basics
Watercolor painting uses water to spread color. Here are some basics:
| Technique | Description |
|---|---|
| Wet-on-Wet | Apply paint on wet paper. Colors blend smoothly. |
| Wet-on-Dry | Apply paint on dry paper. Colors stay sharp. |
| Layering | Let each layer dry. Then add more color on top. |
| Dry Brush | Use a dry brush with little paint for texture. |
Practice these techniques. Try different ways to use water and paint. Experiment with colors and brushes. This will help you paint your sailboat better.
Finding Inspiration For Your Sailboat Scene
To paint a beautiful sailboat watercolor, you need inspiration. A good inspiration will help your painting look more realistic and engaging. Let’s explore ways to find this inspiration.
Gathering Reference Images
Reference images are essential for accuracy. They help you see the details of a sailboat. You can find reference images online or in books.
- Online Sources : Websites, photo libraries, and social media.
- Books and Magazines : Art books, sailing magazines.
- Personal Photos : If you have your own photos, use them.
Always pick high-quality images. They show more details, making your painting better.
Incorporating Personal Touches
Adding personal touches makes your painting unique. Think about what makes you happy.
- Colors : Use your favorite colors for the sky or sea.
- Details : Add small details like birds or waves.
- Story : Imagine a story behind your sailboat.
Your personal touches make your painting special. They show your personality and creativity.
| Source | Benefit |
|---|---|
| Online Images | Easy to find, variety of angles |
| Books and Magazines | High quality, detailed |
| Personal Photos | Unique, meaningful |
Sketching The Sailboat: Laying The Foundation
Before you dive into the world of watercolor, it is essential to lay a solid foundation. Sketching the sailboat forms the backbone of your painting. This step helps you define shapes, proportions, and essential details.
Creating A Basic Outline
Start by drawing the hull of the sailboat . Use light, smooth strokes. Position the hull centrally on your paper. Next, sketch the mast . Draw a vertical line rising from the center of the hull. Ensure the mast is straight and proportional. Finally, add a simple outline of the sails . Use triangles to represent them.
Adding Details And Proportions
Now, add more details to your sketch. Begin with the sail lines . Draw lines connecting the mast to the corners of the sails. Add small circles for pulleys where the lines meet the mast. Sketch the deck details . Include railings, a cabin, or other elements. Ensure everything remains proportional.
Check your proportions. The sails should be larger than the hull. The mast should be tall, but not too tall. If needed, adjust your sketch to maintain balance. Use an eraser for corrections. Your sketch forms the foundation for your watercolor painting.

Credit: www.youtube.com
Mixing Colors: Capturing The Essence Of The Sea
Creating a sailboat watercolor painting is an exciting adventure. Capturing the sea’s essence through color mixing is crucial. Let’s explore how to mix colors and make your painting come alive.
Selecting Your Palette
Choosing the right colors is the first step. A well-selected palette will bring your sea to life.
- Blues: Ultramarine, Cerulean, and Phthalo Blue for varying depths.
- Greens: Viridian and Hooker’s Green for seaweed and reflections.
- Yellows: Naples Yellow and Cadmium Yellow for sunlight.
- Neutrals: Payne’s Grey and Burnt Sienna for shadows and details.
Make sure your palette includes a balance of warm and cool colors.
Techniques For Blending Colors
Blending colors smoothly is key to a realistic sea. Here are some techniques:
- Wet-on-Wet: Apply wet paint on wet paper. Colors blend seamlessly.
- Dry Brush: Use a dry brush for texture and waves.
- Layering: Build layers for depth and dimension.
Practice these techniques to achieve a natural look.
| Technique | Effect |
|---|---|
| Wet-on-Wet | Smooth blends and transitions |
| Dry Brush | Textured and detailed effects |
| Layering | Rich depth and contrast |
Experiment with these methods to see what works best for your sailboat scene.
Applying The First Wash: Setting The Scene
Applying the first wash in watercolor painting is crucial. It sets the foundation for your sailboat scene. This process involves establishing the sky and laying down the water. Let’s dive into each step to create a stunning sailboat watercolor.
Establishing The Sky
The sky is the backdrop of your painting. Start with a clean, wet brush. Use a light blue color for a clear sky. Add a touch of water to your brush. This will help the paint spread smoothly. Begin at the top of your paper. Use long, even strokes. Move downwards towards the horizon.
For a sunset scene, mix orange and pink. Blend these colors into the blue. Make sure the colors transition smoothly. You can use a damp brush to blend the edges. This creates a soft, natural look. Remember to keep the sky light and airy. It sets the mood for the entire painting.
Laying Down The Water
The water should reflect the sky’s colors. Start with the same blue you used for the sky. Add more water to your brush. This makes the color lighter. Paint in horizontal strokes. This gives the water a calm look.
To add depth, use a darker blue near the horizon. Blend it into the lighter blue. This creates the illusion of distance. Add small touches of green or grey. This can represent reflections or shadows. Use a dry brush to add texture to the water. This makes it look more realistic.
If there are waves, use a slightly darker color. Paint small, curved lines. This gives the water movement. Make sure to keep the lines soft. This keeps the water looking natural.
Building Layers: Adding Depth To Your Painting
Creating depth in a watercolor painting can bring it to life. By building layers, you can add dimension and realism. This technique helps transform a flat image into a dynamic scene. Let’s explore how to achieve this with your sailboat watercolor painting.
Techniques For Layering
Layering in watercolor painting involves applying multiple transparent washes. Each layer builds on the previous one, adding richness and depth. Start with lighter colors and gradually move to darker tones.
- Wet-on-Wet: Apply wet paint to a wet surface. This technique creates soft edges and smooth transitions.
- Wet-on-Dry: Apply wet paint to a dry surface. This method results in crisp, defined edges.
- Glazing: Apply a thin, transparent layer over a dry layer. This technique deepens the color without altering the underlying details.
Creating Texture And Movement
Adding texture and movement brings life to your sailboat painting. It helps convey the motion of water and the texture of sails.
- Dry Brush: Use a dry brush with minimal paint. This technique adds rough textures, like the grainy look of sails.
- Salt Technique: Sprinkle salt on wet paint. As it dries, the salt creates unique textures, perfect for depicting water.
- Spattering: Flick paint onto the paper. This method adds randomness and energy, ideal for ocean spray.
By combining these techniques, you can create a dynamic sailboat scene. Experiment with different methods to find what works best for you.
Detailing The Sailboat: Bringing Your Art To Life
Detailing the sailboat is crucial in watercolor painting. It brings depth and realism to your art. The detailed parts make your sailboat stand out. Focus on the hull, deck, sails, and ropes. Each part adds a unique element to your painting.
Painting The Hull And Deck
Start with the hull and deck. These are the main parts of the sailboat. Use a light wash for the base color. Let it dry completely before adding details.
Next, add shadows and highlights. This gives the hull a 3D effect. Use darker shades for shadows and white for highlights. Be subtle with your strokes to keep it realistic.
| Part | Color | Technique |
|---|---|---|
| Hull | Base: Light Blue, Shadows: Dark Blue | Light Wash, Dry Brush for Details |
| Deck | Base: Light Brown, Shadows: Dark Brown | Light Wash, Dry Brush for Details |
Capturing The Sails And Ropes
The sails are the most prominent feature. Use a light gray or white base. Add gentle shadows to show folds and movement. Use a fine brush for this.
Ropes add intricate details. Use a thin brush and dark color. Keep your strokes light and precise. This will make the ropes look real.
- Base Color: Light Gray or White
- Shadows: Slightly Darker Gray
- Ropes: Dark Brown or Black
Remember to keep your strokes smooth and light. This ensures the sails and ropes look natural.
Finishing Touches: Perfecting Your Masterpiece
Finishing touches are essential for making your sailboat watercolor painting shine. These final steps can turn a good painting into a masterpiece. Here, you’ll learn how to adjust contrast and lighting, and add final details and highlights.
Adjusting Contrast And Lighting
Contrast brings your sailboat to life. Use darker shades for shadows. Lighten areas where the sun hits. This creates depth and dimension. Don’t overdo it; subtle changes work best. Play with the colors until it looks right.
| Element | Technique |
|---|---|
| Water | Add reflections with light blue and white |
| Sails | Use off-white for sunlit areas, gray for shadows |
| Sky | Blend light blue with hints of pink or orange |
Adding Final Details And Highlights
Details make your painting unique. Use a fine brush for small touches. Add ropes, windows, and waves. Highlight the edges of the sails with white. This gives a sunlit effect. Don’t forget the boat’s reflection in the water. This adds realism.
- Ropes: Thin, dark lines
- Windows: Small, square shapes
- Waves: Light blue, curved lines
Highlights draw attention to key areas. Use white paint sparingly. Too much can look unnatural. Focus on the sunlit parts. Highlights make your sailboat pop out of the water.

Credit: doodlewash.com
Painting a sailboat watercolor can be a relaxing and rewarding experience. Follow the steps outlined for stunning results. Experiment with colors and techniques to create your unique masterpiece. Share your artwork and inspire others. Happy painting!
We may earn a commission if you click on the links within this article. Learn more .
Leave a Reply Cancel reply
Your email address will not be published. Required fields are marked *
Save my name, email, and website in this browser for the next time I comment.
More…!

How to Paint a Tall Ship Sailboat in Watercolour

Skill Level : 2 Intermediate
Medium : Watercolour Painting
Subject : Seascapes
Tutor : Dennis Clark
Class Length : 2 hours 20 minutes
Avg Rating : No Ratings Yet
Silver Level or Higher Class
Class Description
- Read Class Reviews
Gone are the days when the ocean was filled with all types of sailing ships. Fortunately there are still some sailboats sailing the high seas. It is certainly a grand sight when a tall ship sails into a modern harbour. The sight conjours up the imagination of pirates and gun ships in battle.
In this lesson you will learn:
1. How to paint a stormy sky to offset the light coloured sails 2. How to paint the seas to give the impression of waves in motion 3. How to add colour to the sails 4. How to simplify the deck detail and shrouding and more ...
Latest Reviews
Dennis: I really enjoyed this class. Thank you for an informative lesson. Kathy KathyKuz
Unlock the Follow Along Class HERE
Short class video.
Class Tutorial
Tall sailing ships have always captured the imagination of the adventurous. Pirates with eye patches and a hook hand and all that. What we are going to do is paint one in watercolour.
This is the photo we will be working from:

We will unfurl the last sail so that we have a better looking ship.
Masking the Sails

There is a lot of white areas to be protected so use masking fluid to do this. About ½ inch or 15mm around the edge of the sails should be enough protection.
When you have protected all areas that need to be, gently blow dry before proceeding.
Painting the Sky

With a large flat brush wet all the sky area and then float in some Cobalt Blue.
Be careful to keep the horizon straight.

Add more blue pigment to the sky mix and bring a touch of Burnt Sienna to warm it up a bit. Drop this colour into the wet sky and move it around to suit. We are looking for a darkish sky in order to contrast with the light sails. This will ensure a lovely dramatic painting.

With a bundled up tissue dab some areas to give the impression of cloud billows.
Painting the Sea

Make up a light mix of Blue and Viridian and paint the sea with horizontal strokes. Don't paint it too evenly. To be able to indicate some nice windswept waves use the two colours in horizontal lines and intermingled.
Keep the foreground darker at the lower end of the painting and lighter towards the horizon.

Now we can begin to add in the curved lines for the swells and waves. Don't overdo it and make the waves too wild. The waves will get smaller into the distance.

Because clouds show reflections from the sea surface, very carefully glaze in a few light sea colour on sections of the clouds. This creates a colour harmony between sea and sky.

Use a small round brush to paint in the shadow areas of the waves. Note that each swell will have a light refection on the top edge.
A word of warning: Don't make the swells too large in relation to the size of the ship.

Paint the dark reflection of the ship.
Dry the sea area before continuing.
Enjoying This Tutorial?
Painting the sails.

Remove the masking fluid off the ship.
With an Orange/Brown colour begin painting in all the spars and the masts. To keep them straight and even it is best to do so with a series of short strokes.

The sails are made out of a very strong cotton cloth or canvas and unless they are new sails, they will be slightly discoloured and yellow from being exposed to the harsh elements.
To achieve the aged look, start painting, or rather glazing, some Yellow Ochre over the sails.

When that has been completed, mix up a light Blue/Gray for adding the shadows on the sails. Remember to show any folds in the sails themselves.

Continue working on the shadows and eventually adding the darkest shadows under the spars. Touch up, with a light Gray for the seams at the edge of the sails.
Carefully add the other details in the sails and the shadows on the masts.
Touch up all the other smaller details in the sail areas, including the flag.
Painting the Ship

With a very dark mix of Brown made up from Ultramarine Blue and Burnt Sienna, paint the hull of the sailing ship and the lighter strip on the side.

Now comes the interesting part of this painting, and it is all the small details on the deck. In the reference photograph there is a ton of detail. Now, we are NOT going to paint all the detail as shown in the photograph.
We are going to simplify the lot by blocking in the main shapes only. Slowly build up the various tones and colours. Be careful to keep the general shapes of the sailors.

As you can see there is simply a suggestion of all the items on the deck and no details whatsoever.

Once the shapes have been painted we can now, with a small round brush add the railings.
Add Finishing Details

Paint in a gull or two for some extra movement and interest. This close-up shows just how simplified all the details are.

With some Chinese White, straight out the tube, touch up all the small areas that need White, such as the tips of the spars.

For this size of sailing ship we would not be able to paint in the thin ropes with a small brush. They would just be too thick. We will add them in with a very sharp-pointed pencil. A 0.5mm Mechanical pencil works very well here.
Notice that I am only adding in the main rigging and leaving out all the lesser ropes. It is not necessary to add them all in. The brain is well able to add them in for you.

Again, with Chinese White, add the bow wave of the ship as well as the highlights in the deck area and some of the wave tops.
To finish off I want you to notice that each sail has a slightly different brightness than the others. Don't try to keep them all the same colour.
This is what the final painting looks like:

About Dennis Clark
Read more about Dennis Clark

Follow Us on :
Copyright © · Paint Basket TV · All Rights Reserved
As an Amazon Associate, I earn from qualifying purchases.
Pin It on Pinterest
Watson Watercolor
How to paint a boat in watercolor.

Paint a realistic boat and reflection with watercolor without overdoing it in this simple landscape step by step. Paint your far away trees quick and easy and add reflections with the same color so they’re a snap, too! Add a well saturated foreground and your painting will amaze your family and friends by how professional it looks.
Downloads for How to Paint a Boat in Watercolor
- 8 x 10 Outline Page to trace
- Reference photo (from Pixabay)
- Finished WC Boat Landscape
Suggested Colors for Watercolor Boat
- Blue – Cerulean is a good color, but most blues will work well
- Green – mix yellow or green gold with your blue or use a tube green
- Perylene Green (optional) – a great color for dark green
- Boat color – the boat can be any color. I used brown, light brown (add yellow) and dark brown (add black or dark blue)
- Opaque white – any opaque white (I use Bleed Proof White by Dr. Martin)
- Red – for the buoy – any red
- Black – any black
Step by Step Watercolor Tutorial for How to Paint a Boat
Step 1 – draw or trace your outline onto your watercolor paper using graphite paper., step 2 – paint the watercolor sky wet on wet..
NOTE – Your sky will be unique and doesn’t need to look like mine to be a success.
Wet your paper from the top down to the tree and water line, going over the mountains and big tree on the right. Give it plenty of water and hold it up till it quits dripping. The paper needs to be a good wetness for your sky color to spread out.
Mix a puddle of blue that will dry as dark as you want when you paint it on wet paper. You can test the color on a piece of scrap paper and add paint until you have the right concentration.
Paint your sky with a few sweeping brushstrokes – avoid overpainting or trying to control it. Just lay it on and leave it alone. If you can’t control yourself (like me), go get a cup of coffee or something, but let it do it’s own thing.
Step 3 – Paint the distant mountains a light value of blue gray.
Mix a blue gray with mostly blue and a little brown or orange.
If your sky is still damp, dab the mountains with a paper towel to mostly dry.
Paint the mountains, starting at the bottom and painting up. If they seem too dark, use a thirsty brush to lift up some color.
Step 4 – Paint the distant trees behind the water and boat.
Mix a gray green with blue or blue gray plus yellow or gold – mix plenty so you have enough for the reflections, also.
Paint the left side distant trees, starting at the bottom and working up. You can tilt the top of your paper up if the trees spread too far and use gravity to keep them in place.
Mix a little darker color for the trees on the right, but not too dark.
Paint them also, going over the big tree on the right. Dry well.
Step 5 – Paint the tree reflections with wet on wet watercolor.
Wet the area under the trees in the water with clean water, leaving a line of unpainted paper between the trees and the reflection.
Paint – Use a small brush to add a little tree color, starting closest to the trees, and just let it spread.
Step 6 – Paint the boat with watercolor or other medium.

Mix a light, medium and dark version of your color – my boat was beige, brown and black, but yours can be any color you like.
Paint the boat very carefully with a good brush or, if you have trouble painting fine detail, you can use pen and ink or colored pencils to put in the boat. Whatever works for you is the best.
Reflections – Add the boat reflections with the same color and jagged edges.
Step 7 – Paint the water light to dark, working wet on wet.

Mix a big puddle of blue and a smaller puddle of dark blue.
Wet the water area with clean water, going right over the reflections by being careful around the boat. Don’t wet the foreground.
Paint – Start with light blue below the top water line, leaving some unpainted area at the very top. Work the paint so you have light blue at the top, going to darker blue at the bottom, doing as many brushstrokes as you want.
Paint around the red buoy area.
Paint jagged, grassy edges at the bottom where the foreground meets the water.
Step 8 – Paint the foreground with deep, rich color.

Mix a light green and a medium green with your blue and yellow or use tube greens.
Paint the foreground light green on the left to darker green on the very right, using short strokes so you get a texture in your grass area.
Add a few grasses sticking up into the water on the right side with the darker green color.
Step 9 – Add the big tree for this watercolor landscape with boat.
Mix a dark green with green + black or peylene green.
Paint or sponge the dark tree on the right, leaving holes for the birds to fly through. Paint the trunk and shadow the same dark green.
Step 10 – Adjust your values and add finishing details to your watercolor boat landscape.
Rope and buoy – add a rope with opaque white paint going from the boat to the anchoring buoy. Paint the buoy and reflection red, then add a white highlight.
Birds? – add tiny birds in your sky.
More green? – you can wash over the distant trees with a brighter green if you like.
Summary – How to Paint a Boat in Watercolor Techniques to Improve Your Landscapes.
Landscapes need to have a sense of distance to look realistic. Working back to front, increasing the color and detail as you go forward is an easy way to paint realistic landscapes. You can always rework older landscapes that you aren’t happy with with this technique – rewet and soften your farthest away areas and/or add more color to the closest areas. It’s amazing what a difference this will make. Happy painting!
The aim of art is to represent not the outward appearance of things, but their inward significance - Aristotle
Watercolor Sea Turtle for Beginners - Quick and EASY!
Follow along step by step and even beginners can paint a beautiful watercolor sea turtle that everyone will want! For more practice, paint several watercolor sea turtle cards and pick different...
- Skip to main content
- Skip to primary sidebar
- Skip to footer
Louise Jackson Painting Classes
Learn how to paint using watercolor or acrylic paint.
Sailboat in Summer
Learn how to paint a peaceful scene featuring a sailboat on a lake in summer with the instructor and master decorative artist, Louise Jackson. As a bonus, you'll also get a downloadable and printable painting packet so that you can create a second painting featuring a swan on a lake in the fall.

Learn how to paint a ship on the ocean
Instructor: Louise Jackson
Skill Level: Beginner
Duration: 48 mins
"Sailboat in Summer" Online Painting Class
If you want to bring the beauty of the ocean into your home, you are going to love learning how to paint this "Sailboat in Summer". In this painting lesson, Louise will share her technique for creating dramatic whitecaps on the water using masking fluid. She'll also share techniques for creating dramatic crashing waves and a serene sky.
In this video lesson you will learn how to create:
- white sails on the sailboat using masking fluid
- a pastel sky filled with puffy clouds
- movement in the water using various shades of paint
- inked sailboat with watercolor shading
When you have finished this painting lesson you will have an amazing painting to hang on your wall, to give as a gift, or to sell.
What can I expect in this video lesson?
Louise's calm teaching style will allow you to relax and enjoy your painting journey. She'll share over 50 years of painting experience with you giving detailed explanations of each step of the painting process.
Louise paints at a pace that is easy to follow so you can paint right along with her. She'll show you how to paint every detail of this painting including the whitecaps, rocks, sand, water, sky, and moon. You can start and stop the video as often as needed, rewinding and fast-forwarding as needed.
All of Louise's paintings can be created using either watercolors or acrylics and she'll share tips for painting with both.

Class Materials
- full-color picture of the painting (without the watermark)
- written instructions
- color swatches
- supply list
- one PDF file with a single sheet line drawing that will need to be printed at a print shop in full size
- one PDF file with a multi-sheet line drawing that you can print at home on 8 1/2 x11 paper then piece it together
See the F.A.Q. page to answer any of your questions.
Bonus - Complimentary Painting Packet

The "Swan in Lake" Painting Packet
- As a bonus, you will receive a complimentary painting packet so that you can paint a second painting that uses similar techniques that you have just learned in the video painting lesson.
The packet includes:

All the images used in this website are the property of Louise Jackson, M.D.A.. © Copyright 2019 ~ All Rights Reserved.
Please Login
How To Paint Boats In Watercolor
Miscellaneous, how to paint boats in watercolor: simple rowing boat, step 1: initial sketch, step 2: painting the first wash, step 3: painting the background, step 4: painting the boats, step 5: foreground boat & cast shadows, step 7: adding foreground texture, step 8: foreground foliage, step 9: final details, watch the video, materials list.
Ultramarine Blue: Winsor & Newton | Daniel Smith Dioxazine Purple: Winsor & Newton | Daniel Smith New Gamboge: Winsor & Newton | Daniel Smith Burnt Umber : Winsor & Newton | Daniel Smith Paynes Gray: Winsor & Newton | Daniel Smith Alizarin Crimson: Winsor & Newton | Daniel Smith Cadmium Red: Winsor & Newton | Daniel Smith
Rigger Brush (For thin tree branches etc) Bu y from Amazon 1″ Hake Brush Buy from Amazon Synthetic Squirrel Flat Brush Buy From Amazon Princeton Synthetic Kolinsky Mop Brush Buy from Amazon
Arches watercolor paper block, cold press, 9″ x 12″, 140 pound Buy from Amazon
Easy release painters masking tape Buy from Amazon Adjustable desktop easel Buy From Amazon

This simple rowing boat can be painted with just one brush. A 1/4″ flat brush.

Begin by painting a loose background wet into wet using Ultramarine and Dioxazine Purple. Leave the paper dry where the boat will be as the paint can only flow only where the paper is wet.

With the edge of your flat brush, paint the darker interior of the boat with a flat wash of Dioxazine Purple and Payne’s Grey.

Paint the exterior of the boat with Cadmium Red. Thin your paint mixture with water as you progress down to the boat’s reflection in the water. The reflection should be lighter and have a less saturated color than the boat itself.

While the paint was still wet I dropped in some shadows along the rear and particularly around the bottom of the boat.
Here’s a pro tip for painting shadows. Never use gray, or black to darken your colors as this just makes them dull and lifeless. In this instance I’ve added Ultramarine to my Cadmium Red. This darkens the color, as well as cooling it, making for a much more convincing shadow color. For more on this this see my detailed post on color theory and how to mix watercolors for the best results.
How to Paint Boats In Watercolor: “Boats In The Harbor”
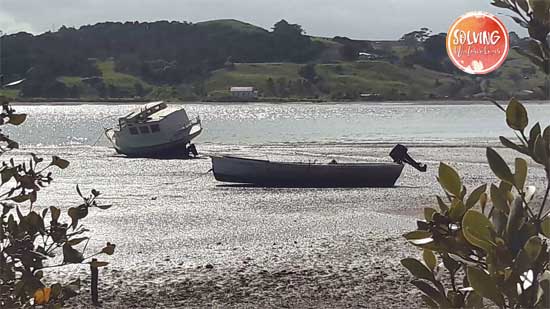
Here is the original reference photo for my painting “Boats in the harbor” taken from a video that I took.
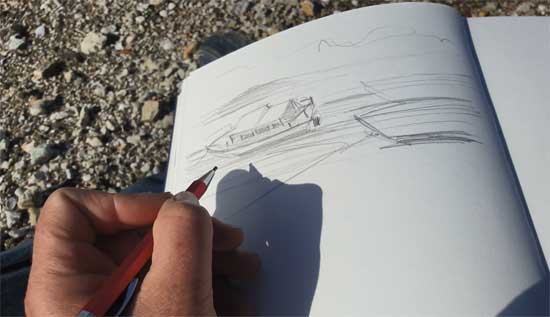
Although the final painting was actually completed in the studio, I also did some tonal Plein Air studies on location. A tonal study is a monochromatic painting, or pencil sketch that is done to help understand just the light and dark values. I was also trying to get a feel for the structure and perspective of the boats.
This painting of a couple of boats anchored on the Kaipara Harbor in New Zealand, shows how it’s possible to portray a convincing looking boat with only a few brush strokes and a couple of tonal values.
Total Time: 45 minutes

My initial sketch, is quite rough, as you can see but there is just enough detail to show the structure of the boats. The rowing boat in the foreground is just a few simple lines but the little cabin cruiser at the water’s edge has a deceptively complex shape and took a bit longer to get right as it is positioned in such a way that makes it necessary to add perspective.
When drawing three dimensional objects in perspective I find that it try and visualize them as collection of simple geometrical shapes such as stacked boxed and then I add the finer details after.

I began by painting the sky and water in simple broad strokes. The painting was set up on my desktop easel angled at about 45 degrees.
For the first wash I used a 1/2 inch Hake brush with Cerulean Blue diluted to a weak tea consistency. I left plenty of white paper showing through especially around the boats. For the dark wet sand and mud in the foreground, I brought the wash down to the bottom of the paper. I picked up some Dioxazine Purple, Payne’s Grey and Burnt Umber and allowed this to mix and blend on the paper.

The boats will be the main focus of this painting. They are the elements with the strongest contrast and strong contrasts tend to draw the eye immediately. To keep things simple and uncluttered, I’m going to keep the background elements quite loose and undetailed.
With a 1/4 inch Flat brush I painted a variegated wash of Greens mixed from New Gamboge and Prussian Blue and Burnt Umber.

A flat brush is perfect for creating the sharp straight edges needed for the clean lines of the boats. Begin by blocking in just the boat’s shadows, with a 1/4 inch flat brush. I used a strong gray-violet which was mixed from Payne’s Gray, Ultramarine and Alizarin Crimson.

I gave the foreground rowing boat a little more detail and tonal variation than the cabin cruiser, as it is closer to the viewer. Here I am adding the finishing touches to the outboard motor. Don’t forget to indicate the cast shadows on the sand as this little detail will really serve to make the boats feel solid and well grounded in the scene.

Add the texture of sand and stones by flicking paint with an old toothbrush. I’ve used a sheet of paper as a mask to ensure that the paint doesn’t go into other areas of the painting. Ensure that the paper is at least an inch above your painting, otherwise it will create an unnaturally straight line of spatter.

Use a small mop brush to paint the leaves and foliage in the foreground. A mop brush is perfect for creating leaf shapes. It also forms a sharp point, which is ideal for thin branches.

With 95% of the painting completed, all that’s necessary now is to add the darkest details such as the anchor lines and other small lines (often referred to as calligraphy) with a Rigger. Here I am adding the windows to the cabin cruiser with the edge of a flat brush.

If you found this post useful check out the links below
How To Start Watercolor Painting: Essential Beginners Guide
6 Easy Beginner Watercolor Painting Ideas You Can Do!
35 Beginner Watercolor Mistakes & How To Fix Them

Black Friday! Get the EVERYTHING Bundle. ALL my courses & Ebooks for only $225 $ 49 See courses here
| This is the fishing boat "Clematis" moored in the estuary at Christchurch, New Zealand. This is the scene we will paint today, using watercolors on Saunders 300gm paper. Always use good quality paper, as washes etc. will be easier. The image is converted to greyscale and the contrast level is adjusted to give a faded image, this reduces the amount of ink used during printing. Using the poster function on your printer, it can be printed to any size required, spread over several sheets of paper. For those who want to see an alternative method of printing across multiple pages (or for those who have printers without this feature), be sure to check out our tutorial! Sheets are trimmed and glued together ready to trace onto your watercolor paper. Line Drawing If the lines are too strong, use a putty eraser to lighten before painting. Raw Sienna, Burnt Umber,French Ultramarine, Cobalt Blue, Light Red, Alizarin Crimson, Paynes Grey Unless you are extremely confident in laying fast washes and painting around objects, I would suggest you mask off the boat and the white reflections in the water. I use "Art Masking Fluid for Watercolor" made by Winsor and Newton. The background houses and radar dome on the boat's superstructure were also masked. With the paper upside down and the board tilted at about 15 degrees, apply a graduated wash from the tree lines to the top of the paper. Dilute the wash with clear water as you work towards the top. Using a mixture of Ultramarine with a touch of light red, apply a wash to top left corner allowing the paint to run wet into wet. On the lower part of sky, just run the paint in streaks across the paper in a diagonal direction and allow it to blend. Paint in the distant trees using payne's grey with a touch of raw sienna, changing to raw umber as you reach the waterline. Before this dries add some payne's grey to give the trees some shape - soft edges will be produced as the original wash is still wet. Very little detail or tone as they are in the distance. Just a hint of activity! Some detail is also painted to far right shoreline, keeping it simple and distant. Use a diluted mix of paint. Using horizontal brush strokes, paint the water in, leaving some of the paper showing through. Use blotting paper to lift some of the wet paint, creating lighter vertical bands. The narrow strip at shoreline will be painted later. Fold a piece of blotting paper in half to give a thicker edge. While the paint is still wet, blotting paper is used to lift some of the paint. While held on edge, the angle of blotter is varied to produce a variety of ripples. To the left, you can see the results obtained after applying blotting paper to the wet wash. The paint has to be blotted immediately after laying the wash, in order to get the maximum effect. Boat and white reflections still masked with fluid. First washes on water completed. An additional wash is added to the background water, in order to emphasize the darker reflections. The reflection of the boat's bow line is painted first to give some direction and length of reflections as a guide. No straight lines! Lesson is copyright of Rod Webb | |
|
ArtGraphica |
How To Paint A Sailboat: A Complete Guide

Last Updated by
Daniel Wade
June 15, 2022
Whether you’re new to owning a sailboat or not, you have likely put some thought into painting your boat yourself. It is important to keep your boat well painted as it can save you a lot of money in the long run. It can also save you a lot of money if you choose to paint your boat yourself.
Whether or not this is the first time you have painted your boat, you will still find this article useful. It has lots of tips and tricks for making sure you get the job done and get it done well. Hiring a professional may be easier, but there is a sense of pride and accomplishment in doing it yourself. If you use this article as a reference, you can’t go wrong.
Table of contents
Why is it important to paint your sailboat?
Painting your boat is not just an excuse to put some creative flair into your boat, it is an important process in keeping the boat safe. Safe from salt, safe from barnacles, and safe from damage. The paint acts as a vital protective layer, without it your boat will be vulnerable to all kinds of damage. If you have a wooden hull, this protective layer will keep the wood from rotting. It can also plug any minuscule holes that might allow sea life and salt to make its way into the body of the boat.
There is also, of course, the added benefit of having a boat that looks good . A boat is a point of pride and should be treated as such. Having a glossy looking boat is something to be proud of. Most boats are not painted far above the waterline, so it is even an opportunity to make your boat stand out. Some people also believe that painting a boat brings good luck. Unless of course, you paint it green, green is thought to bring bad luck. Whether or not you believe that is up to you.
What are the benefits of painting your boat yourself?
When it comes to painting your boat there are only two options. Hire a professional boat painting contractor, or bite the bullet and do it yourself. They both have their pros and cons, of course, but there is so much more to be gained by doing it yourself. First of all, painting your boat yourself is just as fun as it is difficult. Learning to paint is a valuable life skill that you won’t regret learning as early on in your sailing career as possible. If you can learn to paint your boat now, you will save yourself a small fortune in the long run.
Hiring a contractor is expensive, to say the least, it may be faster and easier overall, but the extra cost can make it simply not feasible. Or simply unappealing. If this is the first time you are painting your sailboat you will need to make a one-off purchase of all the equipment needed for prepping, painting, and finishing the boat. After these one-off purchases are out of the way, you will only need to buy paint and new rollers the next time. Even if you need to buy all the equipment brand new, it can be cheaper than hiring someone else to do the job for you.
How often do you need to paint your sailboat?
The general rule of thumb for painting your boat is that it will need bottom paint about once a year. This is when you will need to take the boat completely out of the water and give it a fresh new coat. If your boat spends all of its time in the water, it certainly needs painting at least once a year. The saltwater is so corrosive that you shouldn’t let your boat go without a fresh coat of bottom paint for more than 2 years. Even if your boat only spends half its time in the water, and the other half on land, you will find that its best to keep its coat topped up.
The top paint, or the above waterline paint, doesn’t need painting anywhere near as often. It isn’t in direct contact with the seawater so it simply isn’t going to get eroded down as much. The salty sea spray can still be damaging over time so this paint should be re-done every 3 years. It can be more or less frequent depending on use and personal preference. Some people like to do above waterline paint yearly, with the rest of their boat, but it isn’t necessary.
What are the best paints to use for your sailboat?
There are plenty of great brands of paint out there, in various colors and shades, so you won’t struggle for choice. There are some things you might want to look for in your paint . For example, you may have noticed that a lot of boats tend to have red hulls. This isn’t just a fashion statement, and while red is supposed to bring luck this isn’t the main reason either. The reason is that this red/orange paint is perfect for added protection along the bottom of your boat.
This red/orange paint is interestingly chosen because it is, of course, traditional; but mostly because of its copper. The copper is actually what gives the paint its red/orange color.
Copper is perfect for the bottom of your boat for several reasons. First, copper acts as a biocide. It stops worms from making their way into the hull if your boat is wooden. If it is metal or fiberglass, it still has the benefit of stopping barnacles and other sea life from attaching themselves deep into the hull of the boat. Copper is also strong enough to hold up to scraping.
Scraping is when you scrape barnacles and other sea life off the hull of your boat. Scraping is an important part of keeping your boat in good condition. It is important to check with the marina or port authority whether or not you are allowed to scrape. If you scrape without permission you may find yourself on the receiving end of a hefty fine. The reason is that they don’t want you introducing invasive species on to the marina floor. This is mostly a problem when you are coming from somewhere vastly foreign, not sailing from New York to Chicago for example.
How many coats of paint does a sailboat need?
When painting your boat it’s a good idea to think about how many coats of paint you are going to need. There is no exact number that is needed, it is mostly to do with how well protected your boat needs to be and how much time you have on your hands. Every coat takes time and attention to detail.
If you choose to do four coats of paint it is going to be time-consuming but very well protected. That being said, the minimum number of coats is two. One is not enough. If your boat only spends part of the time in the water, two to three coats are plenty.
If you are someone who lives on their boat full-time, or at least most of the time, you may want to do more coats. Three, maybe even four, might be ideal here. The reason is that first, your boat is going to experience way more wear and tear than one that is just an ocean part-timer. And second, taking out your boat (which is also your home) is a giant hassle. It is a tedious process, so doing it as infrequently as possible is probably in your best interest. More coats last longer. When you are sailing from place to place, finding somewhere to take your boat out of the water and perform this maintenance is inconvenient. You want to be doing it as little as possible.
What safety precautions do I need to take when painting my sailboat?
All paint can be toxic when inhaled. Even if it is “non-toxic” paint it is going to be harmful to your lungs. They aren’t meant to inhale anything but air, even non-toxic paint is going to be bad for them. This is why it is important to wear a face mask.
Your mask should be specifically for painting, not surgical masks or other cheap medial masks. They are not going to be strong enough, with a fine enough air filter. Whether you feel the need to wear eyewear is up to you during the painting process.
Before the painting begins, when you are scraping and sanding, it is a good idea to wear some goggles to keep debris and splinters out of your eyes. It is also a good idea to wear gloves. You don’t want to rough your hands up too much, they need protection from not only the paint but splinters and sharp pieces of metal.
Painting a boat can be dangerous work. Without taking the proper safety precautions you are putting yourself at unnecessary risk. This safety equipment costs just a few bucks and is equally important as any of the other tools needed to paint your boat.
What tools do I need to paint a boat?
There is more to painting your boat than just using paint and a brush . You will also need tough sandpaper , potentially an angle grinder or welder , paint, primer , brushes, paint rollers , paint thinner , and solvent. You will need to make sure you have all of these things before you start painting. You can pick any of these items up at a boating goods store.
It is a good idea to bring some buckets with you for filling with water, both for rinsing off your boat and your brushes. All of your safety equipment needs to be brought too.
If this is your first time painting your boat yourself, you may find you need to buy all of these things at once. That can be a lot to stomach when its all in one go, luckily, most of these tools and equipment can be reused. Besides, it is still going to be far cheaper than hiring someone to do it for you. All of this equipment is an investment in your boat.
How to paint a sailboat
Whether this is the first time you have painted your boat or not, you may find some of the tips in this next section useful. Painting your sailboat may be tricky at first, but over time you will get the hang of it. The problem with painting your boat is that it can be a very expensive mistake if you get it wrong.
It is important to read this guide carefully, take your time, and make sure you do the job properly. It may be slow going at first, speed will come over time. Once you have gathered all of your safety equipment and tools you are ready to get started.
The workspace
First of all, you need to ensure you have the right workspace. You cant paint your boat in the water so you are going to need to find somewhere to do your work. This is easy enough if you don’t live on your boat full time, take the boat to your house and do your painting on the driveway. If this isn’t an option because you don’t have space or live on your boat full time, you are going to need to rent somewhere. There are typically places affiliated with the marina that you can use. In some cases, these even come with a majority of the equipment you will need. This, of course, drums up the price a bit, but that’s unavoidable.
Your workspace needs to be well ventilated, or you risk making yourself very sick. Both from paint fumes, rubbing alcohol fumes, and fine matter from when you sand the hull down. This means painting your boat in your garage, if it even fits, is not always the best idea. If you do decide to paint outside, it is important to consider the chance of rain. Of course, your boat is pretty waterproof, but once you begin sanding rain might damage the wood if left to sit there.
Before you do anything else, it is important to look your boat over fully from top to bottom. You are looking for any bumps, scrapes, cracks and general damage. This damage is not going to be noticeable while the boat is in the water, so just before you paint it is one of the only times you get to have a close look. Once you have made note of all this damage, it is time to get to work repairing it. Depending on just how severe this damage is, you may want to get help with this next stage.
All of this damage needs to be repaired before anything else can take place. Painting over these damaged areas is just going to hide the problem temporarily, the next time it comes to painting you will find they are far worse. If you don’t deal with this now, they are going to snowball into complicated and expensive repairs.
After your repairs are done it is time to start sanding. This is very time consuming as you need to do it three times. Per coat. First, take the 600 grit sandpaper and make your way around the boat. It is best to use electrical tape to mark out a section at a time so you don’t keep losing your place. After you have finished with the 600 grit sandpaper, it is time to move on to 800, then 1200. This process is important so you will be painting on as smooth a surface as possible. It is then a good idea to wipe the surfaces of the boat down with a damp cloth to remove any of the dust and flakes of metal/wood. Otherwise, you end up painting over them.
You could wash the boat down with a hose but you want to avoid getting the boat unnecessarily wet now that the hull has lost its protective layer. If you are sanding down a boat with a copper paint bottom, you may find the sanding process difficult. Just do your best, it doesn’t need to be 100% perfect. It is important to get as much of the old paint off as possible. Your new paint won’t adhere to the old paint as well as it would to the boat hull itself.
Putting on a layer of primer is not 100% necessary but it is recommended. The idea is that you want your topcoat to adhere to the boat as well as possible, a layer of primer can help you do that. The primer needs to be painted on evenly all over the boat. If you only feel like doing below the waterline, that is fine too. It will save you a lot of time. Putting on the layer of primer is not the most time-consuming part, it is mostly the sanding down that you will have to do. You will need to sand down using the 600 grit paper, then the 800, then 1200. Just like last time. Your layer of primer needs to be as smooth as possible for the maximum adhesion.
Now comes the paint. It is recommended to do at least two layers of paint. One undercoat and one top. Some people choose to go as far as two layers of primer, two layers of undercoat, and three layers of topcoat. This is going to be very time consuming, remember you will need to sand down three times between each layer of paint. You can paint using a brush if you like but is far easier to use a roller. It is also far easier if you employ someone to help you with this stage. It could be your spouse, child, friend, or anyone. It doesn’t need to be a paid professional. It can take a long time to go through this process. Especially if you are effectively doing 8 layers of paint (including primer).
The fastest way to paint, especially if you are on your own, is to use a sprayer. They are easy to use, with a little practice. If you haven’t used one before you may find that you struggle to get an even coat. You should always paint in vertical stripes, not horizontal. Additionally, it is a good idea to have someone following after you with a small brush doing small touch-up jobs. Any unevenness will need to be sanded down and repainted. The whole painting process can take a week if you aren’t efficient.
Take pictures
It is a good idea to take pictures throughout the whole process. This is for future reference. For example, if you take pictures of the boat when you are assessing it for damage, you can compare them to after you have repaired or sanded the trouble spots down. If you cant see the trouble spots still, great! If you can, it will help you keep an eye on them after you have painted too. It’s a good idea to catalog all of these areas if they start to become regular problems you may want to have your boat looked at by a mechanic. You might also like to have a before and after picture for your blog, or just as a personal memento.
Hopefully, you now have all the theory needed to paint your boat. There is a lot more that goes into painting your boat than simply grabbing some paint and a brush. It takes planning, practice, and attention to detail. If you follow this guide you will have no trouble at all. If this is your first time painting your boat, don’t be disheartened if it takes a lot longer than you expected. Speed will come with time, it is far more important to get the job done right than get it done quickly. If you put the work in you will be painting like a pro in no time at all.
Related Articles
I've personally had thousands of questions about sailing and sailboats over the years. As I learn and experience sailing, and the community, I share the answers that work and make sense to me, here on Life of Sailing.
by this author
Repairs and Maintenance
Most Recent

What Does "Sailing By The Lee" Mean?
October 3, 2023

The Best Sailing Schools And Programs: Reviews & Ratings
September 26, 2023
Important Legal Info
Lifeofsailing.com is a participant in the Amazon Services LLC Associates Program, an affiliate advertising program designed to provide a means for sites to earn advertising fees by advertising and linking to Amazon. This site also participates in other affiliate programs and is compensated for referring traffic and business to these companies.
Similar Posts

How To Choose The Right Sailing Instructor
August 16, 2023

Cost To Sail Around The World
May 16, 2023

Small Sailboat Sizes: A Complete Guide
October 30, 2022
Popular Posts

Best Liveaboard Catamaran Sailboats
December 28, 2023

Can a Novice Sail Around the World?
Elizabeth O'Malley

4 Best Electric Outboard Motors

How Long Did It Take The Vikings To Sail To England?

10 Best Sailboat Brands (And Why)
December 20, 2023

7 Best Places To Liveaboard A Sailboat
Get the best sailing content.
Top Rated Posts
Lifeofsailing.com is a participant in the Amazon Services LLC Associates Program, an affiliate advertising program designed to provide a means for sites to earn advertising fees by advertising and linking to Amazon. This site also participates in other affiliate programs and is compensated for referring traffic and business to these companies. (866) 342-SAIL
© 2024 Life of Sailing Email: [email protected] Address: 11816 Inwood Rd #3024 Dallas, TX 75244 Disclaimer Privacy Policy
IMAGES
COMMENTS
This video shows how to paint a sailing boat in watercolor. It´s simple and easy, for beginners. Get my drawing book: http://amzn.to/1K7L8EdFollow my Instagr...
Hey guys here is a super Fun and EASY watercolor tutorial for you to try abstract sailboats!! I go over this step by step- lots of fun with wet on wet techni...
Learn to paint watercolor SAILING BOAT painting - paint a sky, sea, sailing boat.This painting is intended for beginners and it is easy to paint just follow ...
Watercolor Sailboat Step by Step. 00:00 - Intro. 00:32 - Color mixing. 01:06 - Painting the sail boat. 02:16 - Painting waves. 03:01 - Painting trees and background. 04:53 - Painting the sky. 06:14 - My thoughts on the painting. 06:51 - YOUR thoughts? Links & Freebies. Get access to all my favorite art supplies and business ...
Since I didn't have a sailboat there, I sketched and took photos of the sailboats moving up and down the Sound. The shimmering water is the tricky part of this painting. It's a great opportunity to practice your dry brush! This painting needs rough press paper to get that sparkling water. The rest of the painting is simple.
Watercolor Boat Painting - Finally we Paint! Paint the cabins in the lightest value. Continue with the light colors. More light colors. So let's start painting. We're going to paint this in layers and build up the painting from light to dark. We're first going to block in all the shapes with their lightest colors.
Los Angeles-based watercolor artist Maria Raczynska demonstrates how to paint a beautiful birds-eye ocean scene with a sailboat in this video tutorial! Go back. Princeton Artist Brush Company. Neenah, WI 54956.
Step 7: Details On A Watercolor Sailboat. Dilute some Neutral Tint with a no. 8 round brush, then paint the sailboat's shadows and details. Drop in a little of the green mixture near the bottom to show how it reflects the water's color, then mix Burnt Sienna and Indigo for a dark brown to paint the cabin door.
Painting Demonstration 1. I paint a quick, rough first wash with big mop brushes. I want the brush to hit and miss a lot, so I have the sparkling, dancing light. There are very few bright white highlights on the water. Most of the highlights are the color of the sky, a soft almost cobalt blue. I paint the background trees first wast after the ...
Watercolor Sailboat - Tutorial. I enjoy sailing, but never seem to do it enough. It is so very peaceful to sail in the open waters. I love listening to the waves splash against the boat as it zips through the water at the mercy of the wind. I created this painting last month from an online tutorial.
To paint a sailboat watercolor, sketch the sailboat lightly and layer the watercolor washes. Use wet-on-wet techniques for realistic water effects. Creating a sailboat watercolor painting can be a relaxing and rewarding experience. Start with a light pencil sketch to outline the sailboat and its surroundings.
Hi, this is a simple sailboat watercolor painting composition for all new Extreme Beginners! It covers the glazing technique, drawing and layout of the compo...
How to paint watercolor boats - DANIEL SMITH Artists' Materials
With a large flat brush wet all the sky area and then float in some Cobalt Blue. Be careful to keep the horizon straight. Add more blue pigment to the sky mix and bring a touch of Burnt Sienna to warm it up a bit. Drop this colour into the wet sky and move it around to suit.
Mix a big puddle of blue and a smaller puddle of dark blue. Wet the water area with clean water, going right over the reflections by being careful around the boat. Don't wet the foreground. Paint - Start with light blue below the top water line, leaving some unpainted area at the very top.
In this video lesson you will learn how to create: white sails on the sailboat using masking fluid. a pastel sky filled with puffy clouds. movement in the water using various shades of paint. inked sailboat with watercolor shading. When you have finished this painting lesson you will have an amazing painting to hang on your wall, to give as a ...
How to Paint Boats In Watercolor: Simple Rowing Boat. This simple rowing boat can be painted with just one brush. A 1/4″ flat brush. Begin by painting a loose background wet into wet using Ultramarine and Dioxazine Purple. Leave the paper dry where the boat will be as the paint can only flow only where the paper is wet.
Use cobalt blue across the foreground in close diagonal bands of color. Fold a piece of blotting paper in half to give a thicker edge. While the paint is still wet, blotting paper is used to lift some of the paint. While held on edge, the angle of blotter is varied to produce a variety of ripples. The edge of the blotter paper should be changed ...
Here is an easy scene to paint in watercolor - easy boats in a harbour setting with reflections.More paintings athttp://www.timwilmot.com/In this demo I will...
Watercolor can be an unforgiving medium. It's not easy to create a fresh painting. Finding the balance between intentional, well thought out work and free, expressive brush marks can be challenging. This guide will help you be more mindful throughout your process and create fresh, powerful paintings.
After you have finished with the 600 grit sandpaper, it is time to move on to 800, then 1200. This process is important so you will be painting on as smooth a surface as possible. It is then a good idea to wipe the surfaces of the boat down with a damp cloth to remove any of the dust and flakes of metal/wood.
Beginner Drawing Course: http://bit.ly/2Gn4rOIDrawYTInstagram: https://www.instagram.com/lironyanil/My books on Amazon: http://www.amazon.com/Liron-Yankonsky...
This video will take you through all the stages in painting a small fishing boat in watercolour, tutored by professional artist Paul Clark.Link to video on '...
I paint this watercolour very loosely, and just hint at shapes and details. The location is near Sydney, Australia. Glen Davis is a small town inside a huge ...