- AROUND THE SAILING WORLD
- BOAT OF THE YEAR
- Email Newsletters
- America’s Cup
- St. Petersburg
- Caribbean Championship
- Boating Safety
- Ultimate Boating Giveaway

Getting the Most From Your Backstay
- By Mike Ingham
- Updated: September 15, 2015

While coaching, I’m often asked the best order of depowering. It is a good question because there are several options such as sheets, steering and controls, which all contribute to keeping the boat flat in a breeze. All of these tools should be used, but for just about any boat and condition, my suggestion is to start with the backstay. It’s a control that considerably reshapes both the headsail and mainsail at the same time. Since use of the backstay has almost no downside, it’s an excellent tool to depower the sails. Let’s explore why.
The discussion needs to start with how mast bend and forestay sag control the power of the main and jib, respectively. As a quick review, there’s inherent shape built into sails using what’s called “broad seam,” whereby the panels that make up the sections of the sail are designed and cut with curves on the connecting edges, or seams. There’s not much we can do to change it on the fly. The rest of the shape is built into the main and jib with luff curve and luff hollow, respectively. For the mainsail, luff curve is extra cloth added into the luff, in an arch from tack to head. When the mast is straightened, it pushes that material into the sail, adding depth. When the mast is bent, it pulls the extra cloth, and thus shape, out of the sail. The same is true with the jib, except cloth is cut out of the luff in an arch from tack to head to create luff hollow. When the forestay is sagged beyond that luff hollow, cloth — and shape — is pushed into the sail. When it’s tightened, cloth is pulled out of the jib luff, thereby flattening the sail.
The backstay takes advantage of luff hollow and luff curve simultaneously to depower the sails, much like an airplane lowers its wing flaps for high lift and retracts them when high lift is not required. With the backstay eased, the mast is relatively straight and the forestay is sagged for maximum power in both sails, like airplane flaps down. As the backstay is tensioned, the mast bends and the forestay tightens, depowering both sails — flaps up.
Because it’s not the only tool to depower the sails, it’s worth talking about the other significant controls and how they work in conjunction with the backstay. Steering is an important one. You can steer up a little into the wind, both because the apparent wind shifts aft in the puff, and because you get rid of power by pinching.
Easing the mainsheet certainly opens the leech, spilling power from the main. But easing the mainsheet also straightens the mast and sags the forestay, which is opposite of what the backstay does so well. It’s slight, but it does put power into both sails when you want the opposite. Depowering with the backstay is much more efficient. As an added advantage, when the backstay is tensioned, the mainsail leech opens up because the mast is bent, shortening the distance from head to clew.
Since the leech opens and closes with adjustments to the backstay, it’s well worth a glance up at the top of the main, and re-trim if necessary. I often find that the leech opens so much, I need to tension the mainsheet in order to get some leech tension back. Another important consideration here is when you ease the backstay in a lull, the leech will tighten so much that the main will need to be eased. Trimming in a puff and easing when needing power seems counterintuitive, but it’s worth keeping a constant eye on the leech to make sure you have the desired tension, especially with masts that have bendy upper sections.
At times, a puff might be too big or hitting too quickly and frequently to keep up with backstay. In these conditions I switch to playing the mainsheet because I can react more quickly. I will still use the backstay for trends and when things are less chaotic. In these unstable and quickly changing conditions, it’s most important to keep the boat at a constant heel angle, so it’s better to be able to keep it under control any way you can than to be searching for the ideal sail shape.
To augment the backstay, the flatter the sea state, the more mainsheet tension you can have while playing the traveler more aggressively. This technique helps keep the forestay tensioned and the mast bent, which is essentially assisting the backstay. I find this technique particularly effective with boats that have flexible masts. The choppier the water and the stiffer the mast, the less effective this is. With a stiff mast and choppy water, keeping the mainsheet eased opens the leech and twists the main open. This helps with aggressive steering and helps keep the bow down and the boat moving through the waves. Once in the correct range of backstay and mainsheet, the traveler is still the first move with the sheet and/or traveler fine-tuning depending on the boat and condition.
To use the backstay effectively, rig tune has to be set right. I try to set the rig so that in the lulls with my backstay off, the sails are fully powered. Thus, when the puffs hit, I can tension the backstay, keep the boat under control, and keep it at a constant heel. For most boats, it’s maybe a 4-knot wind range that the backstay will cover. If the puffs are beyond what the backstay can handle, I still set the rig for the lulls. If the puffs are too big for the backstay to handle, or if the wind builds beyond its range, as a last resort, I’ll switch to easing sheets and playing the traveler.
How do you know if you’ve overdone it with your backstay tension? Easy: If your overbend wrinkles become too extensive, you have too much. Overbend wrinkles are creases in the mainsail that start from the mast, usually just below the spreaders, and head toward the clew. If they extend all the way to the clew, for sure, the backstay is too tight. When wrinkles extend halfway to the clew, you’re at about maximum bend. If you’re at this point and still need to de-power, it’s time to ease the sheet and drop the traveler. If the backstay is tensioned most of the time and rarely eased all the way in the lulls, then your next move is to go tighter on the rig.
You’ll know you have it right when you can set up your rig and sails such that, in the lulls, the backstay is eased and you can comfortably depower using mostly backstay. You’ll still have to change point and play the sheets or traveler, but they should be mostly fine-tune adjustments. The bulk of the power control is with backstay. Your helm and heel should remain constant as you tension it in the puffs and ease it in the lulls.
Consider the comparisons between the images of a mainsail and jib with and without backstay tension below:

Read more: How To – Sail Trim
- More: sail trim , Sailing How To
- More How To

How To Refine Your Polars and Sail Charts

The Building Blocks of Asymmetric Spin Trim

Fundamental Tactics: How To Handoff

Racecourse Strategy: The Middle Versus the Edge

Barcelona Breeze Increase Spikes Intensity

Luna Rossa Dominant on Busy Day in Barcelona

One and Done on Drifter Day of Cup Challenger Series

Shocks and Drops At Louis Vuitton Cup Start
- Digital Edition
- Customer Service
- Privacy Policy
- Terms of Use
- Cruising World
- Sailing World
- Salt Water Sportsman
- Sport Fishing
- Wakeboarding

The $tingy Sailor
Diy trailerable sailboat restoration and improvement without throwing your budget overboard.

Upgrade Your Rig With a DIY Adjustable Backstay
At some point when you get serious about sail trim, whether for racing or just high performance cruising, you’re going to want an adjustable backstay. Most C-22s and similar daysailers were rigged at the factory with fixed length backstays that are only slightly adjustable with a turnbuckle. They’re not intended for adjusting to different wind conditions. You set it and forget it.
Consequently, you only have one setting for mast bend and headstay tension. That’s fine for casual cruising. Set it for the conditions that you usually sail in and it will usually be close. But an adjustable backstay gives you a range of trim positions to optimize the mainsail and headsail shape for any conditions, which are what you can encounter when racing or when you’re no longer just a fair weather skipper.
Before I continue, a bit of legal housekeeping. This post contains affiliate links. That means I receive a small commission if you make a purchase using those links. Those commissions help to pay the costs associated with running this site so that it stays free for everyone to enjoy. For a complete explanation of why I’m telling you this and how you can support this blog without paying more, please read my full disclosure .
In other rigging posts on this site, I’ve described how to add DIY controls for each of the three sides of a mainsail:
- Luff – Control Mainsail Draft with a Boom Downhaul
- Leech – Control Your Mainsail Shape Better With a Boom Vang
- Foot – Flatten Your Mainsail Foot with an Outhaul
Each of them secondarily affects the middle or belly of the mainsail a little bit but an adjustable backstay primarily affects it and completes the sail trim picture. Genoa car placement also affects the leech and foot of the headsail and halyard tension also affects the luff. An adjustable backstay primarily affects the belly of the headsail. The cool thing about an adjustable backstay is that it affects the belly of both sails at the same time. It’s a two-for-one control that improves performance both upwind and downwind.
How an adjustable backstay improves sail shape
Your mainsail might have been designed and built with a slight outward curve in the luff specifically to take advantage of bend in your mast. With a fixed backstay or a loosened adjustable backstay, the mast (and consequently, the luff) is relatively straight. This lets the mainsail form a more rounded shape in its belly when it’s filled with air, which adds power and is just what you want in light air. The extra fabric width in the middle of the sail has to go somewhere, so it fills to leeward.
When you tighten an adjustable backstay, the top of the mast curves slightly aft. This makes it fit the curve in the mainsail luff, which flattens and depowers the mainsail, just what you want in a strong breeze. Even if your mainsail has a straight luff, the effect is the same. The mainsail is more efficient and the boat will heel less. Hence, you might not need to reef the mainsail as early or at all.
Similarly, your headsail was probably designed and built with straight luff but it can take advantage of an adjustable backstay as well. With a fixed backstay or a loosened adjustable backstay, the forestay should be tuned with several inches of sag in it. Like the mainsail, this lets the headsail form a more rounded shape in its belly when it’s filled with air, again, just what you want in light air.
When you tighten an adjustable backstay, since it pulls the masthead slightly aft, it also increases the tension on the headstay and pulls the sag out. Then it is straight and matches the luff, which removes some of the belly of the headsail and flattens it, again, just what you want in a strong breeze. Together with the mainsail, it too becomes more efficient.
Incidentally, a tighter headstay can also make your headsail furler work better. An adjustable backstay can also make trailering easier without the need for a quick release lever on the forestay. It lets you slacken the forestay, which can make disconnecting it to unstep the mast easier, especially if you have a furler. If you need just a little more slack, pull the mast forward by hand with one of the halyards.
The simple animation below illustrates this simultaneous flattening of the mainsail and headsail. An adjustable backstay deepens the middle of both sails a few inches.
Another benefit of an adjustable backstay is that after a day of sailing with a tight backstay in a strong breeze, you can slacken the backstay to let the rig relax and release tension on the hull while your sailboat is moored.
Direct vs. indirect backstays
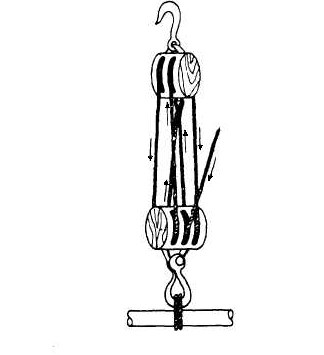
Adjustable backstay designs fall into two types: direct and indirect. With a direct adjustable backstay, the adjuster (typically a tackle system) is integrated into the backstay. The adjuster directly controls the length of the backstay and bears the full load of the backstay. This is the type of system that I’ll describe how to make in this post.
The advantages of a direct system are that it is simpler and therefore, more economical to make. It’s also more mechanically efficient compared to indirect systems, as I’ll explain in a moment. The disadvantage of a direct system is that if any part of the adjuster breaks, the entire backstay can fail. That’s not likely to happen except under extreme conditions and it can be safeguarded against by adding a safety wire or strap to back up the adjuster in case of failure.
With an indirect adjustable backstay, the adjuster (also typically a tackle system) is not integrated into the backstay and it doesn’t carry the full load of the backstay. The adjuster indirectly controls the length of the backstay, which can function without the adjuster. The advantage of an indirect system is that it is more fail-safe. If the adjuster breaks, the backstay can continue to work, albeit without adjustment ability. The disadvantage of an indirect system is that is more complicated and therefore, more expensive to make and to maintain.
The adjustable backstay that was installed on C-22s at the factory is an indirect system that looks like this;
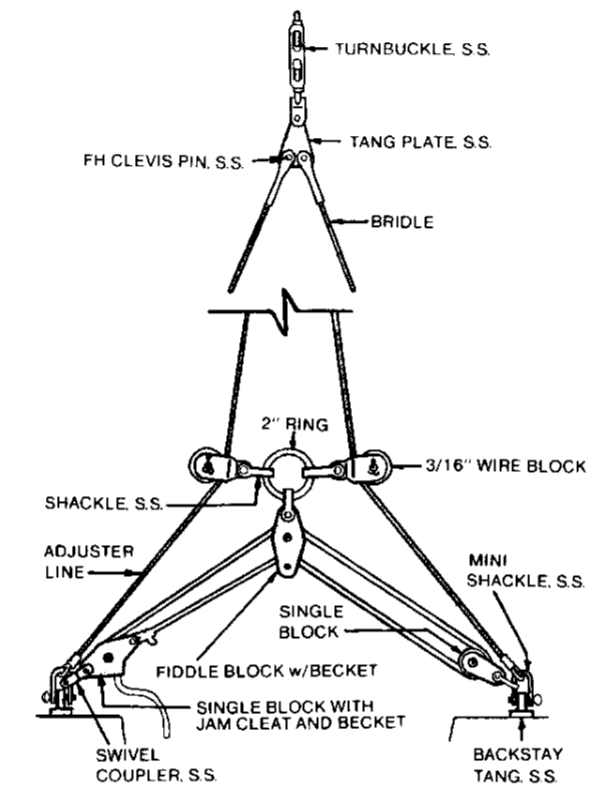
Tightening the tackle system pulls the center ring down, which pulls the bridle wires together and shortens the overall length of the backstay. Another disadvantage of this design is that the more you tighten the tackle, its mechanical advantage decreases.
The angle of the line through the center fiddle block decreases and the angle of the bridle wires through the wire blocks increases. Both of these effects increase the amount of force required to shorten the backstay. The end result is, it’s easier to adjust at the beginning of the adjustment range and harder to adjust at the end of the adjustment range. It gets hardest in strong winds, right when you need it most. That is why most modern backstays are direct designs.
DIY materials list
Following are the parts and materials you’ll need to make the direct adjustable backstay shown. I used a 5:1 tackle system because that’s what I had on hand but you could substitute a 4:1 tackle (two double blocks, no triple block) instead. It’s important that the breaking load of each part is equal to or greater than the breaking load of the backstay wire. You don’t want the adjuster to be the weakest link.
- Harken #304 1-1/2″ wire block or equivalent
- Harken #94 29mm triple block with cam cleat or equivalent
- Harken #85 29mm double block with becket or equivalent
- 1/2″ x 13 tpi SS eye bolt. The older C-22s used nearly identical eye bolts for the backstay, keel cable attachment, and the chain plate bolts. They’re readily available and inexpensive on eBay. However, the chain plate bolts are not threaded the full length of the bolt to the flange and need spacing washers. The backstay and keel eye bolts are fully threaded, do not need spacing washers, and are preferred for this project.
- 1/2″ SS washers (4-6 required if the eye bolt is not fully threaded)
- 20′ x 1/4″ New England Ropes Sta Set double braid
- 22′ x 1/8″ 1×19 SS wire w/swaged eyes on both ends. This is the main, non-adjustable part of the backstay.
- 10′ x 1/8″ 7×7 SS wire w/swaged eyes on both ends. This is the adjustable part of the backstay. Do NOT use 1×19 wire for this piece, which is not designed for use with wire blocks.
- SS shackles to attach the backstay to the eye bolts
For tips to help you decide whether to make the wire parts of the backstay yourself or to have a rigger make them for you, see How to Replace Your Standing Rigging for Less .
Installation instructions
To assemble and install the direct adjustable backstay shown:
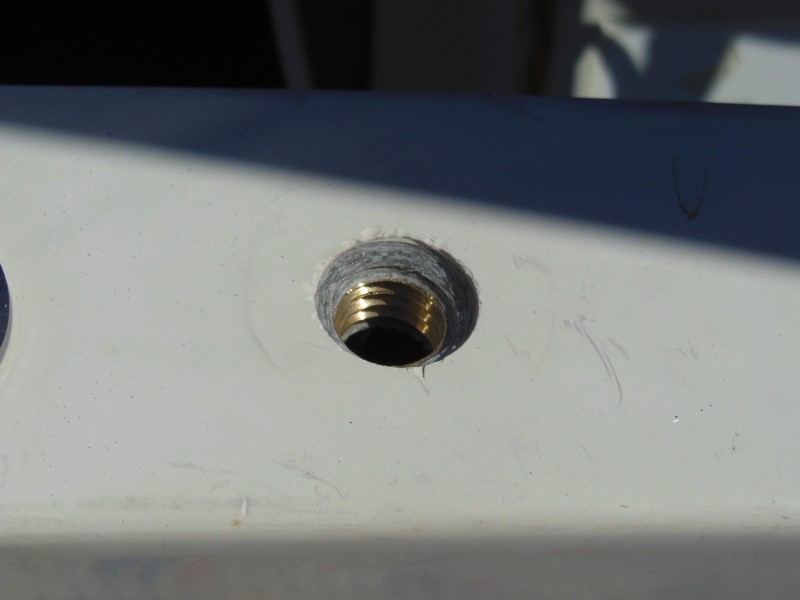
1. If your sailboat already has an eye bolt installed in the port side of the transom, skip to step 2. If your sailboat does NOT have an eye bolt already installed in the port side of the transom, continue with this step. If your sailboat is not a Catalina 22, modify these instructions to provide adequate transom reinforcement.
A. Drill a 1/8″ starter hole through the top of the transom 2″ outboard of the traveler bar (6″ from the port side of the tiller cutout). Place the hole in the middle of the transom thickness. There is a 5/16″ thick brass bar embedded by the factory in the top of the transom for this purpose. Drill completely through the bar.
B. Redrill the hole to enlarge it to 3/8″ or 27/64″ (preferable if you have that bit).
C. Chamfer the fiberglass down to the brass bar with a countersink bit or large drill bit.
D. Tap the hole to 1/2″ x 13 tpi. The finished hole should look like this:
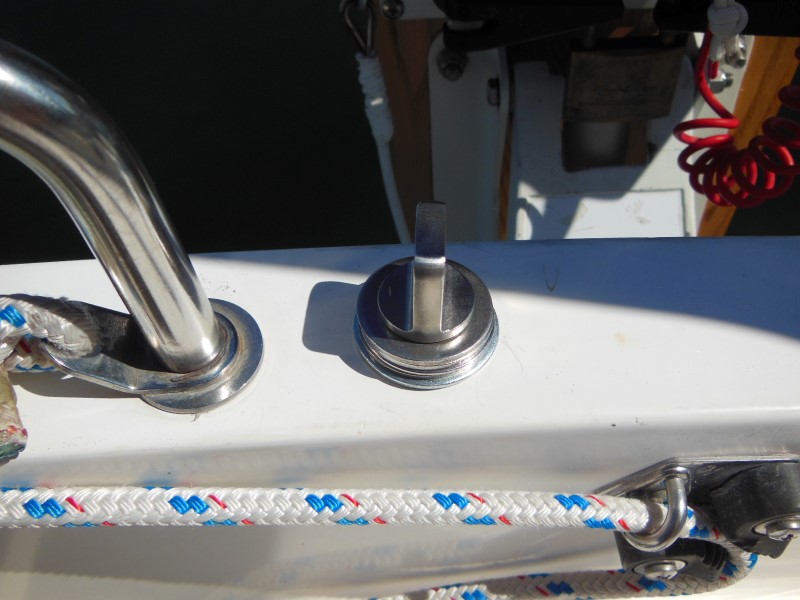
2. Test fit the 1/2″ eye bolt in the hole to decide how many washers you need for a tight fit. The tab of the eye bolt when tightened must point toward the cockpit like the picture below.
3. Apply a 1/4″ cone of butyl tape around the bolt and the underside of the lowest washer so that it will fill the countersink in the transom and squeeze out a little.
4. Apply blue thread locker to the eye bolt threads and install the eye bolt snug.
Do not overtighten the bolt or you might strip the brass threads. If you do strip the threads, then you will need to drill the hole out to 1/2″ and add washers and nuts on the inside of the transom, which is very difficult just to see, let alone work on. This is also a possible workaround if your sailboat is not a C-22. In that case, most owners end up cutting access holes in the front of the transom to install the nuts and then cover the holes with access plates or vents. To make matters worse, the back of the transom has a wood core and is thicker, the front of the transom has no core and is thinner. With the eye bolt centered on the transom, the threaded end of the bolt barely clears the core inside the transom. You will have to cut into the core to create clearance for the washers and nuts. To avoid all this, don’t strip the eye bolt threads.
5. Unstep the mast and, if necessary, move it so that you can work on the masthead.
6. Remove the existing backstay and attach one end of the 22′ wire to the masthead in its place.
7. Step the mast and reconnect the shrouds.
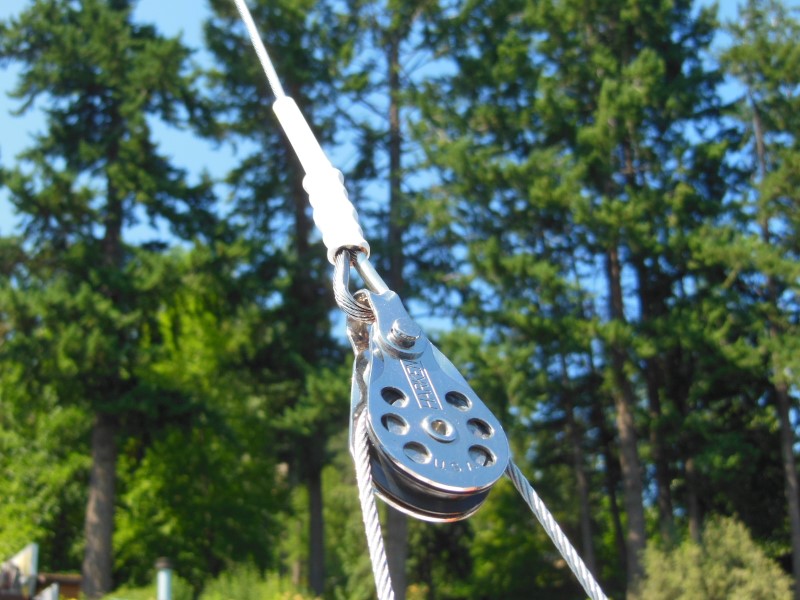
8. Reave the 10′ wire through the wire block and attach the wire block to the loose end of the 22′ wire like this:
9. Use a shackle to connect one end of the 10′ wire to the transom eye bolt on the opposite side (typically the starboard side) from where you want the adjuster cam cleat to be located (typically the port side).
10. Attach the double block with becket to the loose end of the 10′ wire like this:
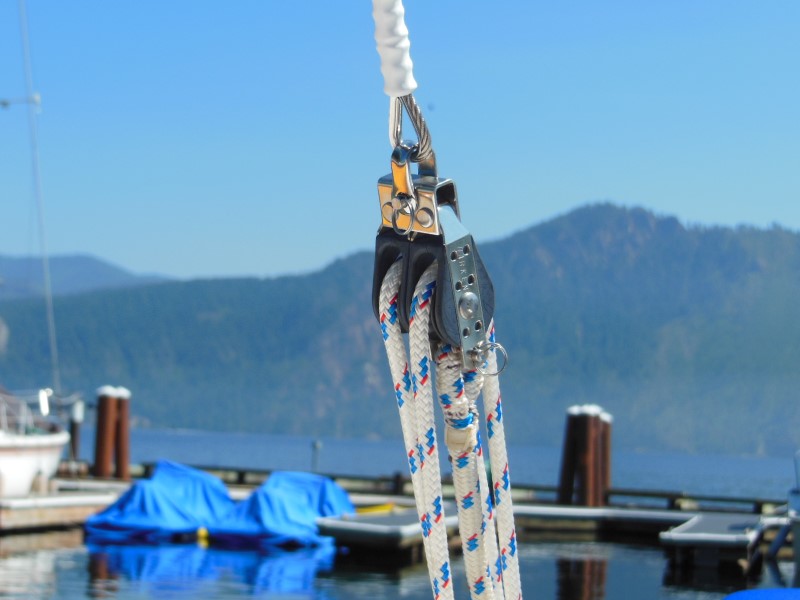
11. Reave the 1/4″ double braid line through the double and triple blocks.
Use a double luff reaving order like shown below.
Start from the becket on the double block, reave the line through the sheaves on one side of both blocks, through the opposite sides of both blocks in the opposite direction, and exit through the middle sheave of the triple block and the cam cleat. Do not spiral reave the line through the sheaves. Leave a long tail in the line until after the backstay is installed and the rig tuned.
12. Use a shackle to connect the triple block to the remaining eye bolt (typically on the port side) like this:
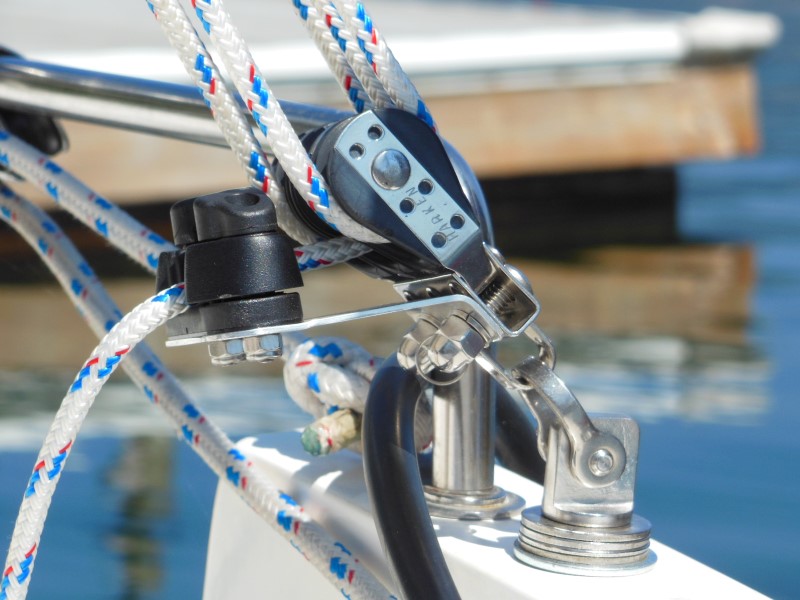
The completed installation should look like this:
13. With the adjuster slack, check the mast rake and prebend and the standing rigging tuning. If you’re not sure how, refer to the Catalina 22 Tuning Guide from North Sails. If you don’t have a tension gauge, consider purchasing one after you read How To Measure Standing Rigging Tension .
14. Tighten the adjuster just enough to take the slack out of the backstay and so that it won’t interfere with the boom when the mainsail is raised. This will be the minimum backstay tension setting.
15. Tie a stopper knot in front of the cam cleat to prevent the adjuster from being slackened any further.
16. Trim the excess adjuster line to leave about a 1′ tail. Tie another stopper knot on the end to give a better grip on the line.
17. Tighten the adjuster to 25% of the breaking strength of the main wire or the bridle wire, whichever is less . This should bend the top half of the mast aft a few inches. This will be the maximum backstay tension setting that you should not exceed.
For example, if the breaking load of the main wire is 1587 lbs and the breaking load of the bridle wire is 1350 lbs, calculate 25% of 1350 lbs, which is 337.5 lbs or a setting of 25 on a Loos PT1 tension gauge.
18. Mark the adjuster line in front of the cam cleat with a permanent marker. Do not tighten the adjuster beyond this mark when you are sailing.
Now go out and practice adjusting your new backstay in various wind conditions to optimize the headsail and mainsail shape and maximize your pointing ability and speed. When you’re done for the day, slacken the adjuster to the minimum setting.
Would you like to be notified when I publish more posts like this? Enter your email address below to subscribe to this blog and receive notifications of new posts by email. You will also receive occasional newsletters with exclusive info and deals only for subscribers and the password to the Downloads page. It’s free and you can unsubscribe at any time but almost nobody does!
Subscribe to Blog via Email
Enter your email address to subscribe to this blog and receive notifications of new posts by email.
Email Address:
Share this:
11 thoughts on “ upgrade your rig with a diy adjustable backstay ”.
Nice description of the why and how to add the direct backstay adjuster. If one doesn’t have a transom with the brass structure to mount to, I assume one would want to use the typical metal backplate when installing that eyebolt? Cheers, and thanks for some fresh inspiration to work on my project boat!
Yep, treat it just like you would a chain plate bolt because it’s doing much the same job.
I had an indirect system when I got my boat and it functioned (minimally) as you describe. I couldn’t tell any difference. Then I installed a system as you outline here. sailing on a close reach in light air and flat water, I could actually FEEL the boat accelerate as I eased the backstay and I could FEEL the boat slow down as the sails stalled when I tightened it up. I played with it for half hour like this just appreciating the noticeable difference from the “indirect” method I had previously uses. This is one of the best modifications you can make to your boat.
Thanks for sharing your experience, Mike!
Did your adjustable backstay make your quick release on the forestay and shrouds redundant?
Hello, Harry
No, I still use the levers with the adjustable backstay, especially on the forward lower shrouds. But I also tune my standing rigging a little tighter than normal for racing. I might be able to pin/unpin the forestay without a lever and the backstay relaxed but it wouldn’t be quick or easy.
Thanks for asking, $tingy
Hello, I have a few questions regarding adjustable backstay for C22. I am planing to replace rigging on my currently acquired Catalina 22 sport. Since I already have eye bolt installed in the port side, I think it would be good idea to install adjustable backstay, for two reasons: adjustment of back stay and better tension distribution (two bolts vs 1 bold). The only concern I have is safety, as you mentioned in your article (“The disadvantage of a direct system is that if any part of the adjuster breaks, the entire backstay can fail.”). So, is there risk that whole mast can fall or can aft shourds still hold the mast up? What is your recommendation for wire or strap to back up the adjuster in case of failure? Thank you.
I haven’t read any stories of adjustable backstays failing but that doesn’t mean there aren’t any, I just haven’t dug deep enough. My guess would be that a backstay failure would result in the mast folding forward above the lower shroud tangs. Assuming the standing rigging was in good condition otherwise, it would take a lot of wind to cause to cause it to fail and it would probably fail at a block or terminal. Sudden failure of the backstay would allow all of the load on the foresail to pull the top of the mast forward impeded only by the mainsail leech, main sheet, and possibly a vang. The upper and lower shrouds would likely survive and hold the bottom half of the mast in place. All this is speculation, of course, and the actual conditions would determine the result.
That said, I don’t have a safety strap on my adjustable backstay even though I do race my C-22 and occasionally sail in winds that can completely overpower it. But if I were to add one, I’d add a short length of wire rope on the static side of the adjuster with one end attached below the bridle block and the other end attached above the bridle block. I’d make it with no slack when the adjuster is at minimum tension. As the adjuster is tightened, the safety strap will slacken slightly and have the most slack when the backstay is at its tightest. Its purpose would not be to maintain tension on the backstay in case of a failure but simply to limit the masthead from springing forward and bending catastrophically. I wouldn’t use nylon webbing, which can deteriorate from UV exposure.
Hope that helps. Send me a picture of your sailboat if you would like to add it to the Readers Gallery. There aren’t any C-22 Sports there yet. $tingy
I purchased a Catalina Capri 26 about a year ago and have been thinking about upgrading to an adjustable backstay, that’s how I found your article and site which is very helpful. The current (non-adjustable) backstay runs diagonally from the masthead to a chainplate mounted to the transom (exterior – port side) about 18″ above the waterline. I was thinking of adding another chainplate same in the same area on the starboard side. But in order to have the adjusting sheet accessible to the cockpit I would need to reverse the configuration by attaching the Harken double block with becket down below at the chainplate and the Harken triple block with cam-cleat above near the skipper. Is that feasible and something that will work? I look forward to any advice you can offer and of course all your future articles!
Thanks, Kirk
I understand what you want to do but inverting the cam cleat block wouldn’t be very safe. The line tail would hang down and if a crew member or a fouled line accidentally pulled it downward, it could uncleat and unexpectedly slacken the backstay, which could damage the mast. Instead, consider leaving the tackle in the upright position and raise the whole assembly up with a short pendant or a long tang to where the skipper can reach it. Be sure every component in the system is rated to a working load at least equal to the backstay wire. However, I couldn’t find where anybody has done this before so you might be in uncharted territory and therefore I must recommend against it.
I do appreciate you getting back to me I had the same thought about a short pendant. I totally understand why you can’t (legally) endorse that but think I’m going to take a shot at it and make it as bullet proof as possible. Once again, thank you for your articles and I’m looking forward to several projects this winter as I really look forward to next Spring!
Leave a comment Cancel reply
This site uses Akismet to reduce spam. Learn how your comment data is processed .

- Already have a WordPress.com account? Log in now.
- Subscribe Subscribed
- Copy shortlink
- Report this content
- View post in Reader
- Manage subscriptions
- Collapse this bar
- All Courses
- RYA Start Yachting
- RYA Competent Crew
- Novice to RYA Day Skipper
- RYA Day Skipper Fastrack
- RYA Day Skipper Practical
- RYA ICC Flotilla Course
- Sailing Refresher
- RYA Coastal Skipper Combined
- RYA Coastal Skipper Practical
- RYA Yachtmaster Coastal
- RYA Yachtmaster Offshore
- All Adventures
- Mile Builders
- Gibraltar to Africa Weekend Adventure
- Round the Island Race
- KMT Sailing : Cultural adventures under sail
- All Yachtmaster Courses
- Professional Yachtmaster Fastrack program
- RYA Yachtmaster Theory
- Extended Yachtmaster Preparation
- Passage Making and YM Preparation Course
- Online Courses
- RYA Online Theory Course
- RYA Online VHF / SRC
- RYA PPR Online Course
- Yacht Charter Gibraltar
- Full Day Charter and Half Day Charters
- Frequently Asked Questions
- Joining Instructions
- Special Offers
- Gift Vouchers
- Pre Course Experience
- How to Get Here
- Why Choose Jolly Parrot
- Jolly Reviews
- Where We Sail
- Our Jolly Fleet
- Helping You Choose
- Where are the Parrots?
- Gibraltar Weather
- Sailing Glossary
- Jolly Links
- Terms & Conditions
- Photo Gallery
When to adjust the backstay and what it achieves
27 October 2020
Many of us will be aware that to trim our sailboat we have various options open to us. This includes sheets, halyard tension, car position , vang or kicker and traveller position. In addition, we can change a sail’s shape and efficiency by adjusting leech tension and create or reduce draft by adjusting the outhaul .
In addition to trimming sails using these control lines, racing boats in particular and smaller keelboats with limited capacity to reef will also rely on the backstay and cunningham in order to change the shape of the sail and power and depower the rig.
The backstay on many yachts is only adjustable by an experienced rigger and requires a deep knowledge of the subject. However, other vessels will have an adjustable backstay meant to be adjusted to suit conditions and point of sail. The adjustment might be by way of a simple pulley system, much like the main sheet mechanism. Other backstays may be hydraulic and they are operated by a pump and release valve. Larger cruising vessels might have an electrically powered backstay.
Adjusting the backstay will either increase the bend of the mast (backstay tension on) or decrease bend of the mast (backstay eased). It’s usual to ease backstay downwind and put on backstay tension when going upwind.
If one over tensions the backstay, it can have a significant effect on the boat, depowering the mainsail. This may well negate the need for a reef. Over-tensioning an adjustable backstay and/or easing or dumping the vang will significantly depower the boat.
Downwind, you would usually keep the vang under tension and ease the backstay although it’s important to realise that the primary purpose of the backstay is to brace the mast and stop it falling forward or breaking!
Fractionally rigged yachts (where the spreaders are spread back and the forestay does not go to the top of the mast) will usually have additional bracing in the form of a running backstay. These are used to help brace the mast below the masthead, where the forestay meets the mast or where an inner forestay might be used. Again, adjustment of the running backstay can alter mast bend and have an effect on boat speed.
Remember, when adjusting rig tension it’s important to release tension gradually so as not to create large ‘shock forces’ which will, over time, induce significant wear and tear to the rig.
Other Blog Articles
What is a saloon berth.
30 May 2024
Why learn to sail in Gibraltar?
The pros and cons of in-mast furling.
How Does Backstay Tension Affect Mainsail Trim?
February 6, 2018
If you have a mast that bends when you apply backstay tension, you have a powerful tool for controlling mainsail shape. Quantum’s Dave Flynn answers a sailor's question about how to use this tool and how it interacts with other sail controls.

As a follow-up to your article on mainsail twist/trim, what is the role of backstay tension on mainsail shape? - Richard G.
The way it works is simple. However, before we start, you need to get past the concept of the backstay simply pulling aft on the mast. In reality, much of the force is directed down towards the deck. The mast compresses under this tension. Imagine a straw that you set against a table and push down on. This is basically what is happening to your mast as you add backstay tension. Assuming you start with a little bit of pre-bend (mast bending forward at the middle), the compression induced by the backstay will increase the bend forward at the middle of the mast. This has a few of effects.
First, as the middle of the mast moves forward, the luff of the mainsail is pulled away from the leech. This flattens the sail just as pulling on the outhaul and moving the clew away from the tack flattens the foot of the sail. It just does it over a much larger area since the whole mast is moving forward to some extent. The more bendable the mast, the easier it is to add backstay tension and flatten (de-power) the sail. On many small boats which don’t have a backstay, pulling on the mainsheet has the same effect. Tensioning the mainsheet tensions the mainsail leech. The leech acts like a backstay to induce compression and mast bend. The boom vang can also help. Pulling on the vang pulls down on the boom to control leech tension, but it also forces the boom forward, pushing bend into the lower sections of the mast.
Second, when you compress the mast with the backstay, the head of the sail gets closer to the clew. This opens the leech of the mainsail which induces twist. Normally, whenever you add backstay you need to add mainsheet (or vang) to keep the twist the same, unless of course you want to depower even more by adding twist.
Finally, mast bend also shortens the distance between head and tack, making the luff go soft. You will see the telltale sign of horizontal wrinkles perpendicular to the mast appear as you add backstay. To compensate, add luff tension with either the halyard or cunningham. Conversely, when you ease the backstay, you need to remember to ease luff tension and ease the mainsheet or vang. It all goes together in an endless loop!
Make a point to study the cause and effect of the backstay and experiment with it in different conditions. As you master the dance, you will have a valuable tool to control mainsail shape.
The Discussion
This website uses cookies and collects usage statistics. Privacy Policy
Us, too. We pour that passion into each of our newsletters to help you enjoy sailing even more.
No products in the cart.
Sailing Ellidah is supported by our readers. Buying through our links may earn us an affiliate commission at no extra cost to you.
The Running Rigging On A Sailboat Explained
The running rigging on a sailboat consists of all the lines used to hoist, lower, and control the sails and sailing equipment. These lines usually have different colors and patterns to easily identify their function and location on the vessel.
Looking at the spaghetti of lines with different colors and patterns might get your head spinning. But don’t worry, it is actually pretty simple. Each line on a sailboat has a function, and you’ll often find labels describing them in the cockpit and on the mast.
In this guide, I’ll walk you through the functions of every component of the running rigging. We’ll also look at the hardware we use to operate it and get up to speed on some of the terminology.
The difference between standing rigging and running rigging
Sometimes things can get confusing as some of our nautical terms are used for multiple items depending on the context. Let me clarify just briefly:
The rig or rigging on a sailboat is a common term for two parts, the standing , and the running rigging.
- The standing rigging consists of wires supporting the mast on a sailboat and reinforcing the spars from the force of the sails when sailing. Check out my guide on standing rigging here!
- The running rigging consists of the halyards, sheets, and lines we use to hoist, lower, operate and control the sails on a sailboat which we will explore in this guide.
The components of the running rigging
Knowing the running rigging is an essential part of sailing, whether you are sailing a cruising boat or crewing on a large yacht. Different types of sailing vessels have different amounts of running rigging.
For example, a sloop rig has fewer lines than a ketch, which has multiple masts and requires a separate halyard, outhaul, and sheet for its mizzen sail. Similarly, a cutter rig needs another halyard and extra sheets for its additional headsail.
You can dive deeper and read more about Sloop rigs, Ketch Rigs, Cutter rigs, and many others here .
Take a look at this sailboat rigging diagram:
Lines are a type of rope with a smooth surface that works well on winches found on sailboats. They come in various styles and sizes and have different stretch capabilities.
Dyneema and other synthetic fibers have ultra-high tensile strength and low stretch. These high-performance lines last a long time, and I highly recommend them as a cruiser using them for my halyards.
A halyard is a line used to raise and lower the sail. It runs from the head of the sail to the masthead through a block and continues down to the deck. Running the halyard back to the cockpit is common, but many prefer to leave it on the mast.
Fun fact: Old traditional sailboats sometimes used a stainless steel wire attached to the head of the sail instead of a line!
Jib, Genoa, and Staysail Halyards
The halyard for the headsail is run through a block in front of the masthead. If your boat has a staysail, it needs a separate halyard. These lines are primarily untouched on vessels with a furling system except when you pack the sail away or back up. Commonly referred to as the jib halyard.
Spinnaker Halyard
A spinnaker halyard is basically the same as the main halyard but used to hoist and lower the spinnaker, gennaker, or parasailor.
The spinnaker halyard is also excellent for climbing up the front of the mast, hoisting the dinghy on deck, lifting the outboard, and many other things.
A sheet is a line you use to control and trim a sail to the angle of the wind . The mainsheet controls the angle of the mainsail and is attached between the boom and the mainsheet traveler . The two headsail sheets are connected to the sail’s clew (lower aft corner) and run back to each side of the cockpit.
These are control lines used to adjust the angle and tension of the sail. It is also the line used to unfurl a headsail on a furling system. Depending on what sail you are referring to, this can be the Genoa sheet , the Jib sheet , the Gennaker sheet , etc.
The outhaul is a line attached to the clew of the mainsail and used to adjust the foot tension. It works runs from the mainsail clew to the end of the boom and back to the mast. In many cases, back to the cockpit. On a boat with in-mast furling , this is the line you use to pull the sail out of the mast.
Topping lift
The topping lift is a line attached to the boom’s end and runs through the masthead and down to the deck or cockpit. It lifts and holds the boom and functions well as a spare main halyard. Some types of sailboat rigging don’t use a topping lift for their boom but a boom vang instead. Others have both!
Topping lifts can also be used to lift other spars.
A downhaul is a line used to lower with and typically used to haul the mainsail down when reefing and lowering the spinnaker and whisker poles. The downhaul can also control the tack of an asymmetrical spinnaker, gennaker, or parasailor.
Tweaker and Barber Haul
A tweaker is a line, often elastic, attached to the sheet of a headsail and used to fine-tune the tension on the sheet.
Barber haul
A barber haul is a line attached to a headsail’s sheet to adjust the sheeting angle to the wind. It is often used to pull the clew further toward the center or outboard than the cars allow.
Boom Preventer
A boom preventer is a line attached to the boom’s end when sailing off the wind. Its function is to hold the spar in place and prevent it from swinging wildly.
If the boat were to get an accidental gybe, it could cause serious damage to the rigging or even harm people on board. It is important for the rigger to be cautious when setting up the boom preventer.
Running Backstay
Running backstays is similar to a normal backstay but uses a line instead of a hydraulic tensioner. Some rigs have additional check stays or runners as well.
Bonus tip: Reefing
The term reefing is used when reducing the effective sailing area exposed to the wind of a given sail. Headsails are usually reefed by partially furling them in, and they often have marks for what we refer to as 1st, 2nd, and 3rd reefs.
The mainsail is reefed similarly with an in-mast furling or in-boom furling system.
On a traditional mast, we use a system called slab reefing. The system has reefing lines running through the boom to reinforced points on the luff and leech, allowing you to pull the sail down to the boom and effectively reduce the sail area.
Having at least two reefing points in the mainsail is normal, but most cruising sailboats have 3. The 3rd is used for the heaviest conditions, giving you only a tiny bit of sail area exposed to the wind.
You want to reef your sails before the wind increases to a point where your boat gets overpowered.
It is essential to practice your reefing technique . You will find yourself in situations with rapidly increasing winds where you need to reduce your sails quickly.
Rule of thumb: If you think setting a reef might be a good idea, do it.
Shaking a reef is the term used when we sail with a reefed sail and want to increase the sail area back to full.
Hardware used for sail handling and the running rigging
Furling system.
Most sailboats have their headsail on a furling system. A furling system is a tube that runs along the forestay from the bottom furler drum to the masthead swivel.
This system allows you to roll the headsail around the forestay, making furling the sail in and out accessible. It is also convenient when reefing the sail when the wind picks up, as you can easily do this from the safety of the cockpit. These furling systems come in manual versions and electric versions.
In-mast furling
In-mast furling is a system that rolls the mainsail in and out of the mast. To unfurl the mainsail, we use the outhaul .
In-boom furling
In-boom furling is a system that rolls the mainsail in and out of the boom. This system has been costly and has mostly been seen on big yachts earlier. They are becoming more affordable and common on smaller boats, though. To unfurl this setup, we use the main halyard.
A Stack pack is also called a Lazy Bag or Lazy Pack. It is a bag with a zip attached to the boom where the mainsail is stored when unused. It protects the mainsail from UV rays from the sun and weather elements. It is a very nice and tidy way to store the mainsail and reefing lines if you don’t have in-mast or in-boom furling.
Lazy Jacks is a system of lines running from the stack pack to the mast. The Lazy Jacks guide the mainsail up and down from the Stack Pack and prevent it from falling down on the deck. It is also possible to rig Lazy Jacks without a Stack Pack.
A block is a pulley with a sheave wheel. Blocks are used to change the direction of a pull on a line or rope and give a mechanical advantage. They have many uses, especially onboard sailboats.
A winch is a metal drum that gives you a mechanical advantage to control and tighten lines. These can be operated by turning a rope around it and pulling manually or by a winch handle to get more force. Most modern winches are self-tailing, which means they lock the line on so you can winch the line without holding on to it. Some boats even have electrical winches operated by a button.
Mainsheet Traveler
The mainsheet traveler is a horizontal track that the mainsheet is attached to through a series of blocks. The traveler enables you to adjust and lock the boom at an angle and also plays a critical part in trimming the mainsail.
Most cruising sailboats have their traveler attached to the top of the coachroof in front of the spray hood. A racing boat typically has the traveler in the cockpit near the helm to give the helmsman better control over the mainsheet.
The cars are basically a pulley or block attached to a track on the port and starboard deck that your headsail sheets run through. Cars are used to control the angle of the sheet between the clew and the deck. The cars are handy when you trim the sail to set the right balance of tension between the foot and leech, depending on your point of sail.
The jammer is used to lock a line in place. Most sailboats use these for locking the halyards, mainsheet, outhaul, reef lines, traveler lines, boom vang lines, etc. You can pull or winch a line through a closed jammer, but it won’t run away if you let go of it unless you open the lock.
As I explained earlier, it is normal to have most or all of the lines led back to the cockpit, and they are usually run through a series of jammers.
The jammers are often labeled with the name of the line it locks, which makes it easier to remember which line goes where.
Spinnaker Pole
A spinnaker pole is a spar used to wing out a headsail when sailing off the wind, particularly the spinnaker. The spinnaker pole should have the same length as the distance between the mast and the forestay measured along the deck. We use a fore and aft guy and the pole’s topping lift to rig a pole correctly.
The rigging varies depending on the layout of the boat, but it usually looks like this:
- One line runs from the bow to the end of the pole.
- An aft line runs from near the stern to the end of the pole.
- A topping lift is used to raise and lower the pole.
Whisker Pole
A whisker pole is similar to the spinnaker pole and is rigged similarly. It is typically built lighter and attached to a track on the mast. These can be found in fixed lengths or adjustable lengths. Ideally, the length should be the same as the foot of the headsail you intend to pole out.
Boom Vang/Rod Kicker
The Boom Vang has a few different names. Rod-kicker, kicking strap, or kicker. It is used to tension the boom downwards. When you are sailing downwind and have the boom far out, the mainsheet won’t pull the boom down as much as inboard, and you can then use the vang to adjust the twist and shape of the mainsail.
Mooring line
A mooring line is a traditional rope lead through a fairlead to the vessel’s cleat and a mooring buoy, key, or pontoon.
Final words
Congratulations! By now, you should have a much better understanding of how the running rig on a sailboat functions. We’ve covered the different lines, their purpose, and the hardware used to operate them. I hope you’ve enjoyed this guide and learned something new.
Now it’s time to take what you’ve learned and put it into practice by getting out on the water, setting sail, and getting hands-on experience with the lines.
Or you can continue to my following guide and learn more about the different types of sails .
Sharing is caring!
Skipper, Electrician and ROV Pilot
Robin is the founder and owner of Sailing Ellidah and has been living on his sailboat since 2019. He is currently on a journey to sail around the world and is passionate about writing his story and helpful content to inspire others who share his interest in sailing.
Leave a Reply Cancel reply
Your email address will not be published. Required fields are marked *
Standing Rigging (or ‘Name That Stay’)
Published by rigworks on november 19, 2019.
Question: When your riggers talk about standing rigging, they often use terms I don’t recognize. Can you break it down for me?
From the Rigger: Let’s play ‘Name that Stay’…

Forestay (1 or HS) – The forestay, or headstay, connects the mast to the front (bow) of the boat and keeps your mast from falling aft.
- Your forestay can be full length (masthead to deck) or fractional (1/8 to 1/4 from the top of the mast to the deck).
- Inner forestays, including staysail stays, solent stays and baby stays, connect to the mast below the main forestay and to the deck aft of the main forestay. Inner forestays allow you to hoist small inner headsails and/or provide additional stability to your rig.
Backstay (2 or BS) – The backstay runs from the mast to the back of the boat (transom) and is often adjustable to control forestay tension and the shape of the sails.
- A backstay can be either continuous (direct from mast to transom) or it may split in the lower section (7) with “legs” that ‘V’ out to the edges of the transom.
- Backstays often have hydraulic or manual tensioners built into them to increase forestay tension and bend the mast, which flattens your mainsail.
- Running backstays can be removable, adjustable, and provide additional support and tuning usually on fractional rigs. They run to the outer edges of the transom and are adjusted with each tack. The windward running back is in tension and the leeward is eased so as not to interfere with the boom and sails.
- Checkstays, useful on fractional rigs with bendy masts, are attached well below the backstay and provide aft tension to the mid panels of the mast to reduce mast bend and provide stabilization to reduce the mast from pumping.
Shrouds – Shrouds support the mast from side to side. Shrouds are either continuous or discontinuous .
Continuous rigging, common in production sailboats, means that each shroud (except the lowers) is a continuous piece of material that connects to the mast at some point, passes through the spreaders without terminating, and continues to the deck. There may be a number of continuous shrouds on your boat ( see Figure 1 ).
- Cap shrouds (3) , sometimes called uppers, extend from masthead to the chainplates at the deck.
- Intermediate shrouds (4) extend from mid-mast panel to deck.
- Lower shrouds extend from below the spreader-base to the chainplates. Fore- (5) and Aft-Lowers (6) connect to the deck either forward or aft of the cap shroud.
Discontinuous rigging, common on high performance sailboats, is a series of shorter lengths that terminate in tip cups at each spreader. The diameter of the wire/rod can be reduced in the upper sections where loads are lighter, reducing overall weight. These independent sections are referred to as V# and D# ( see Figure 2 ). For example, V1 is the lowest vertical shroud that extends from the deck to the outer tip of the first spreader. D1 is the lowest diagonal shroud that extends from the deck to the mast at the base of the first spreader. The highest section that extends from the upper spreader to the mast head may be labeled either V# or D#.
A sailboat’s standing rigging is generally built from wire rope, rod, or occasionally a super-strong synthetic fibered rope such as Dyneema ® , carbon fiber, kevlar or PBO.
- 1×19 316 grade stainless steel Wire Rope (1 group of 19 wires, very stiff with low stretch) is standard on most sailboats. Wire rope is sized/priced by its diameter which varies from boat to boat, 3/16” through 1/2″ being the most common range.
- 1×19 Compact Strand or Dyform wire, a more expensive alternative, is used to increase strength, reduce stretch, and minimize diameter on high performance boats such as catamarans. It is also the best alternative when replacing rod with wire.
- Rod rigging offers lower stretch, longer life expectancy, and higher breaking strength than wire. Unlike wire rope, rod is defined by its breaking strength, usually ranging from -10 to -40 (approx. 10k to 40k breaking strength), rather than diameter. So, for example, we refer to 7/16” wire (diameter) vs. -10 Rod (breaking strength).
- Composite Rigging is a popular option for racing boats. It offers comparable breaking strengths to wire and rod with a significant reduction in weight and often lower stretch.
Are your eyes crossing yet? This is probably enough for now, but stay tuned for our next ‘Ask the Rigger’. We will continue this discussion with some of the fittings/connections/hardware associated with your standing rigging.
Related Posts
Ask the Rigger
Do your masthead sheaves need replacing.
Question: My halyard is binding. What’s up? From the Rigger: Most boat owners do not climb their masts regularly, but our riggers spend a lot of time up there. And they often find badly damaged Read more…
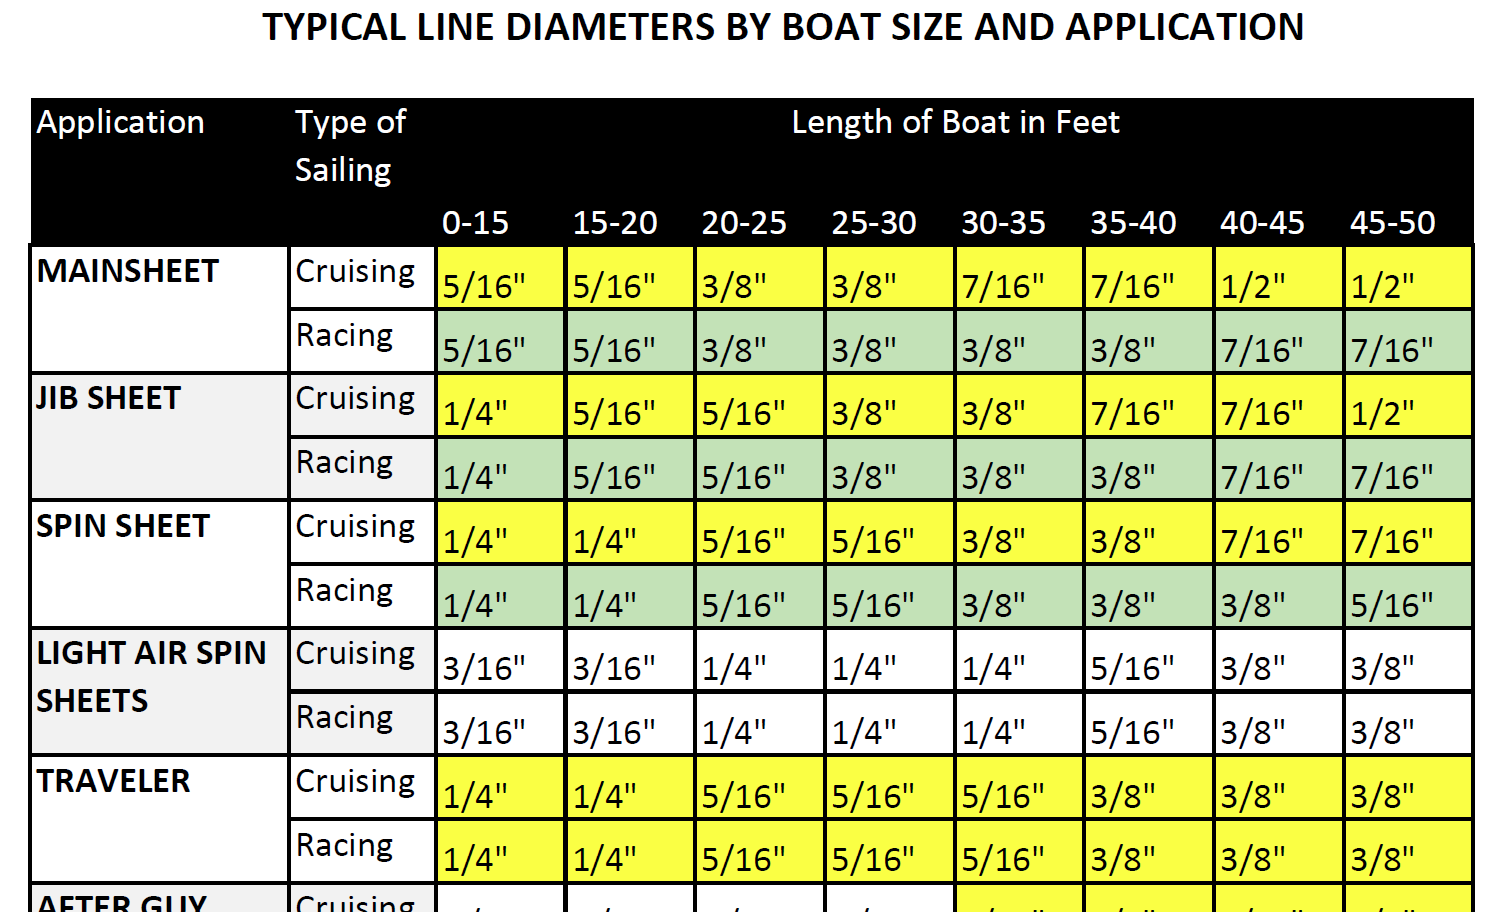
Selecting Rope – Length, Diameter, Type
Question: Do you have guidelines for selecting halyards, sheets, etc. for my sailboat? From the Rigger: First, if your old rope served its purpose but needs replacing, we recommend duplicating it as closely as possible Read more…
Spinlock Deckvest Maintenance
Question: What can I do to ensure that my Spinlock Deckvest is well-maintained and ready for the upcoming season? From the Rigger: We are so glad you asked! Deckvests need to be maintained so that Read more…
- BOAT OF THE YEAR
- Newsletters
- Sailboat Reviews
- Boating Safety
- Sails and Rigging
- Maintenance
- Sailing Totem
- Sailor & Galley
- Living Aboard
- Destinations
- Gear & Electronics
- Charter Resources
- Ultimate Boating Giveaway
Rigging Redo: Our Switch to Synthetic
- By Behan Gifford
- August 23, 2024

Updating the standing rigging on our Stevens 47, Totem , wasn’t an intentional part of the 40-year refit that we recently completed. We had re-rigged in 2019, anticipating our departure to the South Pacific in spring 2020. The pandemic scratched that, and we embarked on a significant refit in 2021 that instead left this rig on saw horses for a year and a half.
Putting the rig back up was among the last tasks during our extended stay at Cabrales Boatyard in Puerto Peñasco, Mexico. As we neared mast-stepping day in November 2023, my husband, Jamie, busted out his rigging kit. That’s how we refer to the 10X loupe that serves as the key for scrutinizing components at a level that human eyes just can’t do without magnification.
Some halyards showed age and wear, but we already knew this and had a replacement Dyneema/polyester double braid replacement line on hand. The one surprise? Totem ’s backstay.
Our Backstay’s Weak Link
New in 2019, the wire still looked fine, as did the swages. But two Sta-Lok insulators on the backstay —an assembly that enables that aft wire to be used as an antenna for single sideband radio—didn’t. Surface crazing on the black nylon portion of the insulators, which were added in 2008, suggested ultraviolet degradation.
During our 2019 rerig, we chose to reuse the backstay insulators. The fittings inspected well. Some people consider mechanical rigging terminals such as Sta-Lok, Hayn Hi-MOD and Norseman to be indefinitely reusable. They’re not. Jamie considers their lifespan at two rigging cycles (or about 20 years) maximum. Our old insulators met safe criteria, so we saved money by keeping them.
Still, we knew to look out for trouble. In the past few years, friends on two different cruising boats had rig failures due to broken insulators. Both crews practice good seamanship and don’t skimp on safety. Melissa White has written about losing the backstay on Galapagos (in her blog, Little Cunning Plan , and also in 48°N magazine ), three weeks into a passage from Hawaii to the Pacific Northwest. With only 500 nautical miles to Cape Flattery, Washington, their insulator snapped in half in the rolling swells of the North Pacific Ocean. They were in conditions that allowed them to stabilize the rig, and they altered course to a closer point of landfall.

The crew of Miles wasn’t so lucky: When their insulator failed, their rig came down . Never mind the fact that they’d had a rigging inspection only months before, and no faults had been found.
When they dismasted, they were in degrading conditions approximately 100 miles east of Eleuthera, Bahamas. In an admirable effort, they secured the wreckage and bashed overnight to the nearest safe harbor in San Salvador.
So, Jamie took another look at our setup last November, and he condemned Totem ’s insulator. The conclusion was easy, but the decision about next steps was not.

We were days from putting Totem back in the water, looking for a weather window to sail south. Five family members were flying to meet us in a bay 800 nautical miles south of the boatyard. Any delay in stepping would make us late for the family Christmas. Could we get to Puerto Vallarta with the existing backstay, or could the rig be compromised on our trip south?
And, in the time between putting insulators on the new rig in 2019 and wrapping an extensive refit in 2023, we had changed our stance on single sideband use. Once our only offshore communication, the hardware no longer earned a place on Totem because multiple satellite options are available today. Since we weren’t installing the SSB , we didn’t need new insulators. This opened options to consider in replacing the backstay.
One of those options was Dyneema, which is a strong, lightweight line made from synthetic ultra-high molecular weight polyethylene fibers. Dynex Dux is Dyneema that’s put through another cycle of heating and stretching to get every fiber in every yarn bundle to be exactly the same length. It’s lightweight, super strong and has virtually no stretch, making it a great alternative to wire for rigging.

We knew this because in 2008, Jamie had installed a Dynex Dux solent stay and inner forestay on Totem . He had also installed a Dux backstay on a friend’s boat in Puerto Rico in 2017, and loved the results.
With Totem now our focus, we reached out to Colligo Marine, the US distributor for Dynex Dux, rebranded as Colligo Dux . Colligo’s founder, co-owner and lead engineer, John Franta, helped us. Picking up the backstay became a perfect excuse for us to drive to Southern California for Thanksgiving with cousins. (Shipping into Mexico is fraught with issues.) Barely a week later, we were on our way back to Mexico with the new backstay in hand.
Shifting forward a few weeks, Totem was in Banderas Bay in time for family Christmas, after a conservative sail south with the old backstay in place. The new one was installed in the slip at Marina Riviera Nayarit. The hardest part of replacing the backstay with the mast up? Detaching and lowering the old backstay, because it was so heavy. The new stay was in place minutes later.

Wire vs. Synthetic Rigging
If Dux is so great, why didn’t we replace all of our standing rigging with it back in 2019?
Well, we did think about it. At the time, Jamie chose wire because of the cost of additional hardware necessary in the shift to synthetic rigging. We simply didn’t have the resources to consider the upgrade.
There are other considerations for a switch to synthetic rigging, too. They include abrasion, chafe, ultraviolet longevity and thermal expansion. Stainless steel wire has just as many issues and is harder to inspect well. Our new backstay was an easy choice this time around because of the weight savings, ease of installation and absence of chafe points.

We’re now getting ready to sail around 2,000 nautical miles from Hawaii to Micronesia. We aren’t sure yet if we’ll make landfall in Tarawa, Kiribati, or sail the slightly shorter distance to Majuro, Marshall Islands. Ideally, we can visit Tarawa first (it’s harder to get there later), but the weather will make the decision for us.
Meanwhile: Totem Talks will be on again before we sail west. For this next free livestream, we’ll have a circumnavigation roundtable with our friend and neighbor here in Hawaii, Dustin Reynolds . He didn’t just circumnavigate: Dustin holds a Guinness World Record for the first solo voyage around the world by a double amputee (arm and leg).Bring your voyaging questions, and sign up to be notified by email for the date of the livestream.
- More: DIY Projects , Hands-On Sailor , How To , rigging , Sailing Totem
- More How To

Grease the Wheels of Your Boat: A Guide to Proper Lubrication

A Bowsprit Reborn: A DIY Renovation Story

Top Tools for Sailboat Cruising: Must-Have Gear for 2024

Made for Shade: Cockpit Cover Options

Catalina Introduces the 6 Series

At Your Service

Galápagos: A Paradise Worth the Paperwork

Around Alone
- Digital Edition
- Customer Service
- Privacy Policy
- Terms of Use
- Email Newsletters
- Cruising World
- Sailing World
- Salt Water Sportsman
- Sport Fishing
- Wakeboarding
What is a Sailboat Stay?

A sailboat stay is a cable or line that supports the mast. Stays bear a significant portion of the mast load.
Stays are a significant part of a sailboat's standing rigging, and they're essential for safe sailing. Stays support the mast and bear the stress of the wind and the sails. Losing a stay is a serious problem at sea, which is why it's essential to keep your stays in good condition.
Table of contents
How to Identify Sailboat Stays
Sailboat stays connected to the top of the mast to the deck of the sailboat. Stays stabilize the mast in the forward and aft directions. Stays are typically mounted to the very front of the bow and the rearmost part of the stern.
Sailboat Forestay
The forestay connects the top of the mast to the bow of the boat. The forestay also serves an additional purpose—the jib sail luff mounts to the forestay. In fact, the jib is hoisted up and down the forestay as if it were a mast.
Boats equipped with roller furlings utilize spindles at the top and base of the forestay. The spindles rotate to furl and unfurl the jib. Roller furlings maintain the structural integrity of a standard forestay.
Sailboat Backstay
Backstays aren't as multifunctional as forestays. The backstay runs from the top of the mast (opposite the forestay) to the stern of the sailing vessel, and it balances the force exerted by the forestay. Together, the forestay and the backstay keep the mast upright under load.
Sailboat Stay vs. Shroud
Stays and shrouds are often confused, as they essentially do the same thing (just in different places). Stays are only located on the bow and stern of the vessel—that's fore and aft. Shrouds run from the port and starboard side of the hull or deck to the top of the mast.
Best Sailboat Stay Materials
Traditional sailboat stays were made of rope and organic line. These materials worked fine for thousands of years, and they still do today. However, rope has limitations that modern sailboat stays don't.
For one, traditional rope is organic and prone to decay. It also stretches, which can throw off the balance of the mast and cause serious problems. Other materials, such as stainless steel, are more ideal for the modern world.
Most modern fiberglass sailboats use stainless steel stays. Stainless stays are made of strong woven stainless steel cable, which resists corrosion and stress. Stainless cables are also easy to adjust.
Why are Stays Important?
Stays keep the mast from collapsing. Typical sailboats have lightweight hollow aluminum masts. Alone, these thin towering poles could never hope to withstand the stress of a fully-deployed sail plan. More often than not, unstayed masts of any material fail rapidly under sail.
When properly adjusted, stays transfer the force of the wind from the thin and fragile mast to the deck or the hull. They distribute the power of the wind over a wider area and onto materials that can handle it. The mast alone simply provides a tall place to attach the head of the sail, along with a bit of structural support.
Sailboat Chain Plates
Sailboat stays need a strong mounting point to handle the immense forces they endure. Stays mount to the deck on chainplates, which further distribute force to support the load.
Chainplates are heavy steel mounting brackets that typically come with two pieces. One plate mounts on top of the deck and connects to the stay. The other plate mounts on the underside of the deck directly beneath the top plate, and the two-bolt together.
Mast Stay Mounting
Stays mount to the mast in several ways depending on the vessel and the mast material. On aluminum masts, stays often mount to a type of chain plate called a "tang." A tang consists of a bracket and a hole for a connecting link. Aluminum masts also use simple U-bolts for mounting stays.
Wooden masts don't hold up to traditional brackets as well as aluminum. A simple u-bolt or flat bolt-on bracket might tear right out. As a result, wooden masts often use special collars with mounting rings on each side. These collars are typically made of brass or stainless steel.
Sailboat Stays on Common Rigs
Stays on a Bermuda-rigged sailboat are critical. Bermuda rigs use a triangular mainsail . Triangular sails spread their sail area vertically, which necessitates a tall mast.
Bermuda rig masts are often thin, hollow, and made of lightweight material like aluminum to avoid making the boat top-heavy. As a result, stays, and shrouds are of critical importance on a Bermuda rig.
Traditional gaff-rigged sail plans don't suffer as much from this issue. Gaff rigs use a four-pointed mainsail. This sail has a peak that's taller than the head and sometimes taller than the mast.
Gaff-rigged cutters, sloops, schooners, and other vessels use comparatively shorter and heavier masts, which are less likely to collapse under stress. These vessels still need stays and shrouds, but their stronger masts tend to be more forgiving in unlucky situations.
How to Adjust Sailboat Stays
Sailboat stays and shrouds must be checked and adjusted from time to time, as even the strongest stainless steel cable stretches out of spec. Sailboats must be in the water when adjusting stays. Here's the best way to keep the proper tension on your stays.
Loosen the Stays
Start by loosening the forestay and backstay. Try to do this evenly, as it'll reduce the stress on the mast. Locate the turnbuckles and loosen them carefully.
Match the Turnbuckle Threads
Before tightening the turnbuckle again, make sure the top and bottom threads protrude the same amount. This reduces the chance of failure and allows you to equally adjust the stay in both directions.
Center the Mast
Make sure the mast is centered on its own. If it's not, carefully take up the slack in the direction you want it to go. Once the mast is lined up properly, it's time to tighten both turnbuckles again.
Tighten the Turnbuckles
Tighten the turnbuckles as evenly as possible. Periodically monitor the direction of the mast and make sure you aren't pulling it too far in a single direction.
Determine the Proper Stay Pressure
This step is particularly important, as stays must be tightened within a specific pressure range to work properly. The tension on a sailboat stay ranges from a few hundred pounds to several tons, so it's essential to determine the correct number ahead of time. Use an adjuster to monitor the tension.
What to Do if you Lose a Stay
Thankfully, catastrophic stay and shroud failures are relatively rare at sea. Losing a mast stay is among the worst things that can happen on a sailboat, especially when far from shore.
The stay itself can snap with tremendous force and cause injury or damage. If it doesn't hurt anyone, it'll certainly put the mast at risk of collapsing. In fact, if you lose a stay, your mast will probably collapse if stressed.
However, many sailors who lost a forestay or backstay managed to keep their mast in one piece using a halyard. In the absence of a replacement stay, any strong rope can offer some level of protection against dismasting .
How to Prevent a Stay Failure
Maintenance and prevention is the best way to avoid a catastrophic stay failure. Generally speaking, the complete failure of a stay usually happens in hazardous weather conditions or when there's something seriously wrong with the boat.
Stays sometimes fail because of manufacturing defects, but it's often due to improper tension, stripped threads, or aging cable that hasn't been replaced. Regular maintenance can prevent most of these issues.
Check the chainplates regularly, as they can corrode quietly with little warning. The deck below the chainplates should also be inspected for signs of rot or water leakage.
When to Replace Standing Rigging
Replace your stays and shrouds at least once every ten years, and don't hesitate to do it sooner if you see any signs of corrosion or fraying. Having reliable standing rigging is always worth the added expense.
Choosing a high-quality stay cable is essential, as installing substandard stays is akin to playing with fire. Your boat will thank you for it, and it'll be easier to tune your stays for maximum performance.
Related Articles
Daniel Wade
I've personally had thousands of questions about sailing and sailboats over the years. As I learn and experience sailing, and the community, I share the answers that work and make sense to me, here on Life of Sailing.
by this author
Sailboat Parts
Learn About Sailboats
Most Recent

What Does "Sailing By The Lee" Mean?
October 3, 2023

The Best Sailing Schools And Programs: Reviews & Ratings
September 26, 2023
Important Legal Info
Lifeofsailing.com is a participant in the Amazon Services LLC Associates Program, an affiliate advertising program designed to provide a means for sites to earn advertising fees by advertising and linking to Amazon. This site also participates in other affiliate programs and is compensated for referring traffic and business to these companies.
Similar Posts

Affordable Sailboats You Can Build at Home
September 13, 2023

Best Small Sailboat Ornaments
September 12, 2023

Discover the Magic of Hydrofoil Sailboats
December 11, 2023
Popular Posts

Best Liveaboard Catamaran Sailboats
December 28, 2023

Can a Novice Sail Around the World?
Elizabeth O'Malley
June 15, 2022

4 Best Electric Outboard Motors

How Long Did It Take The Vikings To Sail To England?

10 Best Sailboat Brands (And Why)
December 20, 2023

7 Best Places To Liveaboard A Sailboat
Get the best sailing content.
Top Rated Posts
© 2024 Life of Sailing Email: [email protected] Address: 11816 Inwood Rd #3024 Dallas, TX 75244 Disclaimer Privacy Policy

- Forum Listing
- Marketplace
- Advanced Search
- About The Boat
- Gear & Maintenance
- SailNet is a forum community dedicated to Sailing enthusiasts. Come join the discussion about sailing, modifications, classifieds, troubleshooting, repairs, reviews, maintenance, and more!
Split back stay: pros and cons

- Add to quote
This is a bit theoretical issue at this point, but I will be facing it down the road, so please bear with me. When I finally buy a boat for an Atlantic crossing (most likely Bristol 34) I will be replacing the standing rigging and chainplates, as well as installing a windvane. It would make sense to install a split back stay at that time. But what are the pros and cons of a split back stay, besides easier access to windvane and higher cost? Your help is always greatly appreciated.

Seems to me disadvantages would be more potential points of failure, and ensuring new chainplates are adequate. Depending on cockpit layout the lower portions may interfere with helm seating positions where the original single did not. Advantages would include, as you've mentioned, improved vane access and simple, inexpensive tension adjustment options.
Hmmm... I would think that a split back stay would be stronger, as the loads get more distributed. Helm seating positions is a very good point. Can you elaborate on the tension adjustments?

From a structural view, there's really no true advantage for split backstays on a sloop, as running backstays are more 'versatile' in the function of applying additional 'helper' stress to the forestay; and, the runners are just as redundant as the second backstay. With two backstays its easier to overload and then break a forestay. For cutter rigs, the TWO backstays better 'react' with the two stays forward of the mast - forestay and headstay; although and again in that function, runners are better and more versatile in rigging 'stress' (sag) balancing - but this is in comparison to inefficient 'auxiliary stays' found on cutter rigs - IMO. I say that besides providing a redundant safety function, 'runners' have become my favorite stays for making micro-adjustments to rig tension and headsail (sag) shape while on-the-fly?

RichH said: From a structural view, there's really no true advantage for split backstays on a sloop, as running backstays are more 'versatile' in the function of applying additional 'helper' stress to the forestay; and, the runners are just as redundant as the second backstay. With two backstays its easier to overload and then break a forestay. For cutter rigs, the TWO backstays better 'react' with the two stays forward of the mast - forestay and headstay; although and again in that function, runners are better and more versatile in rigging 'stress' (sag) balancing - but this is in comparison to inefficient 'auxiliary stays' found on cutter rigs - IMO. I say that besides providing a redundant safety function, 'runners' have become my favorite stays for making micro-adjustments to rig tension and headsail (sag) shape while on-the-fly? Click to expand...
Great picture. Thanks. In real life is such tension adjustment a visual thing, or do you actually measure it? Yes, chainplate attachment would have to be done properly. I was thinking of using SS plates bolted to the hull on the outside. That part of the hull is usually quite thick and solid. I would most likely use a commercial rigger to do the whole thing.

Other common arraignment is block on backstay with 1x19 starting at one aft corner of boat,then going up through the block and down to other aft corner of boat. Usually you have a hydraulic ram at one of the inferior attachments to allow varied backstay tension. Usually over time you learn how to tension for different points of sail, different jibs, different wind speeds. Hydraulic ram is calibrated Boats are different. We have a masthead sloop with Solent. We have running back stays. The running backstays are never used except on passage. They are too much a PIA when tacking/gybing. They are used to tension inner for stay the Solent lives on when on passage or in storms or persistent strong winds to prevent mast pumping.
krisscross said: When I finally buy a boat for an Atlantic crossing (most likely Bristol 34) I will be replacing the standing rigging and chainplates, as well as installing a windvane. It would make sense to install a split back stay at that time. But what are the pros and cons of a split back stay, besides easier access to windvane and higher cost? Click to expand...
That makes a lot of sense, Jon. Much appreciated. No, I have not used a windvane before, so it is all a very important primer for me. The plan is for a crew of 2 and have an auto-pilot, but being able to use the self steering vane is high on my list.
Have lower portion of backstay split. Have had no issue with my SSB. In fact like connection to antenna ( upper portion of backstay) being above the Bimini . Think it's less likely to be messed with, is above the salt spray and in a protected spot. I'm with hypeer on this one. Perhaps if I had a fractional sloop or a square head main I'd feel differently. Think two full backstays create unnecessary windage and complexity. But perhaps belt and suspenders if both are spec'd to carry the full load. Think on masthead sloops having runners is good addition support for the stick, allow tensioning inner jib or Solent and prevent pumping. But on most cruising boats the stick is stiff, has required prebend and doesn't have winches dedicated for runners. We do set ours up when running in a fresh breeze or above and when the storm jib baby stay goes up for passage. Otherwise they sit by the shrouds ( have their own attachment point there). But if OP decides to not go with split backstay think he should still have some way to adjust tension of whatever backstay he ends up with. Losing ability to tension fore stay via backstay and flatten main with mast bend is too much to lose even for a cruiser.
Design,build install hyfield levers for running backs is a worthy addition and so easy to use or not use as conditions require. Most big gaffers use them as there is no backstay.
Excellent review Richmand much appreciated. One would further note when you apply additional backstay tension you increase tension on the head stay but decrease tension on the fore stay. This decreases sag if you are flying a genny but increases sag if you are flying the Solent. We have found it necessary to adjust stay tensions several times a year depending are where we are. We find putting in more tension in the Solent stay then the genny stay necessary wherever we are. Given constructed prebend and nature of shrouds this is not a problem. We do use runners to prevent pumping but also find when there are long boards we tension the runner to leeward just before a tack by hand. When it then becomes the windward after the tack and you ease the other one jib shape is good.
I'm wondering, based on these comments, and esp on a boat like the Outbound, whether adding a hydraulic adjuster to the solent wouldn't be a good way to tweak things depending on conditions..
Huge plus for the Solent is having a sail that is appropriately sized for winds common in trades and offshore. Makes less sense for boat to be used exclusively in coastal environs if overwhelmingly most common working sail is Genoa. Of course your basic premise is wrong as you would never fly the genny and Solent together except ddw on dual poles. We don't do that either using parasailor or wing and wing. But if we did pole both out when going ddw some sag is a good not bad thing on that point of sail. Solent make great sense for a cruising boat. We very rarely gybe the Genoa. If persistent light air fly parasailor. Upwind if short tacking fly the Solent as it's the front third doing most of the work lose very little and point wonderfully so vmg is excellent. Other big advantage of Solent is as center of effort shifts when wind speeds increase sail plan remains balanced. Decades ago it was thought cutter was ideal for cruising boat as centers of effort move toward mast as sail plan shorten. Now thought benefit of this thinking is not borne out. Rather Solent or scutter a la Shannons actually preferable. That's why for last twenty odd years variants of Solent most common on ocean boats even short handed racers. Finally when traveling unless the dinghy is going to be launched frequently ( meaning near daily) it lives on the fore deck. It's real easy to put it there with a Solent rig. Unless you have end of boom sheeting or a really large boat it's harder to do when that spot is gone. Don't like leaving dinghy on the davits except when coastal. Just curious have you ever cruised with a Solent rig. I've had cape dories and a Tayana with cutter rigs. I would never go back to a cutter from a Solent. If a rich uncle died and then I could afford Bobs services it would probably be another Solent although I'm started to rethink my opinion about the newest fractional rigged boats done right for ocean service not the rig you see on many current production boats.
Hi would note Bob is building four beautiful cutters which I would love to own. Think those boats are exceptional in many regards.
.... a nice 'evolution'. But I often wonder if the consideration STEEL vs. FIBERGLASS construction would be the way to go. Could someone recommend such a discussion? <gag>. :-o
- ?
- 176.4K members
Top Contributors this Month

By Product Categories
Small Boat Blocks
Big Boat Blocks
Complementary Hardware
Travelers & Genoa Leads
Mainsail Handling
Headsail Handling
Mooring Solutions
Spare Parts
Accessories
Harken Canvas
Sportfishing
Fly Soft-Attach Blocks
Carbo Air Blocks
Small Boat Classic
Flip-Flop Small Boat
GP Catamaran Ceramic Mainsheet Systems
Protexit™ Exit Blocks
Through-Deck
Wire High-Strength
Dinghy Vang
Small Boat Deck Organizers
Midrange Classic
Midrange Deck Organizers
Zircon Blocks
Element Blocks
Black Magic Air Blocks
Cruising ESP Blocks
Megayacht Blocks
Stainless Steel Blocks
Black Magic Air Runners
FlatWinder Powered Blocks
Mastbase Blocks
Over-the-Top
Crossover Blocks
Big Boat Deck Organizers
Cam Cleats & Kits
Cam Cleat Accessories
Cam Cleat Bases
Stand-Up Bases
Deck Organizers
Spinnaker Pole Cars
Soft Attachments
Fixed Padeyes
Removable Padeyes
Bolt-Down Fairleads
Grand Prix Jib Leads
Halyard Tensioners
Tiller Extensions
Peter's Desk Drawer
Dinghy Jib Leads
Crossbow Pivoting Self-Tacking Jib Traveler
13 mm Micro
22 mm Small Boat
27 mm Midrange
32 mm Big Boat
Windward Sheeting
42 mm Mini-Maxi
T-Track Genoa Lead
Access Rail System
13 mm AA Battcar System
22 mm A Battcar System
27 mm B Battcar System
32 mm C Battcar System
18 mm Switch Battcar System
26 mm Switch Battcar System
26 mm Trysail Switch
32 mm Switch Battcar System
32 mm Trysail Switch
40 mm Switch Battcar System
40 mm Trysail Switch System
Furling Mainsail Outhaul Systems
Single Line Reefing
Harken Vang-Master
Carbo Racing Foil
Small Boat Furling
Small Boat Underdeck
Reflex Furling
MKIV Jib Reefing & Furling
MKIV Underdeck Jib Reefing & Furling
Furling Accessories
Powered Furling
MKIV Ocean Furling
SnubbAir (Not a Winch)
Grand Prix Winches
Air Winches
Circuit Breakers
Analog Switches
Digital System Switch
Aluminum, Chrome & Bronze Winch Handles
Carbo OneTouch Locking Winch Handle
Service Kits
CLR Mooring Winches
Electric Captive Reel Winches
Hydraulic Captive Reel Winches
UniPower Radial
Single-Acting Integral Backstay Adjuster
Single-Acting Cylinders
Locking Cylinders
Double-Pull Cylinders
Grand Prix Cylinders
Hydraulic Cylinder Rod End Blocks
Hydraulic Cylinder End Fittings
Control Valves
Control Manifolds
Control Panels
Compact Control Panel
Rotary Pumps
Hydraulic Pump Handles
Power Systems
Repair Kits
Ball Bearings
Block Spare Parts
Traveler Cars
Furling Spare Parts
Winch Spare Parts
Winch Service Kits
Blockheads Gear
Promo & Gifts
Marine Grip
Blue Performance
Jeep/Truck tops
Garage storage
One-design Covers
Boat accessories
Canvas bags
By Type of Sailing
Dinghy / One-Design
Offshore Racing
Coastal / Day Cruising
Bluewater Cruising
Megayachts / Custom
Service Guide
Tech/Service
deck layouts
Data Sheets (SDS)
How to choose
System diagrams
Calculators
Reeving diagrams
Traveler Purchase Selection Guide
How to Choose
Testimonials
Hoister Videos
Request a Quote
Request Samples
Fabric details
Cover Styles
Canvas Videos
Contract Services
Materials and Components
Our Equipment
Contract Cut-and-Sew Project Spotlight
- Harken at the front
- Safety & Rescue
Support / Selection tools / System diagrams
Backstay Adjuster Systems
Backstay adjusters allow racers and cruisers to adjust and control mast rake and headstay tension. Adjusting the backstay shapes the main to optimize upwind and downwind performance. On racer/cruisers, tightening the backstay increases headstay tension for upwind sailing, while loosening the backstay offwind reduces weather helm. When selecting blocks or systems for backstays, make certain blocks match or exceed the wire or line breaking strength. Typical Boat Length: Small Boat: 22' - 28' (6.7 - 8.5 m) Midrange: 29' - 34' (8.8 - 10.4 m) Big Boat: 35' - 42' (10.7 - 12.8 m)
6:1 Right Angle
This simple 6:1 system is used on small cruising boats with a single line or wire backstay.

| Triple | — | — | ||
| Triple | — | — |
12:1 Cascaded
This cascading 2:1/6:1 system provides a 12:1 purchase and is used on small racer/cruisers and daysailers.

| Single | — | — | ||
| Triple | — | — | ||
| Triple | — | — |
4:1 Split Backstay
This 4:1 system is used on small keelboats with split backstay systems. Pinching the wires together tightens the backstay and increases headstay tension to flatten the genoa, decrease weather helm, and stabilize the rig in heavy air.

| Single | — | |||
| Fiddle | — | |||
| Fiddle | — |
8:1 Split Backstay
A more powerful version of the split backstay adjuster uses a doubling wire running through a wire block for a purchase of 8:1.

6:1 Double-ended Split
This double-ended split backstay system leads lines forward to cam cleats mounted just ahead of the helmsman so adjustments can be made from either side of the boat.

| Single | — | |||
| Single | — | |||
| Double | — | |||
| Stand-up | — | |||
| Cheek | — | |||
| Cam cleat | — |
Double-Acting Hydraulic Backstay Adjuster
These powerful systems deliver oil when the handle is pushed and pulled, delivering oil twice as fast as single-acting pumps—an excellent choice for racer/cruisers.

| Backstay adjuster | — | | |
Product Categories
- United States
- New Zealand
- United Kingdom

Lift. Launch.
Buy a Hoister on Harken.com. Get a free hat! Ends when we run out of free hats.
- Forums New posts Unanswered threads Register Top Posts Email
- What's new New posts New Posts (legacy) Latest activity New media
- Media New media New comments
- Boat Info Downloads Weekly Quiz Topic FAQ 10000boatnames.com
- Classifieds Sell Your Boat Used Gear for Sale
- Parts General Marine Parts Hunter Beneteau Catalina MacGregor Oday
- Help Terms of Use Monday Mail Subscribe Monday Mail Unsubscribe
Split vs Double Backstays
- Thread starter IslandJack
- Start date Mar 6, 2003
- Hunter Owner Forums
- Mid-Size Boats
The only stay on the rebuild Hunter 27 I'm working on, was the forestay. I'm within a week of stepping the mast and installing the rigging. Every similar Hunter I have looked at in person or by photo uses a split backstay. Since I'm starting fresh....and think a bit out of the box, I'm leaning toward double backstays - i.e. 2 backstays , each from the masthead to the jackplates. My reasoning is that it eliminates connections and that 3 stays would always outperform 2. I've tricked myself into such folly before so I'm asking for devils advocates on the subject. So far everyone seems to agree, and I have seen at least 1 mast on a big cat with double back stays. Other than weight - which is nominal, and aesthetics - which are not a concern, anyone see a flaw in my reasoning? IslandJack
Lower Split Allows Adjusting Tension Had a block and tackle on a split backstay on the H30 tall which allowed me to vary the tension on the backstay and hence the forestay. The block and tackle was on one side of the split that connected to a wire cable that ran through a single block on the end of the back stay and then down the other side. Not sure I am clear. There are other methods of providing tension with a lower split on your backstay. It was a decided advantage allowing me to tighten up the forestay by putting increased tension on the back stay, thus allowing me to point higher than I might with a slack forestay. I'll be interested in other answers to your question.
David Foster
Single backstay on our '77 model And we don't race, so tuning the main with the backstay is not a need. And this is certainly by far the most simple approach. None of the h27's I've seen on Lake Erie has a split backstay. I don't think that big, stiff aluminum mast is made for bending anyway. David Lady Lillie '77 h27
For the sake of discussion . . . Stiff masts don't bend, but they sure tip. . . and while one doesn't race, one does need some days to sail really close to the wind. Extra tension on the forestay by tipping the mast back via a backstay adjuster, did wonders for me. I would spend the few extra dollars and do it again.
Our 1989 H28 had a split backstay mainly... because of the walk through transom. I like the idea of an adjustable backstay because it allows you to trim the shape of the main in certain wind conditions. I'm not sure whether a double has any advantages over a split. Terry

Split Backstay w/ Adjuster Like dj mentioned there are other ways to adjust the backstay. One of these is the split backstay with pincer type block. Advantage of this setup over the double backstay is it provides a good location for the radar reflector just above the point where the split is. In order to mount the Davis reflector in the rain-catch position one has to mount it with some U-bolts to the stay which requires drilling some holes in the reflector. Also, if the split stays are long enough, there is a good location to mount a man-overboard pole. If the split stay is too long the pincer adjuster might not like to go "up" (when loosening the backstay) by itself but no problem, a small block where the split stays meet with a line from the pincer block to the deck would fix that.
Check Brion Toss forum I remember seeing a discussion by Brion Toss, a well-regarded rigger, on his rigging forum at www.briontoss.com He was very clearly against using double backstays, but I don't remember his reasoning. It made sense to me at the time, but it has been a while since I saw it. Check out his forum and go from there.
Found the Toss linkl Brett, great memory you have. It took some searching but I found the discussion. Toss says I am about to commit an evil act. I'll read further.... For anyone who is interested, I pasted the link here, and I gotta say the site has some great information on rigging!
Double back stays I did double back stays on my H-33 before I ever heard of Brion Toss. I read his article on the subject well sfter the fact and there were some good points, but as my sole reason for the doubles was comfort it made little difference. I made it through one season with the original split system and managed to hit my head and shoulders on it constantly. By going to the doubles they are now positioned about as well as they possibly can be. In the near future I'll set up a tackle system to make it adjustable.
How tall are you? Hey Sam, how tall are you? I was all the way swayed to splits till you threw in your 2 cents! I put a kicker on it and tried to get to my slip, mast down, and tried to envision how high to put the split. Looks like I'll need the local machine shop to make the 'Y' and I was thinking of putting it pretty high above my head, and follow the bend in the jackplate. The unforseen stress point on jackplates and rigging that Toss talked about made pretty good sense. Guess I'm a little gun shy, I lost a 36 foot mast before - jackplate pulled out of a hull.
- This site uses cookies to help personalise content, tailor your experience and to keep you logged in if you register. By continuing to use this site, you are consenting to our use of cookies. Accept Learn more…
IMAGES
VIDEO
COMMENTS
Learn how to set up and use running backstays, a removable stay that provides aft support to the mast, on your sailboat. Running backstays can improve the sail area, stability, and performance of your rig, especially in stormy conditions.
A backstay is a piece of standing rigging on a sailing vessel that runs from the mast to either its transom or rear quarter. Learn about the different types of backstays (permanent and running), their effects on sail trim and shape, and their uses as antennas or insulators.
Learn how to use the backstay to adjust the headstay sag, the mainsail shape and the heel and helm of your boat. Quantum Sails expert James Suggitt explains the backstay's role and tips for different rig types and conditions.
Learn how to adjust the backstay to reshape both the headsail and mainsail and control the power of your sail plan. Find out when to use the backstay, how to trim the mainsheet and traveler, and ...
Learn how to choose and install a backstay adjuster for your sailboat, whether you have a masthead or fractional rig. Compare hydraulic and mechanical adjusters, and their advantages and disadvantages.
Learn how to make a direct adjustable backstay system that affects the belly of both sails and improves performance in different wind conditions. See the benefits, disadvantages and materials of direct and indirect backstay designs.
Learn about the standing rigging on a sailboat, a system of wires that holds the mast upright and supports the spars. Find out the difference between forestay and backstay, how to adjust the tension, and what types of rigs and materials are used.
Learn how to adjust the backstay to drive the boat and keep it flat in changing wind conditions. The backstay is your gas pedal and helps you use the keel and rudder more effectively.
A running backstay is a rigging component on a sailboat that helps support the mast. Learn how it works, its functions, and its risks in different sailing conditions.
Learn how to set up the backstay and the headstay for optimal sailing performance. Find out the difference between fixed and adjustable backstays, and how to use them to control the mast rake and the helm.
Sailing Instructional Video. Discuss this video and anything sailing on my forum www.anything-sailing.com . A small video for beginners to explain how the b...
The backstay can change the bend of the mast and the shape of the sail by increasing or decreasing tension. Learn when and how to adjust the backstay depending on the point of sail, wind conditions and boat type.
Tensioning the mainsheet tensions the mainsail leech. The leech acts like a backstay to induce compression and mast bend. The boom vang can also help. Pulling on the vang pulls down on the boom to control leech tension, but it also forces the boom forward, pushing bend into the lower sections of the mast. Second, when you compress the mast with ...
Learn the functions and names of the lines, halyards, sheets, and other components of the running rigging on a sailboat. The outhaul is a line that adjusts the foot tension of the mainsail and can also be used to pull the sail out of the mast on a boat with in-mast furling.
Learn how to use running backstays to shape your mast and improve your sailing performance. Compare different types of levers, such as wire stay, highfield lever and prusik knot, and their advantages and disadvantages.
Learn the names and functions of the different parts of standing rigging on a sailboat, such as forestay, backstay, shrouds, and checkstays. Find out the differences between wire rope, rod, and composite rigging materials and their advantages and disadvantages.
Totem's boat cat Panchita reclines on the coiled Colligo backstay. Behan Gifford. We knew this because in 2008, Jamie had installed a Dynex Dux solent stay and inner forestay on Totem.He had also installed a Dux backstay on a friend's boat in Puerto Rico in 2017, and loved the results.
If you sail offshore in extreme conditions, a backstay becomes a much more important piece of equipment. Going through big waves, especially to weather, can result in a boat pitching and a mast that pumps (that's why some have baby stays), but it is not al that simple. There are a number of different kinds of masts and mast designs.
Sailboat Backstay. Backstays aren't as multifunctional as forestays. The backstay runs from the top of the mast (opposite the forestay) to the stern of the sailing vessel, and it balances the force exerted by the forestay. Together, the forestay and the backstay keep the mast upright under load. Sailboat Stay vs. Shroud
Learn how to adjust your standing rigging to hold the mast in the proper position and improve your sail shape. Find out the factors that affect the tension of your stays, such as aspect ratio, wind speed, and sail shape.
RichH. 5054 posts · Joined 2000. #5 · Sep 2, 2015. From a structural view, there's really no true advantage for split backstays on a sloop, as running backstays are more 'versatile' in the function of applying additional 'helper' stress to the forestay; and, the runners are just as redundant as the second backstay.
On racer/cruisers, tightening the backstay increases headstay tension for upwind sailing, while loosening the backstay offwind reduces weather helm. When selecting blocks or systems for backstays, make certain blocks match or exceed the wire or line breaking strength. Typical Boat Length: Small Boat: 22' - 28' (6.7 - 8.5 m)
Mar 6, 2003. #2. Lower Split Allows Adjusting Tension. Had a block and tackle on a split backstay on the H30 tall which allowed me to vary the tension on the backstay and hence the forestay. The block and tackle was on one side of the split that connected to a wire cable that ran through a single block on the end of the back stay and then down ...