
Chainplates
A couple quick notes:
- Use new 316 grade fasteners. Not the old ones you just took out!
- Buy new cotter pins.
- Tape traps salt and limits oxygen which promotes decay.
- Polish and freshwater extend the life of your investment.
- Re-bed your chain plates every 4-5 years.
- No silicone! the vinegar smell indicates a corrosive property stainless doesn’t like.
- We like Butyl, Uv 4000 and Sikaflex.
- Stainless hates detergents like dishwashing and laundry soaps as well as bleach!
Mack Yacht Services, Inc. we know chainplates
Not all Chainplate repairs are equal
- BOAT OF THE YEAR
- Newsletters
- Sailboat Reviews
- Boating Safety
- Sails and Rigging
- Maintenance
- Sailing Totem
- Sailor & Galley
- Living Aboard
- Destinations
- Gear & Electronics
- Charter Resources
- Ultimate Boating Giveaway
Chainplates 101: Inspect and Refit
- By Tom Zydler
- Updated: November 15, 2013
Corroded Chainplates
Out of sight and out of mind: For many sailors, that’s an apt description of their chainplates, the stainless-steel fittings protruding through the deck that anchor a mast’s standing rigging wires. In typical installations, the longer portion of a chainplate is hidden below deck in a locker, where it’s difficult to see or inspect. It’s no wonder that many sailors on the cusp of bluewater cruising focus on beefing up or replacing the standing rigging while assuming the chainplates will continue supporting the wires that keep the mast erect.
For safety and peace of mind, however, sailboat chainplates require attention and possibly upgrading. For example, many chainplates are too thin to grip clevis pins correctly. For a ½-inch turnbuckle with a ½-inch toggle, the chainplate should be at least ⅜ inch thick. For a ⅝-inch turnbuckle and toggle, a minimum thickness of ½ inch is necessary.
Another matter worthy of consideration is the stainless-steel alloy the boat’s chainplates are made of. Though 304 stainless is widely used, it’s prone to crevice corrosion when seawater seeps past bedding compounds and becomes stagnant on the metal, thus rendering it a poor choice for chainplates. (This also illustrates the danger of relying on sealants to protect from moisture chainplates that are led through the deck.) When polished to a high gloss, 316L stainless will survive much longer. Grade 2 titanium is ideal, though its high price makes it cost prohibitive for most yacht applications.
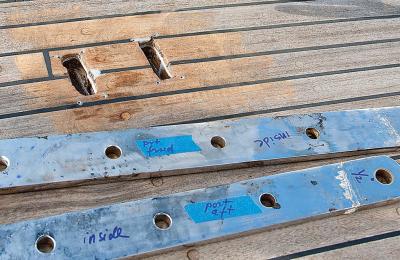
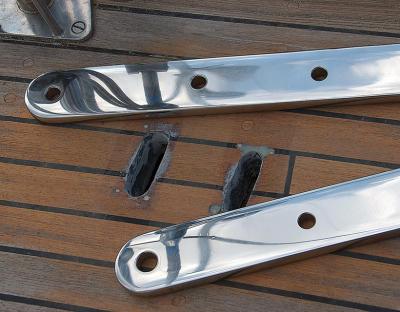
| |In this image, the damaged balsa core, which is typical in older classic-plastic production boats, is visible through the deck slots. Make sure to mark and identify the old chainplates before giving them to the fabricators. They will mark the new ones accordingly.| |

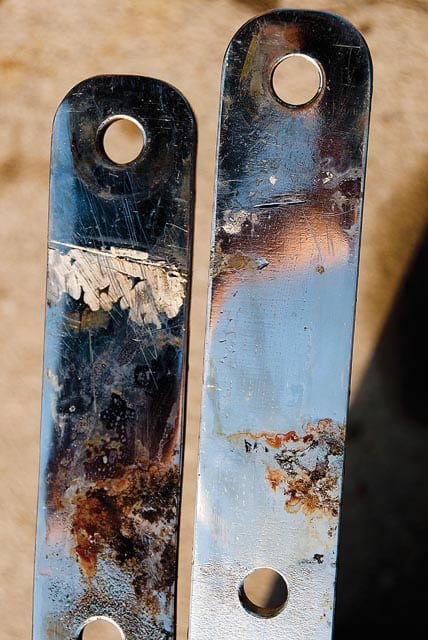
| |Three degrees of chainplate separation: the old chainplate (center), the new 316L bar stock (right) and the finished, polished, brand-new chainplate (left).| |
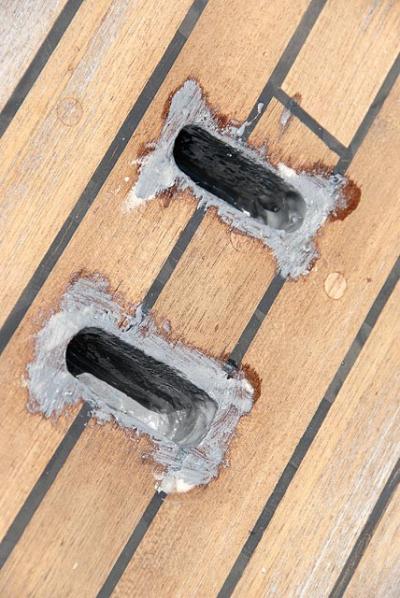
| |The real key to a chainplate replacement job will be how well you effect the repairs to the old balsa core and the deck slots. For my project, I cleared about an inch of balsa core from between the layers of deck laminate and rebuilt the area with thickened epoxy. This not only stiffened the deck, but also created a wall of solid epoxy that would protect the balsa from seawater in the event that the sealant broke down.| |
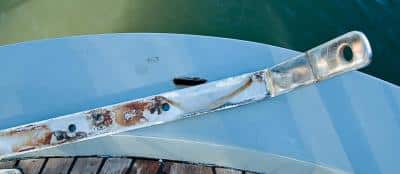
| |Once the backstay chainplate was pulled, it was clear how the corrosion started (where the metal was seated against the teak transom), and where water was trapped near the through-transom fasteners. I corrected this by enlarging the slot in the teak and inserting a rubber gasket where the new chainplate meets the transom.|
In any case, preventing seawater from leaking down the chainplates is essential. Boatbuilders routinely squeeze bedding compound between the deck and the chainplates before installing stainless cover plates. These screwed-in deck plates are supposed to compress the sealant around the chainplates. However, they are often too small to be effective, and furthermore, they embrace the chainplates so tightly they actually trap water in the worst possible location.
Thoughtful design and building practices would help prevent future problems. To maximize upwind tacking angles, racing boats often have chainplates installed well inboard, and these must be led through the deck. Since many owners of dual-purpose performance cruisers also use their boats for racing, many production sailboats have a similar arrangement for tight headsail sheeting. But even with a narrow rigging base, it’s possible to improve the chainplate installation. Some builders specify chainplates welded to a base that is then bolted through the deck onto a strong under-deck plate that’s sometimes backed by a tension rod. In such a setup the topside component can be sealed with a neoprene gasket, which is more effective than a bedding compound that can be squeezed out when the bolts are tightened. Also, this arrangement permits easy inspection of the fitting and its fasteners for smudges of rust, the first sign of creeping corrosion.
On cruising boats, it makes more sense to situate the chainplates outboard, on the outside of the hull. This provides a very wide, efficient base with longer spreaders and a wider angle between the shrouds and the mast, all of which reduces the loads on the rigging wire. The venerable Out Island series of boats designed by Charley Morgan has such chainplates, which are easy to inspect and reduce the risk of crevice corrosion. While they can still corrode on the underside where seawater can get trapped, their generous thickness provides a welcome safety factor.
All bolts holding chainplates require frequent inspections. Fashioned from 304 stainless alloy (also known as 18/8), the threads on these fasteners can collect saltwater and they can corrode quite easily. When sailmaker Dave Beatson began to remove some chainplate bolts on his Creekmore 34, half of the bolt heads fell off when he turned the wrench. So when we bought a 20-year-old Mason 44, I decided to pull out the chainplates to see what, if anything, was going on.
Ominously, I discovered that corrosion — some of which looked like the beginning of straight saw cuts — had begun to disintegrate the metal right where the chainplates vanished through the deck. And the backstay chainplate was losing metal below the deck where the bolts went through the transom. To address the situation, Peter Messenger, one of the most experienced riggers I know, advised using 316L stainless alloy for repairs. After cutting the material to size, he advised polishing it to high gloss. I ordered lengths of 316L bar in ½-inch and ⅝-inch thicknesses to match the size of the turnbuckle toggles for the lower and upper shrouds, respectively. (The original chainplates were much thinner and, while probably still strong enough, the clevis pins had a loose, sloppy fit. Also, the new bar stock I’d ordered was very slightly undersize, making it a perfect fit with the toggles.)
When effecting repairs or refits, ideally the deck area around the chainplates should be a solid glass laminate. It wasn’t on my Mason, which again is typical for most older production boats. So I cleared out about an inch of balsa core from between the layers of deck laminate and rebuilt the area with thickened epoxy. This stiffened the deck. Also, if the sealant broke down, the wall of solid epoxy would prevent seawater from soaking into the balsa and creating a permanent sponge bath, ensuring accelerated corrosion. To prevent future leaks, I discarded the slim stainless cover plates affixed to the original chainplates. Out of prefab fiberglass plate I then made larger cover plates with slots ½-inch wider than the chainplates.
This allowed a generous buildup of BoatLIFE polysulfide sealant. Before sealing, I wiped all metal parts with degreaser to remove any contaminants. When choosing a sealant, avoid the tenacious 3M 5200 polyurethane so beloved by certain boatyard workers because it hides bad workmanship. Plus, it takes days to set. Use 5200 only where you want the pieces to bond permanently. Although it slowly cracks when exposed to sunlight, you’d still need a heat gun and an iron will to remove it later.
| |The new, polished chainplates for the intermediate and upper shrouds are ready to go in.|To prevent future leaks, I discarded the original stainless cover plates for the original chainplates and replaced them with larger cover plates fabricated from prefab fiberglass sheets.|I bedded the new cover plates with a buildup of BoatLIFE polysulfide sealant.|
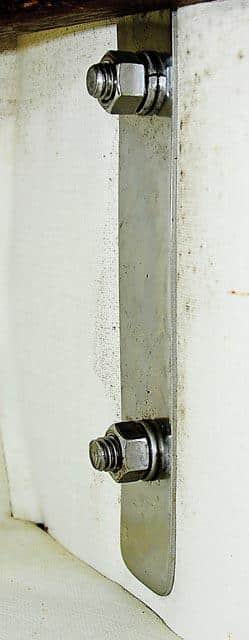
| |Belowdecks, the chainplate fasteners pass through a long 1/8-inch backing plate.| |
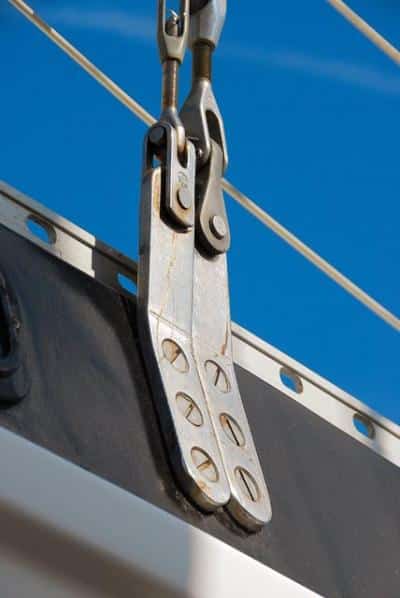
| |Outboard chainplates also work well. Note how the popular U-shaped toggle is beginning to corrode while the old forged bronze toggle is clean.|
Because I tackled the project with the keel-stepped mast still in place, I worked in stages. First I removed the chainplates servicing the lower shrouds; then I made a notation with a marker signifying their locations; finally I brought them to the fabricators to duplicate in the new material. In the calm waters of a protected marina, the upper and intermediate shrouds supported the mast adequately while I worked.
After the lower chainplates were reinstalled, I repeated the steps with the intermediates and then the upper shrouds. The backstay chainplate was the last to go back in: Tension on the mainsheet and the topping lift provided the mast with reasonable fore and aft support.
All this work boosted our confidence in the rig considerably. A month later, knowing our spar was suitably reinforced, we sailed north from Florida to Labrador.
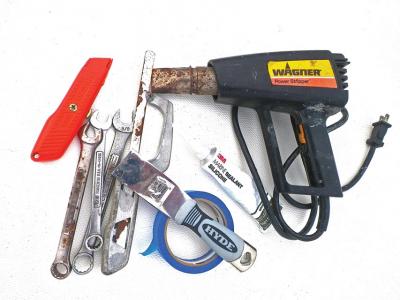
| | Tools for the Job • Wrenches to match and fit the fasteners • Heat gun to soften the old sealant around the chainplates • A narrow metal blade to cut through the sealant adhering to the chainplates • A 90-degree hook (homemade) to scrape balsa core out of the chainplate slots • Epoxy resin and hardener to build up the space left from removing balsa; plus West System 404 High-Density filler additive; a putty knife and gloves • Wide masking tape and duct tape to build up a “dam” that will prevent epoxy from dripping into the boat’s interior • Sandpaper from 40- to 60-grit to smooth out the cured epoxy • Polysulfide sealant and caulking gun • 1-inch-wide masking tape to protect the deck and the upper part of the chainplates from sealant leakage| |Longtime CW contributor Tom Zydler and his wife, Nancy, spent this summer exploring the coast of Labrador and surrounding waters aboard their Mason 44,_ Frances B_.|
- More: DIY Sailboat Projects , How To , sails & rigging
- More How To

Grease the Wheels of Your Boat: A Guide to Proper Lubrication

A Bowsprit Reborn: A DIY Renovation Story

Rigging Redo: Our Switch to Synthetic

Top Tools for Sailboat Cruising: Must-Have Gear for 2024

From Paradise to Medical Emergency: A Bahamas Nightmare Turns Lesson Learned

Free Medical Advice: The Unwarranted, Unprofessional Edition

Gatekeepers of the Waterway

- Digital Edition
- Customer Service
- Privacy Policy
- Terms of Use
- Email Newsletters
- Cruising World
- Sailing World
- Salt Water Sportsman
- Sport Fishing
- Wakeboarding
Please verify you are a human
Access to this page has been denied because we believe you are using automation tools to browse the website.
This may happen as a result of the following:
- Javascript is disabled or blocked by an extension (ad blockers for example)
- Your browser does not support cookies
Please make sure that Javascript and cookies are enabled on your browser and that you are not blocking them from loading.
Reference ID: d2598e8c-67b7-11ef-a65a-c9bd291ba077
Powered by PerimeterX , Inc.
| (001) 401-739-1140 -- (001) 401-739-1149 | |
| |
| are designed for use with Standard Chainplates made from rectangular bar or plate stock which protrude through the deck. Chainplate Covers fit over the Chainplate and are fastened to the deck to help protect against water intrusion as well as helping to restrict lateral movement. Most Chainplate Covers are made from Stainless Steel plate, are rectangular in shape, and fasten to the deck with 2 or 4 screws. are flared, or pushed up, around the slot where the Chainplate goes through to accommodate a greater amount of caulking underneath the Cover, and therefore a better seal. Chainplate Covers are also commonly used as a reinforcement for lock hasps on companionway boards. Chainplate Covers are available if nothing listed on-site is suitable; for a quote, please contact us with complete dimensions as listed in similar items. are listed below by the size of the Chainplates they fit. | |
| Special Cover Plate incorporates a smooth formed hook for use with Spinnaker Guys on dinghies. Formed Stainless Steel Chainplate Cover is 2 1/4" long x (maximum) 1 5/8" wide (7/8" wide at base) x 1" high x 1/16" (.072") thick, with slot 3/4" x 1/16". Attaches to deck with (2) #10 (3/16") screws on 1 5/8" centers. For use with Chainplates made from 3/4" wide stock that is 1/16" thick.
| |
| Stainless Steel Chainplate Cover is 2" long x 3/4" wide x 1/16" (.062") thick, with slot 13/16" x 3/32", and attaches to deck with (2) #10 (3/16") screws on 1 1/2" centers. For use with Chainplates made from 3/4" wide stock up to 3/32" thick.
| |
| Stainless Steel Chainplate Cover is 2" long x 3/4" wide x 1/16" (.062") thick, with slot 13/16" x 7/32", and attaches to deck with (2) #10 (3/16") screws on 1 1/2" centers. For use with Chainplates made from 3/4" wide stock up to 3/16" thick. * XXM
| |
| Stainless Steel Chainplate Cover is 2 1/4" long x 3/4" wide x 1/16" (.072") thick, with slot 1 1/32" x 1/8", and attaches to deck with (2) #10 (3/16") screws on 1 7/16" centers. For use with and other Chainplates made from 1" wide stock up to 1/8" thick. #r
|
|
| Stainless Steel Chainplate Cover is 2 5/8" long x 3/4" wide x 1/16" (.072") thick, with slot 1 1/32" x 5/32", and attaches to deck with (2) #8 (5/32") screws on 1 7/8" centers. For use with and other Chainplates made from 1" wide stock up to 5/32" thick.
| |
| Cover Plate for and other Chainplates made from 1" wide stock up to 5/32" thick. Formed Stainless Steel Chainplate Cover is 2 1/8" long x 1 5/16" wide x 1/16" (.072") thick, with slot 1 1/32" x 5/32", and attaches to deck with (4) #8 (5/32") screws on 1 5/8" and 13/16" centers. For use with and other Chainplates made from 1" wide stock up to 5/32" thick.
| |
| Special Cover Plate incorporates a smooth formed hook for use with Spinnaker Guys on smaller boats. Formed Stainless Steel Chainplate Cover is 2 1/4" long x (maximum) 1 5/8" wide (7/8" wide at base) x 1" high x 1/16" (.072") thick, with slot 1 1/32" x 5/32". Attaches to deck with (2) #10 (3/16") screws on 1 5/8" centers. For use with and other Chainplates made from 1" wide stock up to 5/32" thick.
| |
| Formed Stainless Steel Chainplate Cover is 2 9/16" long x 1 5/16" wide x 1/16" (.072") thick, with slot 1 9/32" x 5/32", and attaches to deck with (4) #8 (5/32") screws on 2 1/16" and 13/16" centers. For use with and other Chainplates made from 1 1/4" wide stock up to 5/32" thick.
| |
| Cover Plate for 1 1/4" x 1/8" Chainplate: CP 84-54MR: Large 2 7/8" OD Stainless Steel Chainplate Cover is 2 7/8" Round x 1/8" (.120") thick, with slot 1 1/4" x 1/8", and attaches to deck with (4) #10 (3/16") screws on 1 3/8" and 15/16" centers. For use with and other Chainplates made from 1 1/4" wide stock up to 1/8" thick.
| |
| Stainless Steel Chainplate Cover is 2 13/16" long x 3/4" wide x 1/16" (.062") thick, with slot 1 9/32" x 7/32", and attaches to deck with (2) #10 (3/16") RH screws on 2" centers. For use with Chainplates made from 1 1/4" wide stock up to 7/32" thick.
|
|
| Stainless Steel Chainplate Cover is 2 3/4" long x 3/4" wide x 1/16" (.062") thick, with slot 1 9/32" x 7/32", and attaches to deck with (2) #10 (3/16") FH screws on 2 1/16" centers. For use with Chainplates made from 1 1/4" wide stock up to 7/32" thick.
| |
| Heavy Stainless Steel Chainplate Cover is 2 1/2" long x 1 3/8" wide x 1/8" (.120") thick, with slot 1 1/4" x 1/4", and attaches to deck with (4) #10 (3/16") screws on 2" and 7/8" centers. For use with Chainplates made from 1 1/4" wide stock up to 1/4" thick.
|
|
| Stainless Steel Chainplate Cover is 3" long x 3/4" wide x 1/16" (.062") thick, with slot 1 1/2" x 1/8", and attaches to deck with (2) #10 (3/16") screws on 2 3/16" centers. For use with Chainplates made from 1 1/2" wide stock up to 1/8" thick. #r
|
|
| Stainless Steel Chainplate Cover is 3 1/4" long x 3/4" wide x 1/16" (.062") thick, with slot 1 9/16" x 5/32", and attaches to deck with (2) #8 (5/32") screws on 2 1/2" centers. For use with Chainplates made from 1 1/2" wide stock up to 5/32" thick.
| |
| Formed Stainless Steel Chainplate Cover is 2 9/16" long x 1 5/16" wide x 1/16" (.072") thick, with slot 1 9/16" x 9/32", and attaches to deck with (4) #8 (5/32") screws on 2 1/16" and 13/16" centers. For use with and other Chainplates made from 1 1/2" wide stock up to 9/32" thick.
| |
| Formed Stainless Steel Chainplate Cover is 2 9/16" long x 1 5/16" wide x 1/16" (.072") thick, with slot 1 17/32" x 13/32", and attaches to deck with (4) #8 (5/32") screws on 2 1/16" and 13/16" centers. For use with and other Chainplates made from 1 1/2" wide stock up to 13/32" thick.
| |
| Stainless Steel Chainplate Cover is 3 3/8" long x 3/4" wide x 1/16" thick, with slot 2" x 1/8", and attaches to deck with (2) #10 (3/16") screws on 2 13/16" centers. For use with Chainplates made from 2" wide stock up to 3/16" thick. and others.
| |
| Stainless Steel Chainplate Cover is 3 1/2" long x 1 1/4" wide, with slot 2" x 7/32", and attaches to deck with (2) #10 (3/16") screws on 2 13/16" centers. For use with Chainplates made from 2" wide stock up to 3/16" thick. and others.
| |
| Formed Stainless Steel Chainplate Cover is 3 1/2" long x 1 1/4" wide x .072" thick, with slot 2" x 7/32", and attaches to deck with (2) #10 (3/16") screws on 2 13/16" centers. For use with Chainplates made from 2" wide stock up to 3/16" thick. and others.
| |
| Heavy Stainless Steel Chainplate Cover is 2 3/4" long x 1 1/2" wide x 1/8" (.120") thick, with slot 2" x 1/4", and attaches to deck with (4) #10 (3/16") screws on 2 1/4" and 1" centers. For use with Chainplates made from 2" wide stock up to 1/4" thick.
| |
| Formed Stainless Steel Chainplate Cover is 3 7/16" long x 1 5/16" wide x 1/16" (.072") thick, with slot 2 7/16" x 7/32", and attaches to deck with (4) #8 (5/32") screws on 2 15/16" and 13/16" centers. For use with Chainplates made from 2 1/8" wide stock up to 7/32" thick. *
| |
| Heavy Stainless Steel Chainplate Cover is 3" long x 1 1/2" wide x 1/8" (.120") thick, with slot 2 1/4" x 1/4", and attaches to deck with (4) #10 (3/16") screws on 2 1/2" and 1" centers. For use with Chainplates made from 2 1/4" wide stock up to 1/4" thick.
| |
| Heavy Stainless Steel Chainplate Cover is 3" long x 1 3/4" wide x 1/8" (.120") thick, with slot 2 1/4" x 5/16", and attaches to deck with (4) #10 (3/16") screws on 2 1/2" and 1 1/4" centers. For use with Chainplates made from 2 1/4" wide stock up to 5/16" thick.
| |
| Heavy Stainless Steel Chainplate Cover is 3" long x 2" wide x 1/8" (.120") thick, with slot 2 1/4" x 7/16", and attaches to deck with (4) #10 (3/16") screws on 2 1/2" and 1 1/2" centers. For use with Chainplates made from 2 1/4" wide stock up to 7/16" thick.
| |
| Heavy Stainless Steel Chainplate Cover is 3" long x 2" wide x 1/8" (.120") thick, with slot 2 1/4" x 1/2", and attaches to deck with (4) #10 (3/16") screws on 2 1/2" and 1 1/2" centers. For use with Chainplates made from 2 1/4" wide stock up to 1/2" thick.
| |
| Formed Stainless Steel Chainplate Cover is 3 7/16" long x 1 5/16" wide x 1/16" (.072") thick, with slot 2 7/16" x 7/32", and attaches to deck with (4) #8 (5/32") screws on 2 15/16" and 13/16" centers. For use with Chainplates made from 2 3/8" wide stock up to 7/32" thick. *
| |
| Stainless Steel Chainplate Cover is 3 1/2" long x 1 9/16" wide x 3/32" thick, with slot 2 5/8" x 7/32", and attaches to deck with (4) #10 (3/16") screws on 2 1/8" and 15/16" centers. For use with , and other Chainplates made from 2 1/2" x 3/16" stock. , and others.
| |
| Heavy Stainless Steel Chainplate Cover has slot 2 1/2" x 1/4", and attaches to deck with (4) #10 (3/16") screws. For use with Chainplates made from 2 1/2" wide stock up to 1/4" thick. and others.
| |
| Heavy Stainless Steel Chainplate Cover is 4" long x 2 3/8" wide x 3/16" thick, with slot 2 1/2" x 3/8", and attaches to deck with (4) #10 (3/16") screws on 3 3/8" and 1 3/4" centers. For use with Chainplates made from 2 1/2" wide stock up to 3/8" thick.
| |
| Formed Stainless Steel Chainplate Cover is 4 1/2" long x 2" wide x 1/16" (.072") thick, with slot 2 5/8" x 1/2", and attaches to deck with (4) #10 (3/16") screws on 4" and 1 1/2" centers. For use with Chainplates made from 2 1/2" wide stock up to 1/2" thick.
| |
| Heavy Stainless Steel Chainplate Cover is 4" long x 2 3/8" wide x 3/16" thick, with slot 2 1/2" x 5/8", and attaches to deck with (4) #10 (3/16") screws on 3 3/8" and 1 3/4" centers. For use with Chainplates made from 2 1/2" wide stock up to 5/8" thick.
| |
| Stainless Steel Chainplate Cover is 4" long x 1 1/4" wide x 1/8" thick, with slot 3" x 5/16", and attaches to deck with (4) #10 (3/16") screws on 3 9/16" and 13/16" centers. , and others. | |
~ Back to Chainplates Main Page ~

Featured on
Diy chainplates.
What goes up must come down, they say, and while true of my mood for the majority of time the old adage best not apply to my mast. So, strong chainplates are most certainly in order! Eventually all chainplates, stays, and turnbuckles will be replaced, but I decided to start with the backstay chain plates because they were horrendously undersized, and attached to the hull with only one bolt and a screw.
The side stays are glassed in (whyyyyyyyyy) and the forestay is attached with a pretty strong stainless steel cranse iron. I think bronze is stronger and better than stainless for attaching the forestay and would never go to sea with glassed in chainplates from 1971, but the back stay chainplates were by far the sketchiest so they were first in line.
While the industry standard promotes stainless steel, bronze literally lasts forever. I guess that’s why yachting went in that direction, so the industry could make more money from us by flooding the market with something shiny that needs to be replaced every 10-15 years due to crevice corrosion. On top of that, stainless steel is much harder to work with. It requires a drill press to drill holes, proper tools to polish, and has an involved annealing process to the metal before and after making a bend. That’s why riggers charge upwards of $100 per chainplate for small sailboats. Plus, you can never know if the material is still good years later without a fucking x-ray machine. Again, bring in the rigger!
Stainless steel was not the right material for both long and short term self sufficiency.
We went with flat bar silicon bronze, a quarter of an inch by two inches. Overkill? Maybe. It was more than sufficient in size, especially when compared to its predecessor. We measured the angle of the bend using a wire and built a fire out of charcoal. We stuck the bronze into the fire until the end we intended to bend was glowing, then we cooled it down in a bucket of sea water and made our first bend which was very slight. We annealed again, cooled, and bent little by little until we reached the angle needed. The annealing process made the bending easier and strengthened the metal after we had literally stretched its innards.
Of course, something had to go wrong. Up until then the process had been relatively painless. Because the turnbuckles and rigging cable are also going to be replaced in the not so distant future, the chainplate had to be sized for a bigger turnbuckle. This meant the current turnbuckle wouldn’t fit, so we fastened the present turnbuckles to large shackles first, and then to the chainplates as a temporary solution.
On the mission to town to get another shackle we stopped by a used marine/antique store that’s only open one day per week for four hours. It was an hour past closing time but the doors were still open. That morning I’d lamented for hours wondering how I was going to get the larger, bronze turnbuckles I’d need for re rigging. The situation was seeming absolutely fruitless with astronomically expensive prices (both new and on Ebay) until we walked into this shop and bought these turnbuckles for three dollars a piece!
The owner of the shop recognized us from the creek we were anchored in where he happens to live. He complimented Sohund’s lines and was interested to hear about this Danish built sea dog. We didn’t have enough cash on us to pay but he let us take the turnbuckles anyway, and we rowed to his house later with the funds after we had finished installing our new backstay chainplates!

Emily, Nice job on the chain plates. I grew up sailing a similiar boat, a 1965 Kim Holman designed ‘North sea 24’ , larger predecessor to his Twister. Great boat kept us very safe and great sailer. Great score with the bronze turnbuckles too! Cheers warren

Sounds like a very cool boat I will look it up! Thanks for reading.
- New Sailboats
- Sailboats 21-30ft
- Sailboats 31-35ft
- Sailboats 36-40ft
- Sailboats Over 40ft
- Sailboats Under 21feet
- used_sailboats
- Apps and Computer Programs
- Communications
- Fishfinders
- Handheld Electronics
- Plotters MFDS Rradar
- Wind, Speed & Depth Instruments
- Anchoring Mooring
- Running Rigging
- Sails Canvas
- Standing Rigging
- Diesel Engines
- Off Grid Energy
- Cleaning Waxing
- DIY Projects
- Repair, Tools & Materials
- Spare Parts
- Tools & Gadgets
- Cabin Comfort
- Ventilation
- Footwear Apparel
- Foul Weather Gear
- Mailport & PS Advisor
- Inside Practical Sailor Blog
- Activate My Web Access
- Reset Password
- Customer Service

- Free Newsletter
Ericson 41 Used Boat Review

Mason 33 Used Boat Review

Beneteau 311, Catalina 310 and Hunter 326 Used Boat Comparison

Maine Cat 41 Used Boat Review

Tips From A First “Sail” on the ICW

Tillerpilot Tips and Safety Cautions

Best Crimpers and Strippers for Fixing Marine Electrical Connectors

Thinking Through a Solar Power Installation

Getting the Most Out of Older Sails

How (Not) to Tie Your Boat to a Dock

Stopping Mainsheet Twist

Working with High-Tech Ropes
Fuel Lift Pump: Easy DIY Diesel Fuel System Diagnostic and Repair

Ensuring Safe Shorepower

Sinking? Check Your Stuffing Box

The Rain Catcher’s Guide

Boat Repairs for the Technically Illiterate

Boat Maintenance for the Technically Illiterate: Part 1

Whats the Best Way to Restore Clear Plastic Windows?

Mastering Precision Drilling: How to Use Drill Guides

Giving Bugs the Big Goodbye

Galley Gadgets for the Cruising Sailor

Those Extras you Don’t Need But Love to Have

UV Clothing: Is It Worth the Hype?

Preparing Yourself for Solo Sailing

How to Select Crew for a Passage or Delivery

Preparing A Boat to Sail Solo

On Watch: This 60-Year-Old Hinckley Pilot 35 is Also a Working…

On Watch: America’s Cup

On Watch: All Eyes on Europe Sail Racing

Dear Readers

Chafe Protection for Dock Lines
- Sails, Rigging & Deck Gear
Chainplates Revisited
Chainplate failures aren't common, but when one occurred on a new boat during its inaugural sail—with our reviewer aboard—we knew it was time to investigate. here's the result of our initial probing..

Following our review of the new J/133 (PS Oct. 1, ’04), in which we recounted a chainplate failure aboard hull No. 3 on its maiden voyage, a reader’s letter prompted us to review the manner in which manufacturers design and construct the critical connections between mast, shrouds, and a boat’s structure. In the case of the J/133, we concluded that the construction method—a contemporary yet time-tested approach—was properly conceived, but poorly executed.
The folks at J/Boats declined to offer specific comments, but the boat’s builder—Pearson Composites, LLC (formerly TPI)—told us that ours was a fair assessment of the situation. (More on that later.)
Nonetheless, the issue of chainplate construction and rig attachment demands further examination, particularly for the owners of older boats whose vessels may be susceptible to chainplate failure.
Like the human anatomy, which is supported by a series of bones connected at joints (“head bone connected to the neck bone, neck bone connected to the shoulder bone”), a sailboat’s standing rigging reflects many similar connections. At one end of any stayed rig, the head of the mast is supported by stays and shrouds that in most cases disappear belowdecks to connect to a metal, wood, or fiberglass section that itself is attached to a bulkhead, the hull’s topsides or bottom, or an interior grid system.
With any rig, contrary forces are at work. At the masthead, tensioned shrouds pulling chainplates upward from a grid in the bottom of the hull, for instance, are at the same time pushing the butt of the mast, or a compression post, in the opposite direction. Consider that the headstay and backstay are pulling the bow and stern upward, and the conflicting forces on the entire structure are enormous.
“The static pressure on the hull of the Santa Cruz 70 produced by the mast, with the boat sitting static at a dock, is approximately 28,000 pounds,” explained Lance Brown, president of Santa Cruz Yachts. Given that, it’s no surprise that America’s Cup boats, which take advantage of every weight-saving method available, often have major failures.
Creating a proper set of connectors, then, requires that designer, engineer, boatbuilder, and rigging specialist each scientifically calculate the loads that will act on the sails in wind and sea, and the loadbearing capacity of the standing rigging, which will ultimately determine the lamination schedule for chainplates or the appropriate strength characteristics of whatever material is used to fabricate these critical connectors.
Ty Goss, of the custom sales division at Navtec, told us that “Once the loads on rigging and turnbuckles are determined, our prototypes are tested by running fatigue tests.
“We will load a turnbuckle to its breaking strength and stress it 120,000 to 200,000 times (1.4 times its projected life expectancy) in 15-second cycles. If it doesn’t break, we know we have the right product.”
On older boats, chainplates were often fashioned from necessary, but unsightly, metal straps attached to the exterior. Unless an owner diligently polished them, the straps or their fittings typically rusted, which produced blemishes on the topsides. These same rust lines, however, could provide an owner with visible evidence of the potential deterioration of the plates, or their fasteners.
On modern fiberglass boats, chainplates are usually out of sight and out of mind. As builders became more confident of the bonding capacity and strength of fiberglass, they began relocating these straps on the hull’s inner skin, or bedded in bulkheads. However, as with the exterior attachments, the new method was not without its drawbacks, since a leak at deck level could result in delamination of the fiberglass, or a waterfilled core; either condition reducing the structural integrity of the components.
Various methods of attaching plates are used, including the method employed by Pearson Composites, LLC in the construction of the new J/133. In that case, the shrouds are connected to a deck plate, which in turn is connected to a tie rod, which is connected to a horizontal pin beddedin a fiberglass buttress in the hull. At PC, LLC, the buttress is a solid fiberglass block with a hole bored that is within 5/1000th” of the size of the pin. This basic design is not new technology; grand-prix racing boats have been employing similar designs for 20 years.
The failure of the chainplate on the J/133 was the byproduct of a miscommunication within the builder’s facility, according to Stephen A Misencik, director of engineering and design at PC, LLC.
“Miscommunications between engineering and the production floor caused the installation of the deck chainplate assembly to be located 2″ aft of where it was originally designed to be,” Miscencik told us. “This resulted in the tie rod being mis-aligned with both the deck fitting as well as the hull buttress/pinion assembly.”
The result: “When the mast and spreaders were constructed by Hall Spars, the shroud-rod connection did not line up properly, placing excessive loads on the fiberglass buttress.” Under sail in 30- to 35-knot winds and a short, steep chop on Lake Michigan, he added “the flange bond on the starboard side on Hull No. 3 failed. Only one edge of the buttress disbonded from the hull.”

When J/Boat’s designers and Misencik compared notes the day after the mishap, the error was discovered, and appropriate modifications completed for future boats. Only one of the five boats that were completed at that time suffered the failure, though a factory team was dispatched to rebuild each of them.
Misencik agrees that factory workers could have been alert to a problem when they encountered difficulties installing the misaligned rod during the construction process.
Coincidentally, he also describes a problem on some early models of the J/109 that were attributed to the improper use of a bonding material. In that case, chainplates were bonded to a grid framework in the bottom of the hull with ITW Plexus adhesive.
“That’s the wrong material to use when trying to produce a rigid structure from two pieces of material,” he explained. The result was excessive flex between the chainplate and the structure. The problem was corrected by replacing the bonding agent with an epoxy mix.
Dave Gerr, director of the Westlawn Institute of Marine Technology and a noted yacht designer, told us that the first calculation to be considered in chainplate design is the boat’s righting moment.
“Then, the design objective is to take the calculated loads from the shrouds and transmit them to the chainplates, without allowing the deckplate to leak,” he said.
“It is important to work out and detail the fastening of the chainplate to the hull because the loads on chainplates are immense,” he added.
Designers typically specify standing rigging and attachments, including bolts, that are 1.3 to 1.4 times stronger than the calculated load. This fudge factor is intended to offset the fact that, regardless of the material used, it will degrade over time with aging and a lack of maintenance.
“Special considerations, though, relate to the intended use of the boat,” said Santa Cruz Yachts’ Lance Brown. That company’s slogan, “Fast is Fun,” was coined by founder Bill Lee, who built a reputation for designing and constructing rocketships. His legendary Merlin was a record setting 68 footer that introduced “downwind sleds” to the sailing vernacular, and remains the precursor of a breed of boats that have evolved to become the sailing equivalent of a Ferrari.
“We built the Santa Cruz 50 and Santa Cruz 70s as race boats, so the interiors were of little consideration, allowing us to place chainplates wherever was necessary to align with the shrouds,” said Brown. Chainplates on the 50-footer were installed using a method mirroring that of the J/133. Shrouds on cruising boats, however, may be located outboard at the rail, for instance, at the expense of tighter sheeting angles and greater pointing ability. And when located outboard, they may be buried behind cabinetry as an aesthetic consideration.
“The Santa Cruz 52 (see PS review July 1, ’95), a performance cruiser, is fitted with conventional living and sleeping quarters, so we had to take into consideration the location of seat backs and shelving. We are taking the same approach with the Santa Cruz 53C, which will be introduced in April, 2005.”
One conventional method of locating chainplates out of the way is to employ flat metal sections attached to bulkheads with fasteners.
“The fastenings,” explained Gerr, “have to be adequately strong, as must the structure they fasten to, in order to distribute the load into the hull. The key to sizing the bolts is to make sure the load from the shroud does not exceed the local crushing strength of the plywood or the laminate that is added to the ply bulkhead to take the chainplate loads.
“Elongated chainplate bolt holes in bulkheads are common trouble spots. Without an adequate load bearing area, a bulkhead will eventually crush above the bolt, resulting in the chainplate pulling upward, elongating the bolt holes, and causing the chainplate to leak.” In a worst case scenario, the chainplate may pull through the deck.”
To avoid overpopulating a bulkhead with bolts, or using larger bolts, Gerr’s alternative is the installation of an annulus. “They are made of fairly high compressive strength material,” he said, “and increase the bearing area in the ply by making the annulus two times the bolt diameter.” The bolt is then installed through the center of the annulus. On older boats that evidence the potential for this type of failure, an annulus will extend the useful life of the bulkhead with a relatively easy and straightforward fix.
Brown describes the forces on chainplates, hull, and mast butt as “contrary forces in a big circle.” To disperse the loads in the new boat from Santa Cruz Yachts, the chainplate will be solid bar stock through-bolted with 12, 1/2″ bolts to a longitudinal stringer that in turn is bonded to the hull and adjoining bulkhead in multiple layers of 0 to 45-degree and 0 to 90-degree fiberglass laid in varied orientations from deck level to the keel. The bulkhead is located on the same reinforced section of the hull as the mast butt, and bonded to the hull and deck.
“That structure is so strong that we could cut the center out of the bulkhead without compromising its integrity,” Brown reported.
His comment brings to mind a common alternative to the chainplate bulkhead arrangement, which is the construction of a knee (envision an upside-down capital “L”), usually constructed of wood or fiberglass bonded to the hull and under the deck, to which the chainplate is attached. Oriented athwartships, the shape is typically long and narrow so as to accommodate furniture. In this arrangement, the chainlate resembles an inverted “T” shape and is typically cut from a single piece of stainless steel or bronze.
Though the knee is tabbed to the hull and deck, Gerr explained, “The knee’s tabbing is secondary bonding, which is structurally rather weak and can suffer from failure due to poor-quality installation, improper resin mixture,” or other factors. For that reason, manufacturers should build in “a large margin of safety,” he said, to ensure a tight structure that will endure hull and deck flex, as well as the worst of the elements.
The contemporary method of attaching chainplates involves the replacement of metal straps with tierods that are secured in the hull structure. In this instance, shrouds and rods meet at the center of two plates located on the top and underside of the deck. To produce proper angles at the intersection of the shroud and chainplate, and prevent leaks caused by the deck flexing, builders are employing self-aligning rod caps that reduce the possibility of a failure.
At the other end, in many cases the tie rod is attached to the hull or grid in a metal plate into which it is threaded; bonding to a fiberglass structure is an option. Thus, in many new boats, these shiny rods are exposed in the main saloon, but go unnoticed, allowing designers to meet an aesthetic challenge.
The Bottom Line Modern engineering techniques and construction methods employed by major manufacturers, as well as marketing and legal concerns, are resulting in the production of better boats than at any time in the history of fiberglass, witness the number of American boats that meet ABYC and CE standards. In this environment, the odds of a structural failure are remote and, most likely, occasioned by a failure during the production cycle, or an inferior component.
The rigging on these boats, however, is not to be neglected. As Brown explained of Roy Disney’s Santa Cruz 70 Pyewacket and her sisters, “those boats were well maintained and continually inspected. Losing a race as a result of mechanical failure was unusual.”
Regardless of the age of a boat, annual inspection of standing rigging remains a must. In addition to inspecting wire for breaks, an owner should carefully examine the chainplate system from the point where it reaches the deck to its termination. Loose deck plates may result in water invading the hull or deck. Rust on the chainplate or bolts may indicate deck leaks, loose bolts or nuts producing a water leak or, in the worst case, the total destruction of the plate itself. Inspecting bolts and plates on a bulkhead is a simple matter; and removing cushions and furniture to allow inspection of the entire plate system is time well spent.
A lesser effort might just invite major failure.
RELATED ARTICLES MORE FROM AUTHOR
Leave a reply cancel reply.
Log in to leave a comment
Latest Videos

What’s the Best Sailboats for Beginners?

Why Does A Sailboat Keel Fall Off?

The Perfect Family Sailboat! Hunter 27-2 – Boat Review

Pettit EZ-Poxy – How to Paint a Boat
Latest sailboat review.

- Privacy Policy
- Do Not Sell My Personal Information
- Online Account Activation
- Privacy Manager

| |||||||||||||||||||||||||||||||||||||||||||||||||||||||||||||||||||||||||||||||||||||||||||||||||||||||||||||||||||||||||||||||||||||||||||||||||||||||||||||||||||||||||||||||||||||||||||||||||||||||||||||||||||||||||||||


IMAGES
VIDEO
COMMENTS
Stainless Steel Chainplate Blank with 3/8" hole for attachment of Shroud. Chainplate Blank has no drilled holes for attachment to boat, and is designed for use in replacement applications where mounting bolt pattern varies, especially in older boats where Chainplates were hand drilled. Flat SS Chainplate is 10" long x 1 1/4" wide x 3/16" thick, 3/8" hole center is 3/4" from end.
Spars, Rigging, and Hardware for Sailboats. Rig-Rite, Inc. Phone: (001) 401-739-1140 -- FAX: (001) 401-739-1149 ... Chainplates and Stemhead Fittings are listed below by configuration, and then by the size of the Pin they are attached to the rigging with. ...
Chainplates. At Mack Yacht Services, we know chainplates! In our experience, they are the most overlooked piece of equipment on boats today. Chain plates are the base of your rigging system and need attention just like everything else on your boat. Barring hurricanes, chainplate failure is the number one reason spars are replaced in our area.
Get the best deals for Sailboat Chain Plates at eBay.com. We have a great online selection at the lowest prices with Fast & Free shipping on many items! Skip to main content. Shop by category ... Sailboat Chainplates 22-3/4" x 2-1/2" x 3/16" Chain Plate Catalina Hunter Irwin. Opens in a new window or tab. Pre-Owned. $79.00. Buy It Now +$22.90 ...
For safety and peace of mind, however, sailboat chainplates require attention and possibly upgrading. For example, many chainplates are too thin to grip clevis pins correctly. For a ½-inch turnbuckle with a ½-inch toggle, the chainplate should be at least ⅜ inch thick. For a ⅝-inch turnbuckle and toggle, a minimum thickness of.
Stainless-Steel Chainplates. Model # P002_060_007_002 Mfg # 84-87. $21.99 - $109.99. Additional 50% off savings is reflected in final price above. Select a Product. -.
Spars, Rigging, and Hardware for Sailboats. Rig-Rite, Inc. Phone: (001) 401-739-1140 -- FAX: (001) 401-739-1149 www.RigRite.com Ordering/Questionsp: ... Chainplate Covers are designed for use with Standard Chainplates made from rectangular bar or plate stock which protrude through the deck. Chainplate Covers fit over the Chainplate and are ...
The exact cost of replacing chainplates will vary by boat. An upgrade from stainless steel to titanium will increase the cost by 30 to 40 percent. For me, the sense of security my crew and I felt during our aforementioned 1,500-mile offshore journey was priceless. February 2020. know how diy maintenance. Everyone dreads the day that something ...
On top of that, stainless steel is much harder to work with. It requires a drill press to drill holes, proper tools to polish, and has an involved annealing process to the metal before and after making a bend. That's why riggers charge upwards of $100 per chainplate for small sailboats. Plus, you can never know if the material is still good ...
Chainplates on the 50-footer were installed using a method mirroring that of the J/133. Shrouds on cruising boats, however, may be located outboard at the rail, for instance, at the expense of tighter sheeting angles and greater pointing ability. And when located outboard, they may be buried behind cabinetry as an aesthetic consideration.
Snead Island Boat Works has become the go-to yard for Island Packet Maintenance. We've replaced hundreds of Island Packet fuel, freshwater and holding tanks. Chainplate replacement is routine here: our carpentry staff completes these jobs with the expertise required to leave the boat looking untouched. Chainplate replacement.
Marine. Rigging Parts / Stemplate. 4,064.10. Each. Qty in Stock: 7. 0006185. Chainplate Cover for U-Bolt type Allied Titanium Chainplate on Hobie 33, 0.059 inches thick X 1-3/4 wide X 2-5/16 inch long with four holes for Item #0006179, Grade 2 (CP) Titanium with Sandblasted Finish.
Island Packet. Island Packet is a yacht builder that currently has 113 yachts for sale on YachtWorld, including 4 new vessels and 109 used yachts, listed by experienced yacht brokers mainly in the following countries: United States, United Kingdom, Mexico, Antigua and Barbuda and Canada. YachtWorld offers a diverse array of models, showcasing a ...
I got two chainplates installed this morning. Many thanks for talking me into the solid epoxy "butter" fit. I was able to torque the bolts right up and it feels rock solid. I would lift the boat with these and stand under it. Best of all, I was able to correct the chainplate angle of the lowers to bring them more into line with the shrouds.
BluemanSailor. 87 posts · Joined 2009. #15 · Jun 28, 2013 (Edited) Am replacing the chainplates on my boat- 8 in total. Cost Stainless metal (316) $25.00 each- cut to size, drilling the holes and welding spacers on the end. $0.00 - exchanged some wood work for the labor.
38'. 11'. 6'. Florida. $39,900. Description: Compassion is looking for a new master. She's 'jones-ing' to get back in the water and under sail as we have aged-out in our abilities to liveaboard. The Ingrid 38 is a heavy displacement blue water ketch derived from Colin Archer's famous double ender designs, inspired by Viking boats renowned for ...
Find new and used boats for sale in Moscow Mills by owner, including boat prices, photos, and more. Find your boat at Boat Trader!
We wish you success in conducting transactions on the yacht market! Sale of yachts and boats in Russia at the most affordable prices, from $10000. Compare prices and choose your dream sailing or motor yacht right now! We have the best deals on the yacht market - 2Yachts.
New and used Boats for sale in Moscow, Idaho on Facebook Marketplace. Find great deals and sell your items for free. New and used Boats for sale in Moscow, Idaho on Facebook Marketplace. ... 1994 Bayliner the boat kind. Lewiston, ID. $7,200. 1987 Hewescraft fisherman. Lewiston, ID. Popular Related Searches. Bayliner Boats. Boat Seats. Boston ...
FOR SALE ** OR TRADE ** IS A JET JON BOAT: 1998 ALUMACRAFT JON BOAT WITH A 650CC JET SKI ENGINE MOUNTED INBOARD INCLUDES / FEATURES:. * 14' ALUMACRAFT JON BOAT. * 650CC 2-STROKE YAMAHA MOTOR. * STI... Tools. Over 4 weeks ago on Americanlisted. $5,500 Lund SV 14ft Boat with Yamaha 20hp Motor - Moscow, ID. This is a 14 ft Lund SV fishing boat. ...